The Best New York Style Pizza Dough and 14 Tips for Success!!
This post may contain affiliate links. For more information, please see our disclosure policy.
This NY style pizza dough recipe has been winning over home pizza makers for nearly 15 years, earning rave reviews from professional pizzaiolos and native New Yorkers alike. Many years ago, my own quest for the perfect crust lead me to this tried-and-true formula based on wisdom from the pizza masters at www.pizzamaking.com and the late great Dough Doctor, Tom Lehmann. With thousands of successful bakes and countless testimonials from both pros and Big Apple natives who say “this is the real deal,” this recipe continues to help home bakers achieve that authentic New York pizzeria experience in their own kitchens.
Important Variables
Making NY style pizza dough is definitely somewhat of an art form. There are so many variables that can be changed aside from the ingredients alone. For example, these variables include:
- oven temperature
- temperature of the water used to make the dough
- proofing methods (room temp vs cold rise)
- order of adding the ingredients (yes, this makes a big difference!)
- mixing time
- use of autolyse
- use of poolish (I don’t do this or the one before, although I have in the past)
And then of course, the toppings which can be simple or as complex as you’d like. But don’t worry too much about all of this – my method is easy and straightforward. Plus, you will make better dough than 99% of the pizza chains out there. You will not want take out anymore!
The Big Secret (How You Proof the Dough)
My all-time favorite dough is NY style dough, which really is classic pizza dough that is stretched out into a thin crust pizza. This type of pizza dough contains water, flour, salt, instant yeast, and olive oil (and sugar especially when baking in a home oven, to help browning).
After it is mixed, it is proofed (left to rise/ferment) in the refrigerator for a minimum of 24 hours and up to 72 hours (it can also be frozen) – this is the big secret. I’ve used the dough up to 5 or 6 days afterwards, so you can essentially prepare dough for the week.
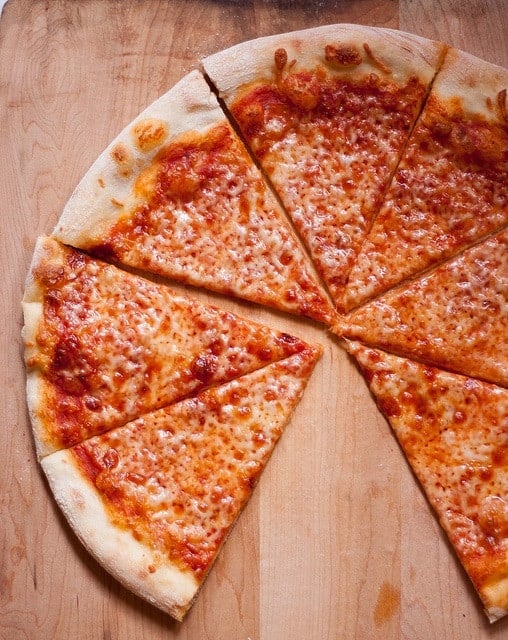
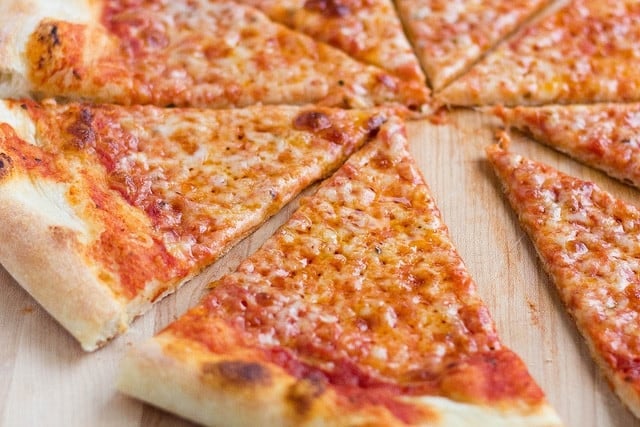
This recipe produces a crisp yet foldable crust that is tender, light, and flavorful and will make enough for four 14-inch pizzas. You can easily double or half the recipe to make 2 or 8 pizzas.
Fourteen Tips for Success
Tip 1: Choosing the flour
Use high-quality flour – I like to use King Arthur’s all purpose or bread flour; higher protein (ie, bread) flours work best. However, I prefer all-purpose flour because I like a lighter, airy crust.
Tip 2: Adding the yeast
Do not add instant dry yeast (IDY) directly to cold or cool water – you may shock the yeast (add the IDY to your flour instead) (please note that IDY differs from active dry yeast, which must be activated by adding it to water).
Tip 3: How much yeast?
Use only enough yeast to “get the job done” – yeast eats the sugar in your flour to produce its leavening effects – I find that if you use too much, your dough will be tasteless (this is just my opinion); however, it is a fact, that too much yeast can make your dough taste bad. Most recipes out there, some of them in well known, published books contain too much yeast!
Tip 4: Cold ferment that pizza dough!
Always use your refrigerator. The best NY style doughs “ferment” or “cure” in the refrigerator for at least 24 hours and up to 48 72 hours. This is called a “cold rise” (vs warm rise on your kitchen counter).
The refrigerator is used to retard (or slow) the dough’s fermentation, allowing that distinctive flavor to come through (ever wonder why some pizza crust tastes different than others, despite the fact that they are both made from just about the same exact ingredients? – this is a big reason why!)
When your dough rises too quickly, the flavor will not develop optimally. Slow rise = MUCH better flavor.
Tip 5: Weigh those ingredients!
Use a scale to weigh the flour instead of using a measuring cup – it is much more accurate and will yield superior results. I’ll admit, I resisted doing this for a loooong time. Just do it. You’ll be glad you did and your dough will be more consistent and much improved.
Tip 6: Add oil last
Mix the oil in as the last step, after the flour has all been incorporated. This is important to allow the flour to hydrate properly.
Tip 7: Flour your dough balls
Before tossing or opening your dough balls, flour them *very* well on each side (if you are a beginner) to ensure they do not stick to your counter or pizza peel. I sometimes use a bit more flour after I begin spreading them.
Tip 8: Keeping those rims a bit puffy
Take care not to “degas” the rim of your pizza as you are spreading your dough! Do NOT ever use a rolling pin! There are many different methods to spread/open your dough ball. I hope to add a few pictures someday of this process.
Tip 9: Baking pizza in a home oven
Ensure that your oven is preheated for a sufficient amount of time (about 1 hour) and bake the pizza within 6 to 8 inches of the top of your oven (ie, your broiler) so that the tops browns sufficiently in conjunction with the bottom of the pizza.
Do not place the stone near the bottom of your oven. I made this mistake for too many years.
After your stone has been preheated sufficiently, the heat from the stone will cook the pizza from the bottom and you can switch the broiler on if you find you need more browning on the top (I now use the broiler to bake my pizzas…more on this sometime in the future).
If you find that your cheese is browning well before your rim attains sufficient color, use partially frozen cheese (ie, place shredded cheese in the freezer while the oven is heating up) and cold sauce or you can drizzle just a bit of olive oil on top of cheese.
Tip 10: Use a pizza stone or steel
Use a pizza stone if you have one. The stone with draw moisture out of the dough and produce a beautifully crisp crust. I use a pizza steel because my stones kept breaking.
Tip 11: Use just the right amount of sauce
Do not use too much pizza sauce – it will make your pizza soggy
Tip 12: Find the right kind of cheese
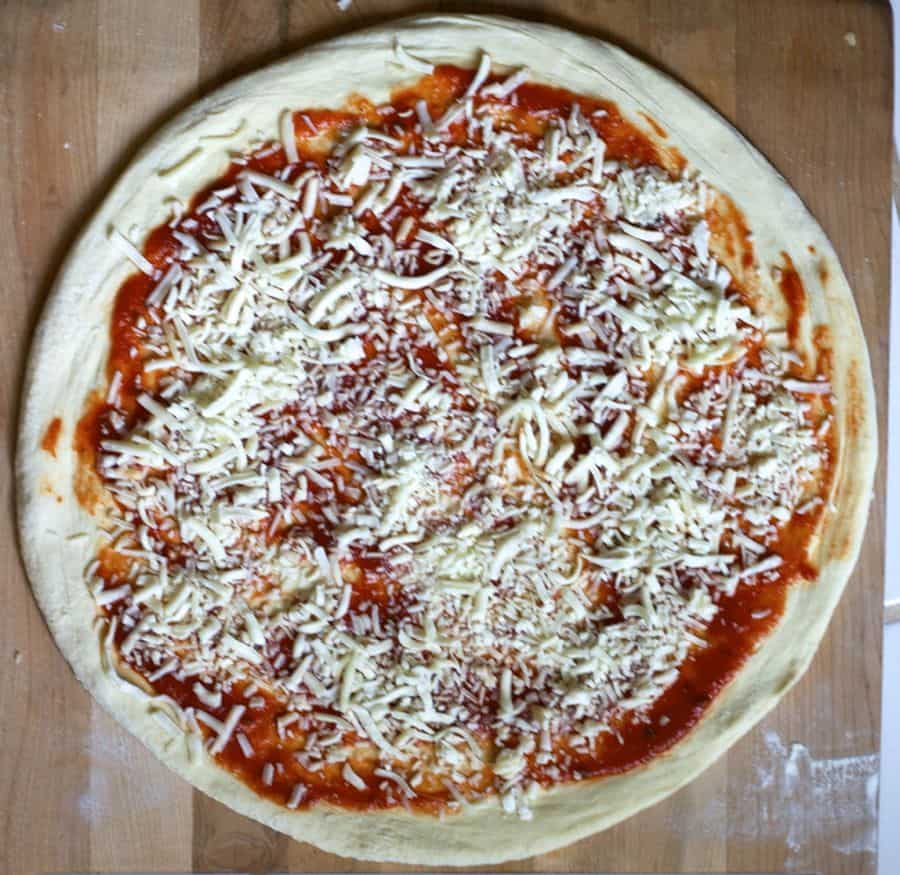
Do not use low fat cheese to top your pizza or pre-shredded cheese (the former will not melt sufficiently and the latter contains additives that prevent the cheese from sticking together and therefore does not melt very well). The best is low-moisture, whole milk mozzarella.
If you must use pre-shredded cheese, I’ve found that adding the sauce on top of the cheese helps with the melting. Also, do not use too much cheese; apply it sparingly so that you can achieve that mottled NY pizza appearance.
Tip 13: Flour your pizza peel
Use semolina or flour on the bottom of your pizza peel to prevent the pizza dough from sticking but be careful not to overdo it because it will burn.
Tip 14: Learn to launch that pizza
Give the pizza peel a few very small quick jerks to make sure the pizza will easily slide off your pizza peel before attempting to transfer pizza to the oven, and more importantly, rub flour into the peel before placing the dough on top.
Stretching the Pizza Dough
A nice video (from The GoodFellas Pizza School of NY), showing how to stretch the dough:
Freezing the Dough
- After mixing dough and dividing into balls, place dough in refrigerator for at least 24 hours.
- Place dough balls on baking sheet lined with plastic wrap or parchment paper, cover loosely with plastic wrap and freeze until firm (~ 2 to 3 hours or up to overnight).
- Wrap frozen dough balls individually in plastic and store in zipper-lock bags for up to 4 weeks.
- When ready to bake, transfer unwrapped dough into the refrigerator for 12 to 24 hours before making pizza.
- Bring dough to room temperature for 20 to 60 minutes before baking (less time for hot kitchen/summer and more time for cool kitchen)
Pizza Dough Calculator
Need more dough? Less dough? Try out our new Pizza Dough Calculator to calculate the weights to get it just right!
More questions? Please see my NY Pizza FAQ
🍕 Equipment Recommended
These are the tools that I regularly use for this recipe.
Baking Steel– the original steel that delivers intense heat for crisp, restaurant-style pizza at home.
Digital Scale – essential for consistent dough every time.
Pizza Dough Proofing Boxes – Use small (500 ml) containers for dough balls weighing 180–250 g (6.3–8.8 oz) for 8–10-inch pizzas, and the large (1000 ml) container for dough balls weighing 260–400 g (9.2–14.1 oz) for 12–16-inch pizzas and longer fermentations.
Steel Peels and Wooden Peels – for easy launches (wood) and retrieving (steel) (look for sizes that are similar to your Baking Steel).
Optional: Pizza Oven – not necessary for this recipe, but a GREAT option if you also bake other pizza styles like Neapolitan, Detroit, or Grandma. I like the electric ovens because they don’t require fuel and can be moved indoors or outdoors and heat up quickly! Great to make multiple small pizzas in succession.
♥️ Loved this recipe? I’d be thrilled if you’d rate it ⭐️ and share your experience in the comments below! Your ratings and comments help other readers discover this recipe and keep this blog going. Did you add any special tweaks? Our community of home cooks would love to hear about it! ♥️
The Recipe
📖 Recipe

The Best New York Style Pizza Dough
Click the heart icon ♡ above to save a recipe. To find your saved recipes later, click the heart icon on the right side of the screen near the search icon and select My Favorites.
Equipment
- Baking Steel for baking
- Digital kitchen scale highly recommended instead of volume measures
- Dough proofing boxes optional, or use what you have
- pizza oven optional, but great if you are making personal pizzas, especially in succession.
Ingredients
Original Recipe for Four 14-Inch Pizzas; want to make more or less? Use the pizza dough calculator
- 6.5 cups (796 g) all purpose flour or bread flour (weighing is most accurate!)
- 2 1/4 cups (493 g) water barely cold water (17.4 oz per 2 1/4 cups)
- 1 teaspoon (3.5 g) instant dry yeast
- 2.5 teaspoons (15.6 g) salt
- 2 teaspoons (7.8 g) sugar
- 1 tablespoon (11.8 g) olive oil
1 Pound of Dough (~454 grams) (use the pizza dough calculator to make more or less dough)
- 2 1/4 cups (274.5 g) all purpose flour or bread flour
- 3/4 cup (170.2 g) water
- 1/2 teaspoon instant dry yeast
- 1 teaspoon salt
- 3/4 teaspoon sugar
- 1 teaspoon olive oil
Instructions
Mixing the Dough
- Place water in mixing bowl.
- In a separate bowl, mix salt and yeast (and sugar if using) into flour
- Combine flour/salt/yeast mixture into water and mix until all the flour has been incorporated.
- After flour has been totally incorporated, add oil and knead for about 4 to 5 minutes (see note)
- Test final dough temperature, which should ideally be between high 70s to low 80s (optional)
Dividing and Rising
- Divide dough into 4 equal pieces (using a digital scale if possible; each ball should weigh 11.5 oz [~326 grams]), shape into a ball, and place in greased, sealed quart-sized container or oiled/greased freezer bag and refrigerate overnight or up to 72 hours (After much experimenting, I have concluded that I like 3 days best but day 2 is good too).
Assembly and Baking
- The following day, remove your dough balls within 1 hour or less of baking and allow the dough to come to room temperature. (the dough will tend to blister more if the dough has not been allowed to come to room temperature however, I often bake coldish dough without problems, just some bubbling)
- In the meantime, place your pizza stone in oven and preheat at 550 degrees (depending on thickness of your stone and your oven’s power) for at least 1 hour
- Open each dough ball using care not to degas, transfer to a pre-floured pizza peel (or on parchment paper), and top with your favorite sauce, cheese, or other toppings.
- Transfer pizza from peel to oven or slide parchment paper onto preheated pizza pan/stone and bake for 4 to 6 minutes each until browned on top and cheese has melted but not burned.
- Enjoy!
Notes
- Use of weight based measurements is highly recommended instead of US Customary. You will need a kitchen scale.
- METRIC amounts DO NOT correspond exactly to the US Customary amounts because, for example, 796 grams equals 6.4 cups (and most can’t measure 0.4 cups or 0.22 cups). Recipe was based on grams.
- Use the Pizza Dough Calculator
- If you want to use the dough the next day, knead a little more (slow speed for about 8 to 10 minutes)
- If you have time to let the dough rest for 3 days, knead for 4 to 5 minutes, low speed or hand knead.
- After mixing dough and dividing into balls, place dough in refrigerator for at least 24 hours.
- Then, place on baking sheet lined with plastic wrap or parchment paper, cover loosely with plastic wrap and freeze until firm (~ 2 to 3 hours or up to overnight).
- Wrap frozen dough balls individually in plastic and store in zipper-lock bags to store for up to 4 weeks (longer may work, but results might vary).
- Before using, transfer unwrapped dough into the refrigerator for 12 to 24 hours before making pizza.
- Bring dough to room temperature for 20 to 60 minutes before baking (less time for hot kitchen/summer and more time for cool kitchen).
- calculate your own using baker’s percentages: 62% hydration, 0.4% yeast, 2% salt, 1.5% oil, and 1% sugar or use my pizza dough calculator.
Best dough recipe I’ve found yet! Thanks so much, Marie, for sharing not just your recipe, but all of your excellent tips! I even studied the accompanying YouTube video.
Thanks so much and glad you enjoyed it!
I too have tried for literally close to 20 years to perfect NY Style pizza dough. I’ve been living in Chicago for the last 10 years and haven’t been able to find a good NY slice near me. This is the absolute best reliably repeatable recipe I have come across and I am floored by the results (as is my family).
Thank you, thank you, thank you!
THANK YOU!! So glad to hear it!! 😃
Marie, thank you so much for such an awesome pizza dough recipe! I love the precise instructions and my pizza came out amazing. It brought back memories of my childhood in NYC. Thanks again! 🤗
So glad you liked it!
I followed the recipe for making 1 pound of dough with 2 1/4 cups of flour. I was mixing by hand since I don’t have a large food processor. I found that the recommended 3/4 cup water wasn’t enough and a lot of the flour wouldn’t incorporate so I ended up adding another 1/4 cup of water to get the dough to come together. Not sure if this was a mistake on my part and what is the experience of others. The dough is fermenting in the fridge so I’ll find out when I try it out!
If you don’t have a scale on hand it’s not uncommon to use too much flour and so adjusting with more water is good provided it’s not too too much. Hope you enjoy! As a side note, think about using the spoon method to fill your measuring cup with flour next time and then level it off so the flour isn’t too compacted when you’re measuring 😃
Thank you for the tip Marie, that makes sense. I will be investing in a kitchen scale very soon! By the way, I made one of the pizzas on day 2 as we were going out on day 3. The results were unbelievably good – best pizza I have eaten, even compared to some really good pizzerias! This recipe is a real keeper. For the sauce, I did not have San Marzano canned tomatoes so I processed some Campari tomatoes, warmed a couple of cloves garlic in a glug of olive oil and then added the pureed tomatoes and half a white onion, some salt and oregano and simmered for about 10-12 minutes till thickened. It was amazing! I will be looking forward to making this pizza for my family and friends. Thank you so much for sharing it!
I too have been putting in the work trying get better at home made pizza for a few years. Bookmarking all the pizza and crust recipes that Google has found me. I have found your pizza write up to be the most thorough and very precise. Thank you for all the details, and especially that video on dough stretching from The Good Fellas Pizza school. It only takes once. From the moment I watched that video my pizza crusts come out perfectly shaped!!! Now I just gotta keep at it until I can perfect the whole enchilada 😂. Thanks again for a great recipe and tutorial!
Agree that stretching is one of the hardest parts – glad the video helps!
I am going to try this, but my question is that upon reading it says the this based on metric. I like metric, it’s a better measurement. However, when I printed this from my computer, it does not show metric, but when I look at the same site on my cell phone, it shows it in grams also, which I prefer. Why is the gram measurement not shown if printed from a home computer, but only shows on the phone?? Same website, should show the same content, one would think.
Hi, after you click print, please click the metric button – hope that helps!
Hi Marie! I love your attention to detail and the ease of these instructions. I’m a pizza newbie, having received a pizza stone for Christmas. Your page was recommended in a FB Homemade Pizza group.
Here’s my question: after kneading, you recommend that the dough be around 80 degrees, more or less. When I initially checked it after 8 minutes, it was 64 degrees. I increased the speed of the machine for a minute or two, and it rose to 68 degrees. I didn’t want to keep kneading so fast–that might mess something else up.
How critical is the temperature of the dough, and what can I do to increase it?
The dough balls are resting in the fridge so I’ll see how they bake up in a few days.
Thanks!
It’s more important that the dough does not get hotter than that as the gluten can become compromised – normally using a room temp rise I’d say it’s more important to hit the target temp but keep in mind the dough does continue to rise in the refrigerator until it reaches the refrigerator temp so you may be losing a bit of that. I’d say you may be able to compensate by doing a longer counter rise/rest on the day of pizza making, just before assembling and baking.
Can this dough be used in an outdoor pizza oven with temperatures of 800 + degrees?
Yes, it can although the sugar is not needed with those temperatures.
Very curious around the science for why you wouldn’t need sugar when cooking at higher temps – did some googling but couldn’t come up with an answer. Will it cause it to burn?
And just generally curious your opinion for all us nerds who purchased pizza ovens through COVID – do you prefer cooking this at lower temps of 550, or should we be taking advantage of a 750 to 800 degree stone?! Thanks!!!!
Hi Matthew, there is some discussion here about NY pizza browning, which is baked in home ovens (ie, lower temps vs many pizza ovens). And I like both temps but I usually do a Neapolitan dough for higher temps – I keep meaning to post on my site. I use Caputo flour and keep the recipe simple- no oil, no sugar
This has been my go to recipe for years. By far the best dough. Sauce is another beast that requires an equal amount of time and effort but it’s all worth it and great food for an extremely cheap price.
🙏 thanks and I’m so glad you’re enjoying!
I have been trying to perfect pizza for years! I followed this recipe and we were absolutely amazed at the outcome!
Wooo! Great to hear ❤️
I disagree with the shredded cheese bit. I’ve never had my cheese not melt and I use almost entirely Great Value provolone/mozz blend now since it is less than $3 a lb. The pizza I enjoy the most, Quad City Style, is very heavy on the cheese and sausage. I’ve never had even the dollar store brand I bought in a pinch not melt.
How are you breaking the stones? I’ve never broke one. I’ve actually been using a screen to make my pizza lately after I bought one to make pizza on the grill. I just toss it on the stone usually but it works fine without it too.
I make pizza dough because I like to add malt to my pizza crust. However, I buy a case of Pizza Buddy dough and keep it in the freezer for after work dinner. At $1 or so a crust, I’m not sure I’m saving any money making my own if I want a basic NY style pizza without any work and not paying $20 a piece at a restaurant. It is pretty perfect as far as crust goes. I made 20 or so balls once to freeze but it took me so long that I just make it enough for that meal.
I like to make my own dough to control the ingredients in the dough – lots of chemicals etc these days in premade. I’m glad you found something you like, and it sounds convenient! I can’t recall why the stones kept breaking but I’ve used a pizza steel for years and years now.
You don’t need to include the synonym “slow” when using the word retard. It is very insulting to imply that I don’t know what the word retard means.
I can’t tell if you’re serious or not but please keep in mind this blog is also read internationally by non native US speakers and so clarity is very important.
In case you’re serious, shut the “f” up Fernel.
Awesome recipe by the way. Pizza was my pregnancy craving (the whole pregnancy) and this recipe never fails. I’m in high altitude now (:( )so sometimes I have to adjust liquid or flour but by now I know what the texture should be so it never fails.
I made the dough but haven’t yet made the pizza. Thank you for taking the time to put this together and for providing the bakers math formula. That made it very easy to convert to full metric and halve the recipe. Also, thanks for including the pizza shaping video.
I’m born-and-raised New Yorker but have lived out of state and I really, really miss the pizza!
I do have a question for you. You skip the bulk ferment of the dough and I’m curious why. Every resource I’ve come across – pizza included – talks about the importance of the bulk ferment. I’d love to get your insight.
I’ll come back and update my comments once I’ve made the pizza.
Good question! Please see response 2 in this thread by the late Dough Doctor Tom Lehman – basically it’s cause this uses a king slow proof in the fridge https://www.pizzamaking.com/forum/index.php?topic=49155.0
I made the pizza last night. The taste of the dough was fantastic and using the technique in the video I probably made the prettiest pie yet. I have an outdoor pizza oven and it was raining last night and we didn’t let the oven didn’t get quite hot enough. The pizza didn’t puff up quite as much as it normally does during cooking. The pie was more crispy than crispy-chewey. It tasted great but I’d give myself a B+ on this one. I have one dough left in the and will try again soon!
Been using this for years. The video on shaping the crust was the key… Thank you
Any advice for regular dry yeast in place of rapid rise? That’s all I have in the kitchen.
Also, this will be a room temperature rise (I’ll let it double, then make into balls). Any other tips with these deviations is much appreciated.
Kindest Regards from Los Angeles
I use instant dry yeast and active dry interchangeably. I’ve never used rapid rise. Just make sure if you have active dry that you see if it needs activation (see instructions on label). As for room temp rise you’ll get less flavor and time depends on room temp and dough temp. Let it double and then ball it. Let balls rise until at least 50% larger or if you have several hours left before dinner you can refrigerate as it should continue to grow until it reaches fridge temp