The Best New York Style Pizza Dough and 14 Tips for Success!!
This post may contain affiliate links. For more information, please see our disclosure policy.
This NY style pizza dough recipe has been winning over home pizza makers for nearly 15 years, earning rave reviews from professional pizzaiolos and native New Yorkers alike. Many years ago, my own quest for the perfect crust lead me to this tried-and-true formula based on wisdom from the pizza masters at www.pizzamaking.com and the late great Dough Doctor, Tom Lehmann. With thousands of successful bakes and countless testimonials from both pros and Big Apple natives who say “this is the real deal,” this recipe continues to help home bakers achieve that authentic New York pizzeria experience in their own kitchens.
Important Variables
Making NY style pizza dough is definitely somewhat of an art form. There are so many variables that can be changed aside from the ingredients alone. For example, these variables include:
- oven temperature
- temperature of the water used to make the dough
- proofing methods (room temp vs cold rise)
- order of adding the ingredients (yes, this makes a big difference!)
- mixing time
- use of autolyse
- use of poolish (I don’t do this or the one before, although I have in the past)
And then of course, the toppings which can be simple or as complex as you’d like. But don’t worry too much about all of this – my method is easy and straightforward. Plus, you will make better dough than 99% of the pizza chains out there. You will not want take out anymore!
The Big Secret (How You Proof the Dough)
My all-time favorite dough is NY style dough, which really is classic pizza dough that is stretched out into a thin crust pizza. This type of pizza dough contains water, flour, salt, instant yeast, and olive oil (and sugar especially when baking in a home oven, to help browning).
After it is mixed, it is proofed (left to rise/ferment) in the refrigerator for a minimum of 24 hours and up to 72 hours (it can also be frozen) – this is the big secret. I’ve used the dough up to 5 or 6 days afterwards, so you can essentially prepare dough for the week.
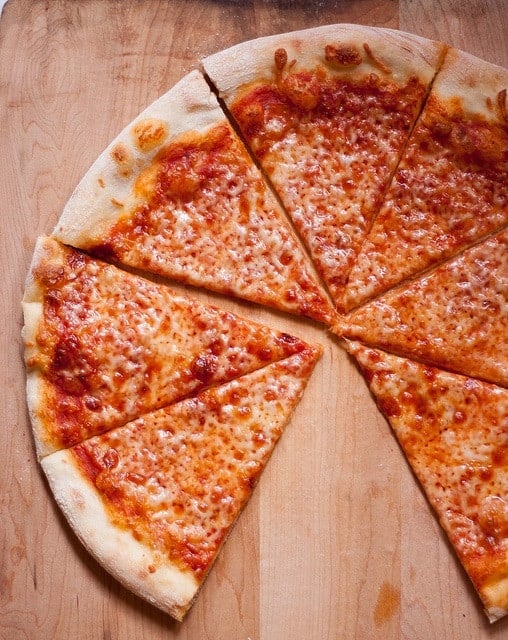
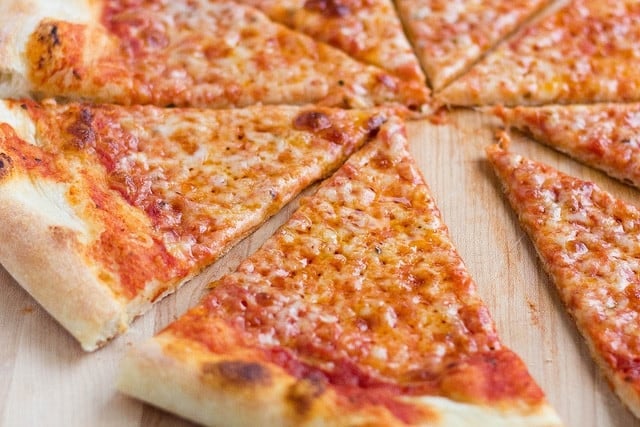
This recipe produces a crisp yet foldable crust that is tender, light, and flavorful and will make enough for four 14-inch pizzas. You can easily double or half the recipe to make 2 or 8 pizzas.
Fourteen Tips for Success
Tip 1: Choosing the flour
Use high-quality flour – I like to use King Arthur’s all purpose or bread flour; higher protein (ie, bread) flours work best. However, I prefer all-purpose flour because I like a lighter, airy crust.
Tip 2: Adding the yeast
Do not add instant dry yeast (IDY) directly to cold or cool water – you may shock the yeast (add the IDY to your flour instead) (please note that IDY differs from active dry yeast, which must be activated by adding it to water).
Tip 3: How much yeast?
Use only enough yeast to “get the job done” – yeast eats the sugar in your flour to produce its leavening effects – I find that if you use too much, your dough will be tasteless (this is just my opinion); however, it is a fact, that too much yeast can make your dough taste bad. Most recipes out there, some of them in well known, published books contain too much yeast!
Tip 4: Cold ferment that pizza dough!
Always use your refrigerator. The best NY style doughs “ferment” or “cure” in the refrigerator for at least 24 hours and up to 48 72 hours. This is called a “cold rise” (vs warm rise on your kitchen counter).
The refrigerator is used to retard (or slow) the dough’s fermentation, allowing that distinctive flavor to come through (ever wonder why some pizza crust tastes different than others, despite the fact that they are both made from just about the same exact ingredients? – this is a big reason why!)
When your dough rises too quickly, the flavor will not develop optimally. Slow rise = MUCH better flavor.
Tip 5: Weigh those ingredients!
Use a scale to weigh the flour instead of using a measuring cup – it is much more accurate and will yield superior results. I’ll admit, I resisted doing this for a loooong time. Just do it. You’ll be glad you did and your dough will be more consistent and much improved.
Tip 6: Add oil last
Mix the oil in as the last step, after the flour has all been incorporated. This is important to allow the flour to hydrate properly.
Tip 7: Flour your dough balls
Before tossing or opening your dough balls, flour them *very* well on each side (if you are a beginner) to ensure they do not stick to your counter or pizza peel. I sometimes use a bit more flour after I begin spreading them.
Tip 8: Keeping those rims a bit puffy
Take care not to “degas” the rim of your pizza as you are spreading your dough! Do NOT ever use a rolling pin! There are many different methods to spread/open your dough ball. I hope to add a few pictures someday of this process.
Tip 9: Baking pizza in a home oven
Ensure that your oven is preheated for a sufficient amount of time (about 1 hour) and bake the pizza within 6 to 8 inches of the top of your oven (ie, your broiler) so that the tops browns sufficiently in conjunction with the bottom of the pizza.
Do not place the stone near the bottom of your oven. I made this mistake for too many years.
After your stone has been preheated sufficiently, the heat from the stone will cook the pizza from the bottom and you can switch the broiler on if you find you need more browning on the top (I now use the broiler to bake my pizzas…more on this sometime in the future).
If you find that your cheese is browning well before your rim attains sufficient color, use partially frozen cheese (ie, place shredded cheese in the freezer while the oven is heating up) and cold sauce or you can drizzle just a bit of olive oil on top of cheese.
Tip 10: Use a pizza stone or steel
Use a pizza stone if you have one. The stone with draw moisture out of the dough and produce a beautifully crisp crust. I use a pizza steel because my stones kept breaking.
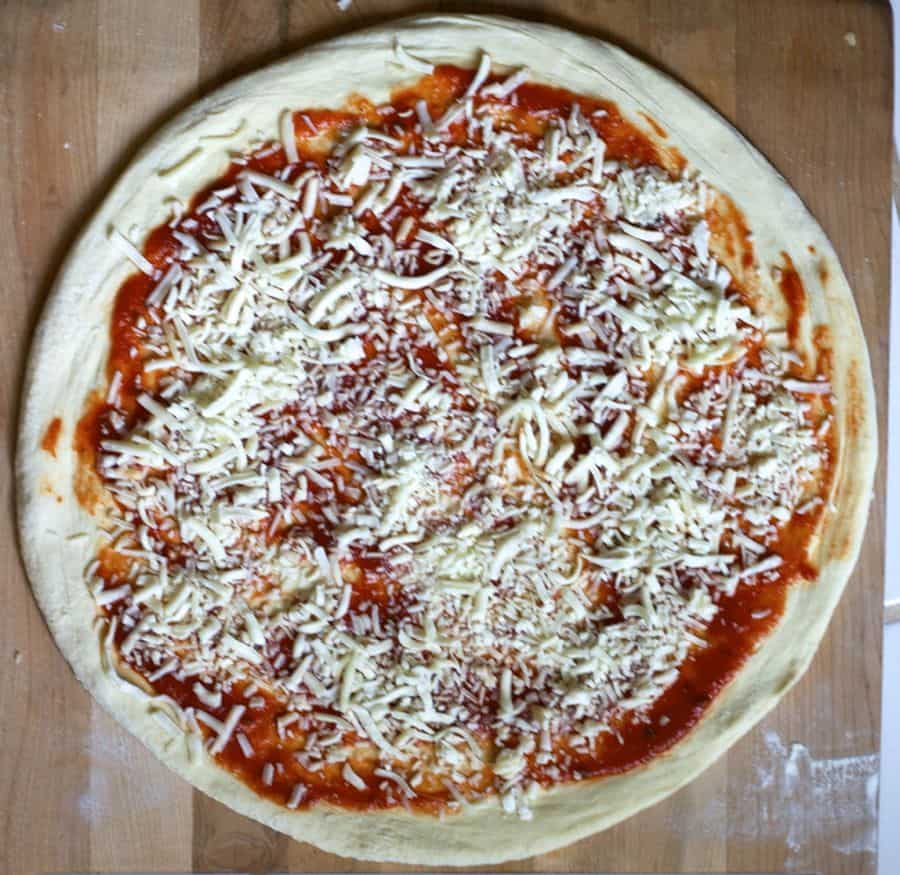
Tip 11: Use just the right amount of sauce
Do not use too much pizza sauce – it will make your pizza soggy
Tip 12: Find the right kind of cheese
Do not use low fat cheese to top your pizza or pre-shredded cheese (the former will not melt sufficiently and the latter contains additives that prevent the cheese from sticking together and therefore does not melt very well). The best is low-moisture, whole milk mozzarella.
If you must use pre-shredded cheese, I’ve found that adding the sauce on top of the cheese helps with the melting. Also, do not use too much cheese; apply it sparingly so that you can achieve that mottled NY pizza appearance.
Tip 13: Flour your pizza peel
Use semolina or flour on the bottom of your pizza peel to prevent the pizza dough from sticking but be careful not to overdo it because it will burn.
Tip 14: Learn to launch that pizza
Give the pizza peel a few very small quick jerks to make sure the pizza will easily slide off your pizza peel before attempting to transfer pizza to the oven, and more importantly, rub flour into the peel before placing the dough on top.
Stretching the Pizza Dough
A nice video (from The GoodFellas Pizza School of NY), showing how to stretch the dough:
Freezing the Dough
- After mixing dough and dividing into balls, place dough in refrigerator for at least 24 hours.
- Place dough balls on baking sheet lined with plastic wrap or parchment paper, cover loosely with plastic wrap and freeze until firm (~ 2 to 3 hours or up to overnight).
- Wrap frozen dough balls individually in plastic and store in zipper-lock bags for up to 4 weeks.
- When ready to bake, transfer unwrapped dough into the refrigerator for 12 to 24 hours before making pizza.
- Bring dough to room temperature for 20 to 60 minutes before baking (less time for hot kitchen/summer and more time for cool kitchen)
Pizza Dough Calculator
Need more dough? Less dough? Try out our new Pizza Dough Calculator to calculate the weights to get it just right!
More questions? Please see my NY Pizza FAQ
🍕 Equipment Recommended
These are the tools that I regularly use for this recipe.
Baking Steel– the original steel that delivers intense heat for crisp, restaurant-style pizza at home.
Digital Scale – essential for consistent dough every time.
Pizza Dough Proofing Boxes – Use small (500 ml) containers for dough balls weighing 180–250 g (6.3–8.8 oz) for 8–10-inch pizzas, and the large (1000 ml) container for dough balls weighing 260–400 g (9.2–14.1 oz) for 12–16-inch pizzas and longer fermentations.
Steel Peels and Wooden Peels – for easy launches (wood) and retrieving (steel) (look for sizes that are similar to your Baking Steel).
Optional: Pizza Oven – not necessary for this recipe, but a GREAT option if you also bake other pizza styles like Neapolitan, Detroit, or Grandma. I like the electric ovens because they don’t require fuel and can be moved indoors or outdoors and heat up quickly! Great to make multiple small pizzas in succession.
♥️ Loved this recipe? I’d be thrilled if you’d rate it ⭐️ and share your experience in the comments below! Your ratings and comments help other readers discover this recipe and keep this blog going. Did you add any special tweaks? Our community of home cooks would love to hear about it! ♥️
The Recipe
📖 Recipe

The Best New York Style Pizza Dough
Click the heart icon ♡ above to save a recipe. To find your saved recipes later, click the heart icon on the right side of the screen near the search icon and select My Favorites.
Equipment
- Baking Steel for baking
- Digital kitchen scale highly recommended instead of volume measures
- Dough proofing boxes optional, or use what you have
- pizza oven optional, but great if you are making personal pizzas, especially in succession.
Ingredients
Original Recipe for Four 14-Inch Pizzas; want to make more or less? Use the pizza dough calculator
- 6.5 cups (796 g) all purpose flour or bread flour (weighing is most accurate!)
- 2 1/4 cups (493 g) water barely cold water (17.4 oz per 2 1/4 cups)
- 1 teaspoon (3.5 g) instant dry yeast
- 2.5 teaspoons (15.6 g) salt
- 2 teaspoons (7.8 g) sugar
- 1 tablespoon (11.8 g) olive oil
1 Pound of Dough (~454 grams) (use the pizza dough calculator to make more or less dough)
- 2 1/4 cups (274.5 g) all purpose flour or bread flour
- 3/4 cup (170.2 g) water
- 1/2 teaspoon instant dry yeast
- 1 teaspoon salt
- 3/4 teaspoon sugar
- 1 teaspoon olive oil
Instructions
Mixing the Dough
- Place water in mixing bowl.
- In a separate bowl, mix salt and yeast (and sugar if using) into flour
- Combine flour/salt/yeast mixture into water and mix until all the flour has been incorporated.
- After flour has been totally incorporated, add oil and knead for about 4 to 5 minutes (see note)
- Test final dough temperature, which should ideally be between high 70s to low 80s (optional)
Dividing and Rising
- Divide dough into 4 equal pieces (using a digital scale if possible; each ball should weigh 11.5 oz [~326 grams]), shape into a ball, and place in greased, sealed quart-sized container or oiled/greased freezer bag and refrigerate overnight or up to 72 hours (After much experimenting, I have concluded that I like 3 days best but day 2 is good too).
Assembly and Baking
- The following day, remove your dough balls within 1 hour or less of baking and allow the dough to come to room temperature. (the dough will tend to blister more if the dough has not been allowed to come to room temperature however, I often bake coldish dough without problems, just some bubbling)
- In the meantime, place your pizza stone in oven and preheat at 550 degrees (depending on thickness of your stone and your oven’s power) for at least 1 hour
- Open each dough ball using care not to degas, transfer to a pre-floured pizza peel (or on parchment paper), and top with your favorite sauce, cheese, or other toppings.
- Transfer pizza from peel to oven or slide parchment paper onto preheated pizza pan/stone and bake for 4 to 6 minutes each until browned on top and cheese has melted but not burned.
- Enjoy!
Notes
- Use of weight based measurements is highly recommended instead of US Customary. You will need a kitchen scale.
- METRIC amounts DO NOT correspond exactly to the US Customary amounts because, for example, 796 grams equals 6.4 cups (and most can’t measure 0.4 cups or 0.22 cups). Recipe was based on grams.
- Use the Pizza Dough Calculator
- If you want to use the dough the next day, knead a little more (slow speed for about 8 to 10 minutes)
- If you have time to let the dough rest for 3 days, knead for 4 to 5 minutes, low speed or hand knead.
- After mixing dough and dividing into balls, place dough in refrigerator for at least 24 hours.
- Then, place on baking sheet lined with plastic wrap or parchment paper, cover loosely with plastic wrap and freeze until firm (~ 2 to 3 hours or up to overnight).
- Wrap frozen dough balls individually in plastic and store in zipper-lock bags to store for up to 4 weeks (longer may work, but results might vary).
- Before using, transfer unwrapped dough into the refrigerator for 12 to 24 hours before making pizza.
- Bring dough to room temperature for 20 to 60 minutes before baking (less time for hot kitchen/summer and more time for cool kitchen).
- calculate your own using baker’s percentages: 62% hydration, 0.4% yeast, 2% salt, 1.5% oil, and 1% sugar or use my pizza dough calculator.
Thanks Marie! I just made pizza using your recipe and everyone thought it was great. The crust rose nicely and was very crispy. The only mistake I made was burning the top of the crust a little. Also the cheese I used made it way too greasy. Otherwise it was a great pizza. I used your pizza sauce recipe, and really liked it.
I like too much this recipe.. really usefull
This may be a silly question but what temperature is your refridgerator where you proof the dough. I have tried using a fridge in the past with little sucess and am wondering if mine is too cold at 36 degrees. You dough recipe is quite close to mine which seems to work on the counter with about eight hours rise followed by punching and then two more hours, but I have yet to make a good crust in the fridge.
Hi Paul -that’s good to know. I may try that for a same day dough – at least it’s a slow proof so it would add good flavor. Do you feel that the flavor isn’t there with the cold proof? What are you experiencing? Maybe proof at room temp for half the time you normally do (ie, 3 or 4 hours, as you describe above) and then place dough overnight in the fridge? I’m not sure how many days the dough would last but it would definitely be great the next day and maybe 2 days? My fridge temp is the same as yours and I don’t have a problem although day 2 and day 3 are always better. I’ve even used it on day 5! Day 1 isn’t as good but that might be solved by doing a few hours of room temp proof first.
This is such a great recipe. In fact it’s so good, friends have offered to pay me to keep them supplied with fresh dough to keep in their freezer so they always have it at the ready.
I just finished making a fresh batch this morning and it’s now chilling in the fridge for pizza fabulosity later this week. The cold proof really adds to the flavour and is definitely worth the wait!
I agree Melissa – it is worth the wait – and that’s funny about the friends offering to pay for it!
I love this recipe! Thank you so much. My husband got a stone pizza maker for fathers day on his grill /smoker. The crust is amazing and will keep using this. The kids love making there own pizza. Thank you for sharing this recipe and all the helpful tips how to make it. I do have a question. When you make this and want to put it in the freezer do you put it in the freezer right away after making it and thaw it in the refrigerator to rise?
Hi Lynn, I have done it both ways – I don’t freeze dough that often but that’s what I’d do: freeze right away after making and then thaw it in the refrigerator before using. Mine usually defrosts in the fridge by dinnertime if I take the dough out of the freezer in the morning. I have also placed leftover dough in the freezer but the other option works better.
I found that proofing in the fridge takes too long and doesn’t make any difference in the taste.
I pop this into the bread maker a couple hours before i want to make pizza and it turns out awesome. Thanks for the awesome recipe!
I also use a little more yeast than what’s recommended here. I think this recipe’s a little too conservative with the yeast (yes I read the tip).
I use cheap White Lily Bread flour from kroger, and it works great, but I would agree, can’t go wrong with king arthur. I used to look for whole milk low moisture mozzerella, and that was good, but I find pre-grated to work just fine and it melts fine.
I also like to leave some garlic, oregano, basil, salt and pepper sitting in some olive oil, and baste the crust before I stick it in the oven. Pizza steel works great. Pizza steel with 700 degree charcoal grill = too much heat. Pizza steel in the oven at 500-550 degrees has worked perfectly. Love this recipe.
Glad you like it Tyler! basting the crust sounds awesome!
Like Jeff I’m here in Kentucky where good NY Style Pizza is far and few between. I read a lot of different ways to make the dough and went with yours based on the flavor attributes that the Cold Risen dough would give me. I was impressed as I made my first pies tonight. 1 Traditional Pepperoni and one Double (type) Sausage. I could really enjoy the aroma of the dough during prep and the taste was there.
I actually used it after the 72 hours and it was awesome. I used Love This Kitchen’s Rectangular Ultimate pizza stone at 550 degrees in my GE Profile wall ovens. I found no need to use the broiler but my dual wall ovens have top heating elements not lower ones and my toppings and cheese cooked evenly with the crust.
Your tips and recipe saved me a lot of time and grief as my family devoured the pizzas. Even watching the video of stretching the dough helped me easily, confidentially and quickly toss, assemble and place in 2nd oven a pizza while the 1st was baking. (Big risk ’cause I have only one peel 🙂 )
On the topic of peel I went with a wood one that had a tapered edge from Amazon that was reasonable priced and I am glad. No issues turning the pie during cooking or removing it. Wood is hands down the best to assemble and place in oven without sticking and I see no need for metal one at this point. I did go with Corn Meal after reading many opinions as to go flour or corn meal and I think I made the right choice.
When I took the first slice of Pepperoni and could fold it I was ready to taste and the balance of the dough, sauce, cheese and pepperoni was like an authentic pie that I would get when back in NY. Thanks for your work and tips.
your pizza sounds awesome! I love the added flavor of the corn meal on the bottom – I’m going to use that next time too. thank you for the kind words -glad you all enjoyed it! And for you to master the launch from the peel on the first try? that’s great!
Marie,
One thing I left out of my original post was I was one of those “I don’t use a scale” kind of cooks. I actually break my Brother In Law’s chops when at his house about using a scale. I am so glad that I took your advice and used the scale. My Yield was spot on for my first single batch dough run with a normal batch. Did a double batch today and it was spot on thanks to the scale. Literally only Fifteen bucks at Wal-Mart digital with tare wt. setting. It made life easier.
I also was prepared before diving in by reading all of the tips, measuring everything out in advance. The tips really helped.
The Corn meal really helps the pie slide better than flour according to many NY Pizza Chefs recommendations and for finished appearance there are no white flour spots that I have seen even on commercial pizza shops slices. It really worked as described.
Oh Brian, I can totally relate! I refused to use a scale for years! My mother doesn’t measure a thing and her cooking is all by feel – this is how I grew up so the use of a scale seemed to foreign and fussy to me. Fast forward to now and I absolutely never make pizza dough without it. Mostly because it’s easier than measuring and the dough just comes out so much better. So I’m with ya! And yes, scales are not expensive (probably the cost of one large pizza).
When can you freeze after the initial refrigeration 24- 72 hr. I already made the dough I only waited 24 hours an? made my first pizza it came out excellent I must say I cut it in half but used the full amount of yeast.
I’ve done it after 1 day or after 3 days. It’s a bit better after 1 day to freeze it in my opinion but still very good after 3 days.
Marie,
I do have a question. My oven only goes up to 450 degrees. What, if anything, should I compensate for this? Just leave the pizza in longer?
Are you using a baking steel or baking stone? If so, you can use the broil feature to heat up your stone/steel (maybe try on 2nd shelf to start and then change based on results) and then launch your pizza- once the stone gets hot enough, you can lower the setting a bi to bake the top. If I were you, I’d probably begin by just using the max temp (in your case, 450 degrees) and then try different options. you will probably need more like 10 minutes or so to bake a pizza at a lower temperature. I’d try the broiler “trick” next, which I think would heat the oven past 450. If you happen to own an infared thermometer, that would help determine how much hotter the oven would get (aim at the stone when using 450 vs using broil feature).
Thank you so much. High quality tomato products may be a challenge. We will see what Kroger has to offer. I did not see the fresh oregano on the DiFara pizza, but that might not be bad to put in the uncooked sauce and apply it all come together in the oven.
I have two pizza stones that I will be using. The dough went in the refrigerator last night (Thursday) and I will be making pizza on Saturday night. I’ll let you know how it goes. Thanks. All the best.
That recipe should be able to take 550 on a pizza stone. Shoot for 5.5 minutes, turning once halfway through the bake.
This looks good. My family just got back from a trip to NYC for a week (work stuff and vacation). My daughter and I went to Di Fara’s in Brooklyn; which may have been a mistake. Now all other pizza seems meaningless. I am going to try to replicate as best I can. It’s just hard to find a good pie in KY. Your recipes give me some hope that it might be possible. All the best.
Ahhhhh! DiFara’s! I’ve heard so much about it! Here are some tips: use two kinds of mozzarella, the fresh kind (like the kind usually served in a Caprese salad) and the aged (the packaged, low moisture, whole milk kind). After baking pizza, top it with a bit of grated parmesan. Top with a bit of finely chopped fresh basil (I’ve read that he uses fresh oregano too). Also important to buy very high quality tomato product for the sauce (he probably adds high quality olive oil to the sauce. This is on my bucket list too! So many ideas for posts, so little time…
Really good quality dough. The recipe is almost identical to Tony Gemignani’s pizza crust video on YouTube and elsewhere.
No matter. My only tweak was to use Caputo 00 Chef’s Flour, which gives me great results even on my home oven at 550°F.
Thanks for the included tips and other useful notes.
Glad you liked it! I have Tony’s book (but haven’t checked out his YouTube channel), but haven’t gotten around to trying his pizza doughs, but will have to some day soon. The only other dough I do make is a simple Neopolitan dough where I use Caputo’s in my BlackStone oven at much higher temps – will try to make a NY pizza hybrid with it (with the oil and sugar) -sounds good! The Caputo flour is pretty amazing!! I’ve heard of many folks using half and half (All purpose and Caputo’s 00).
Thank you for getting back to me, Marie. I made a recipe in which Gemingnani’s name was listed as a co-author. It called for 7 cups of flour and 2 1/4 cups of water. That produced a rather dry dough that I almost fed to the garbage can. I decided to go with it anyway and after about 12 hours in the fridge the dough balls actually became more moist and pliable. The baked pizza was very good. Your recipe asks for about 5 1/2 cups of flour and the same amount of water. That’s a huge difference which produces a much wetter dough and a terrific open crumb which I like a lot. It’s worth the extra effort to deal with the wetter dough to get such a nice interior.
Thank you!!!
Can this recipe be doubled? I’m hosting a group of students and I’m going to try your dough. I have a Bosch that will easily handle a double recipe so it would save time. Also, have you ever used this dough on the grill? Thank you for posting, sounds like a great recipe!!!
Yep, it can be doubled – as for the grill, I haven’t recently. There are a few ways you can do that. you can form the pizza place on the grates for a minute or two, then flip, add topping and finish grilling. Heat can’t be too too high or it may burn too much. will depend on the power of your grill. Others have used a pizza stone propped up on two empty cans (like soup cans) or even bricks and use the grill like a pizza oven
I love this recipe but having trouble with transferring the pizza from the pizza peel to the stone, it keeps sticking. I’ve floured the peel and shake it to see how it will slide but once I put on the sauce and cheese it doesn’t slide off very well? Any tips?
you can use parchment paper on top of the pizza peel to transfer it to the oven. Sometimes, if you add too much sauce and/or cheese, it gets too heavy and it is hard to move. The other tip is to act quickly – the pizza will start to stick after a few minutes so try to launch the pizza right after you add the toppings.
Use cornmeal instead of flour on the peel. Quite slippery.
Should the water be warmed our straight out of the tap?
Hi David, water temperature doesn’t matter too too much here because the dough temperature will quickly equalize to the fridge temperature (since you are placing it in the refrigerator soon after mixing). that said, I would use room temp water. If you find your dough temperature is too high after mixing, use colder water next time (but I wouldn’t get too caught up with it since this is a cold proofing recipe)
Do lower the temperature for baking
you can let the dough warm a bit – it is all detailed in the recipe. if you bake the dough when it is too cold, it will form lots of big bubbles