Lilla’s Famous Peach Cookies
This post may contain affiliate links. For more information, please see our disclosure policy.
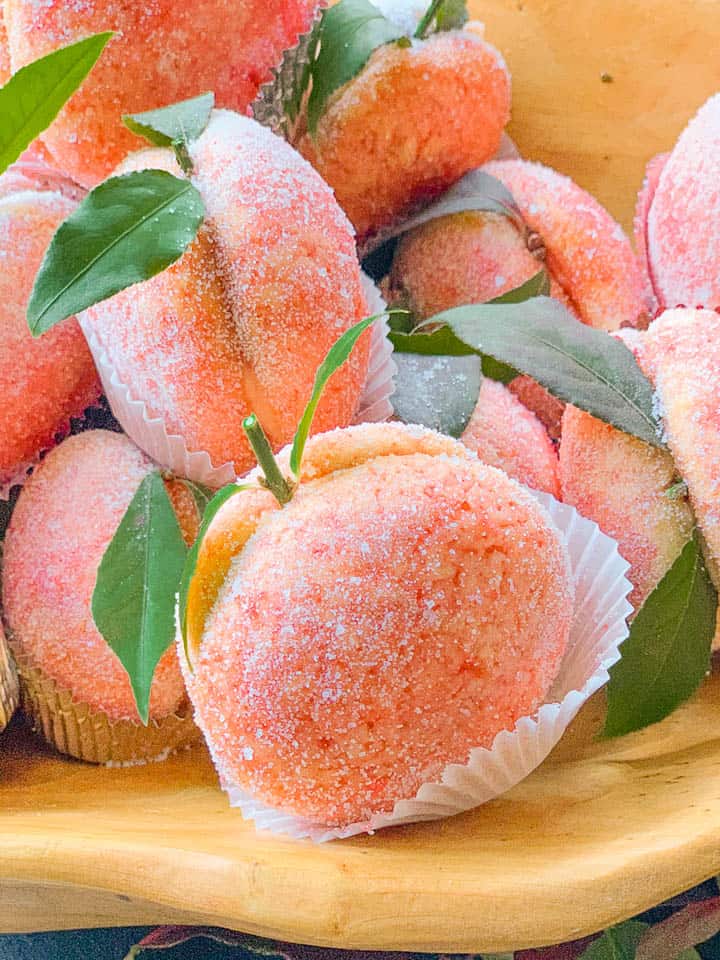
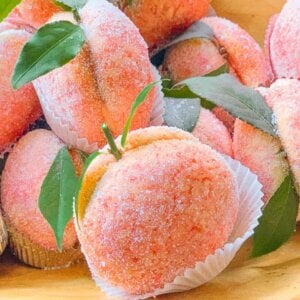
A beloved family recipe for peach cookies that is often requested at parties and holidays! Here is Lilla’s recipe for her fabulous peach cookies! These are a very simple cookie, dipped in a peach flavored syrup and filled with a vanilla pastry cream. Simple but delicious! These can be made without alcohol so everyone can enjoy!

This right here is an example of a beautiful Italian dessert. Something that I hope generations to come will keep making! Yes, it can be time consuming, but these are made typically only for holidays such as Christmas or special occasions such as bridal showers, baby showers, or even birthdays!
These can quickly become a lost art, as the influx of Italian immigrants has passed, and that generation has sadly been aging (most of the Italian immigrants from my childhood are now well into their 80s and 90s)
And so, lets all make sure to carry on the tradition and make these delicious and gorgeous cookies!
My mom makes her cookies without alcohol, but I have provided instructions to make them either way….we prefer the non-alcoholic version!
Other treasured recipes from my mom include her pignoli cookies (also called pine nut cookies or almond cookies), Italian wedding cookies, and ricotta cookies!
In This Post
How to Make Italian Peach Cookies (Videos)
1. Make the dough, bake the cookies, and carve out the bottoms (VIDEO)
2. Make the filling (pastry cream) (VIDEO)
3. Make the dipping syrup (flavors the cookies and gives the color) (VIDEO)
4. Building the Cookies: Dipping, filling and decorating the cookies (VIDEO)

How to Make Peach Cookies (Step by Step in Photos)
Making the cookie dough
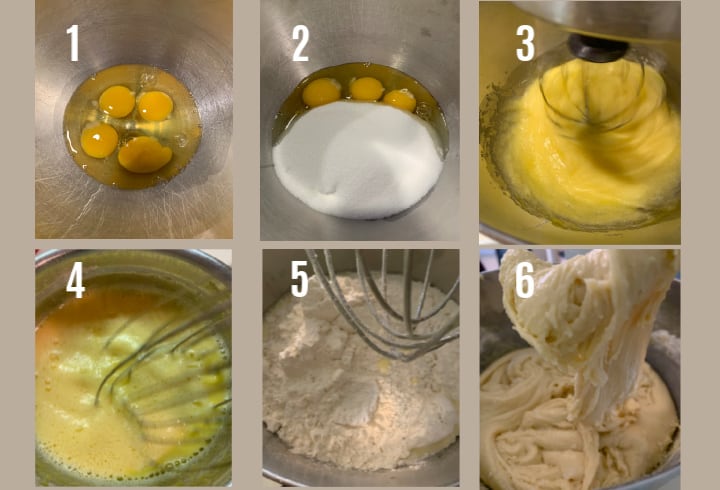
- Add eggs to bowl of a standing mixer
- Add sugar to eggs
- Whip the egg/sugar mixture for 2 minutes until light and foamy
- Small bubbles will appear in the egg/sugar mixture
- Add remaining ingredients (not shown; oil, flour and baking powder)
- Combine until a very soft dough forms. Cover and refrigerate for at least 2 hours.
Baking and carving the cookie bottoms
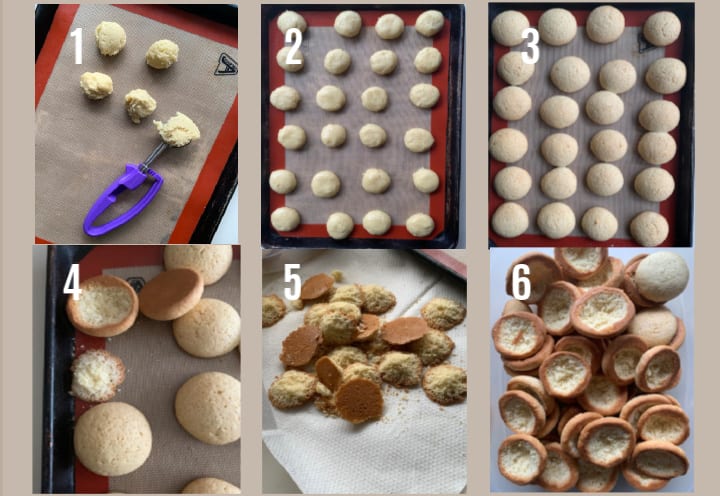
- After 2 hours of chilling dough, line baking sheets with silicone baking mat or parchment paper and form the cookies.
- Roll the cookies into a round ball but then flatten them slightly so they are no longer in a ball shape. Dough will be very sticky so consider using cooking spray on hands to prevent sticking
- Bake for 25 to 28 minutes until they are slightly golden; the cookies are actually slightly overbaked so that they can absorb liquid in the next step without falling apart
- Carve the bottom of the cookie as shown using a sharp knife. Do this while the cookie is still warm as they are prone to breaking if carving when cooled.
- Extra cookie that can be discarded
- Store the carved cookies in a sealed container after they have cooled while you make the pastry cream and the flavored syrup. Cookies can be made a few days in advanced if stored properly (ie, sealed container)
Carving the cookies (video)
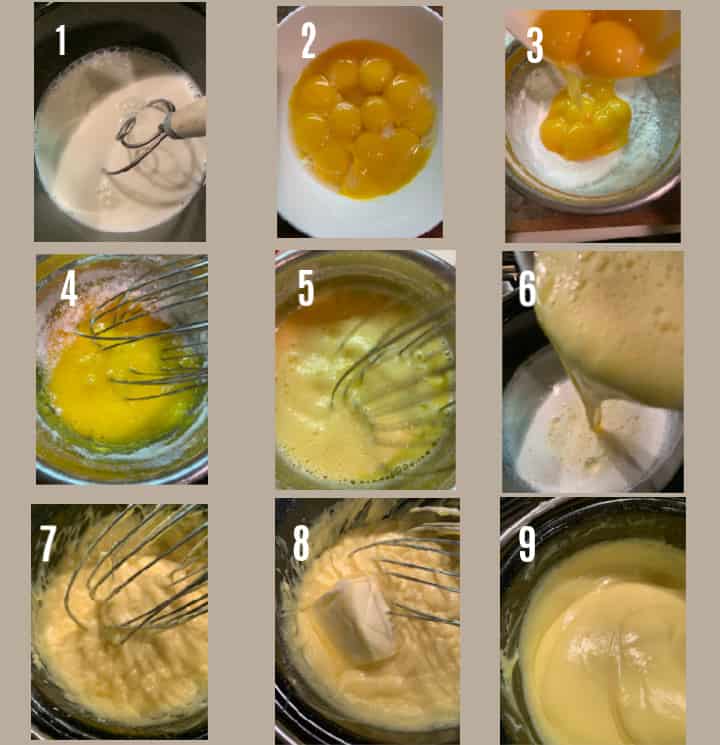
Make the pastry cream filling
- Add milk and part of the sugar to a sauce pan and heat over medium high heat until slightly boiling
- Prepare eggs by separating yolk from whites; we will only need the yolks (store egg whites for another use)
- Combine sugar and cornstarch in a separate bowl, and add egg yolks
- Whisk the eggs with the cornstarch and sugar.
- Add about 1/3 of the hot milk to the egg mixture while whisking vigorously.
- Return the egg mixture to the milk mixture that is on the stove.
- Continuously whisk for 2 minutes, ensuring to scrape the sides and bottom and bottom edge of pot to prevent scorching
- Remove from heat and add butter
- Whisk until butter has melted (optional but highly recommended, add Peach liquor). Cover with plastic wrap and refrigerate after it has cooled a bit to cool completely
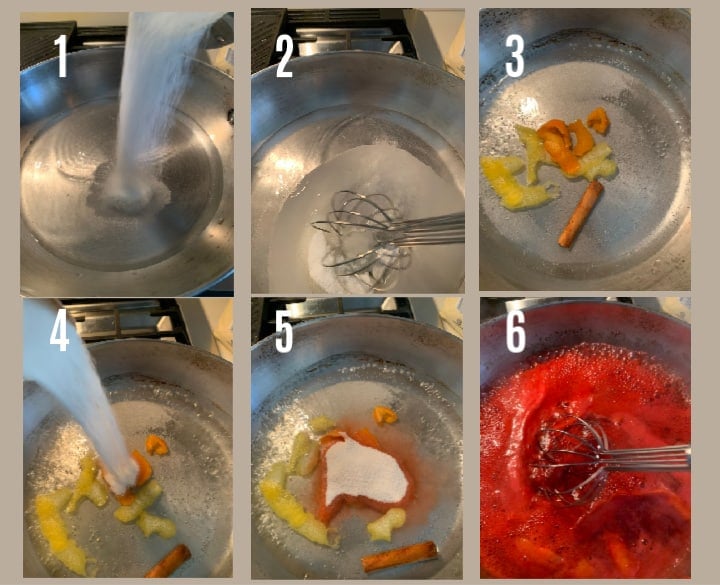
Make the dipping syrup
- Add water (1 cups of it) with sugar and heat over medium heat
- Continue stirring until the sugar has dissolved
- Add flavorings, including lemon and orange peel (try to minimize the white part called pith as much as possible when peeling because that part is bitter! Add cinnamon stick if you have one
- Add jello packet
- Add vanilla extract
- Continue stirring and adjust color by adding red food coloring. Remove from heat and add extra cup of water to cool the mixture and dilute it a bit.
- Optional, flavor with peach liquor
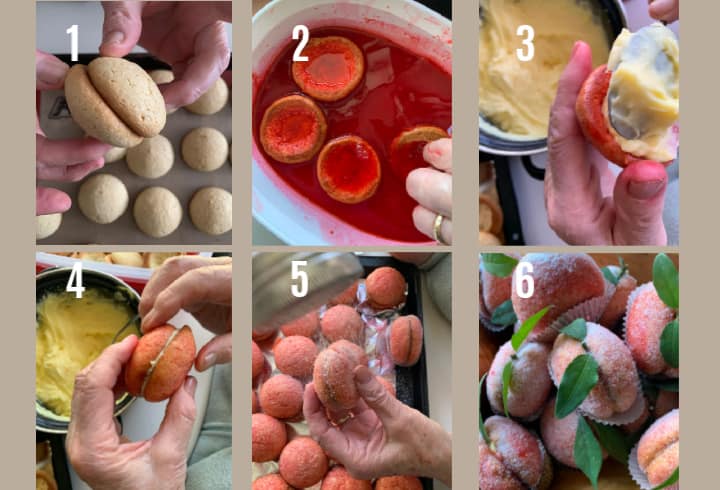
Filling and Decorating (the fun part!)
- Find two matching cookie sizes
- Dip in flavoring syrup (I dunk them completely three times quickly) and shake off excess. (transfer the dipping syrup to a small and deeper bowl when you start running low so dipping is easier.)
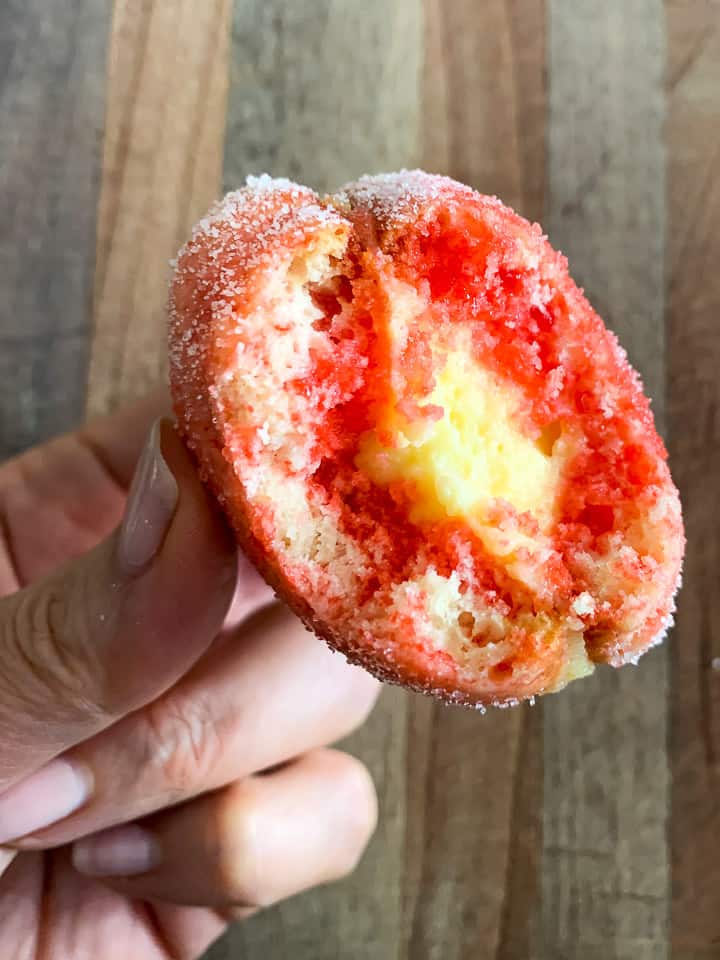
- Fill each half of the cookie with pastry cream
- Sandwich the two filled cookies together
- After all the cookies have been dipped and filled let them dry in fridge for 1 or 2 hours (not shown). Then, sprinkle each cookie generously with sugar (we use a sugar shaker)
- Place cookies in cupcake cups and add leaves. Many use mint leaves, we simply cut some from our garden. You can also uses artificial leaves from the craft store.
Variations for Peach Cookies
- Some people fill the cookies with sweetened ricotta cream
- Other people use jam with or without crushed nuts
- The dipping liquid is traditionally aklermes liquor, which is very difficult to find in the USA. I think that a non-alcoholic cookie can be eaten by more people (ie, children too!)
- A whole almond can be placed in the center of the cookie to simulate a peach pit (be careful of this if you are feeding young children or the elderly).
Top Tips for Making Peach Cookies
- My mom insists on letting the cookie dough rest for a minimum of 2 to 3 hours. She feels that the cookies rise better.
- The cookie dough is quite sticky! Use cooking spray on your hands to help handle the dough and prevent sticking.
- Remember these cookies are baked in order to be dunked in the flavoring syrup and so they’re slightly dry and overbaked, intentionally! Otherwise, they would turn to mush when you dip them.
- My mom likes to actually dip/dunk the cookies in the flavoring liquid rather than spraying on the syrup -she feels dunking the cookies imparts much more flavor and moisture.
- After dipping, let the cookies dry uncovered in the refrigerator for a few hours before sprinkling with sugar; otherwise, the sugar will simply melt away.
- Consider using small cupcake cups or liners so that more of the gorgeous peaches can be seen.
Suggested Schedule
- Day 1: make, bake, and carve the cookies. Also, make the pastry cream
- Day 2: make the dipping syrup, and then fill and decorate the cookies.
Storage and Make Ahead
- Cookies can be made 3 or 4 days in advance and stored in the refrigerator. They do not need to be covered as they should be quite moist and are not subject to drying out quickly.
- Pastry cream can be made ahead and stored for 2 days
- It is not recommended to freeze pastry cream (see explanation in link above); however, you may freeze cookies ahead of time and then fill and decorate a day before needed.
♥️ Loved this recipe? I’d be thrilled if you’d rate it ⭐️ and share your experience in the comments below! Your ratings and comments help other readers discover this recipe and keep this blog going. Did you add any special tweaks? Our community of home cooks would love to hear about it! ♥️
Recipe
📖 Recipe
Lilla’s Peach Cookies
Click the heart icon ♡ above to save a recipe. To find your saved recipes later, click the heart icon on the right side of the screen near the search icon and select My Favorites.
Video
Equipment
- Standing mixer
- wire whisk attachment
- dough paddle attachment
- cookie or baking sheets
- parchment paper or silicone baking sheet
- small knife with pointed tip to carve cookies
- bowls for dunking cookies
Ingredients
To make the cookie dough
- 4 large (4 large) eggs room temperature
- 2 cups (400 g) sugar
- 1 cup (218 g) vegetable oil
- 1/2 cup (122 g) milk
- 6.5 cups (812.5 g) all purpose flour
- 4 tsp (4 tsp) baking powder
To make the flavored syrup for dipping
- 1 cup sugar
- 2 cups water divided (1 cup and 1 cup)
- 1 stick cinnamon
- 2 tbsp vanilla extract
- 1 medium orange peel only
- 1 medium lemon peel only
- 1 box peach flavored jello
- 1/2 tsp red food coloring more as needed
- peach liquor optional (I didn't use)
To make the vanilla pastry cream
- 4 cups (976 g) milk
- 3.5 tbsp (3.5 tbsp) sugar (sugar 1)
- 12 large (12 large) egg yolks
- 7 tbsp (7 tbsp) cornstarch
- 3/4 cup (150 g) sugar (sugar 2)
- 1/2 cup (113.5 g) butter
- 1/3 cup (51.33 g) peach liquor optional but highly recommended
To construct the cookies and decorate them
- 1 cup sugar I use regular ole granulated sugar, but may try colored sugar in the future
- 30 leaves (real or artificial)
Instructions
To make the cookie dough
- Optional but highly recommended to measure out all the ingredients first and set aside
- In the bowl of a standing mixer, add eggs and sugar and beat with whisk attachment for about 2 minutes until light and fluffy
- add the oil all at once and mix until blended
- add the milk and mix until blended
- Combine the baking powder with the flour and then add to the mixing bowl with egg mixture and combine until very soft dough forms (see photo)
- Cover the bowl with plastic wrap, and set into the refrigerator for at least 2 hours
To bake the cookies and carve the cookies
- preheat oven to 350 degrees F and line baking sheets with silicone baking sheet or parchment paper
- Using a cookie scoop or tablespoon, portion dough into approximately 60 to 64 cookies. The shape should be round with a slightly flattened top (see photo)
- please note that this is a sticky dough! use cooking spray to help prevent dough from sticking to hands when forming cookies
- bake in oven for about 25 to 28 minutes. Note that these cookies are intentionally overbaked so that they can withstand the dipping step and not fall apart. That said, do not burn the cookies! They should have a golden color.
- After cookies are baked, carve them while they are still warm.
- The cookies should be cool enough to handle but still warm enough to allow carving. If they are cool, the cookies will be more likely to break when you try to carve the bottom out
- Using a small knife with a pointed tip, carve out the bottom (see photo) so that they can be filled with pastry cream.
- After all cookies have been carved, store them in a sealed container until ready to fill and decorate
To make the cream filling
- Note that this recipe makes a little more cream than needed; the extra pastry cream is delicious enjoyed alone!
- Also note that the sugar is divided, so please use sugar number 1 in first part of recipe and sugar number 2 in second part as described below
- Combine milk and sugar number 1 in a medium sized sauce pan/pot and heat until slightly boiling over medium high heat
- In the meantime, combine the cornstarch with sugar number 2 and then add to the eggs and mix well but do not introduce too much air
- After milk come to slight boil, pour about 1/3 of it into the egg/sugar/cornstarch mixture while whisking vigorously
- Return this egg mixture back to the pot containing the remaining milk/sugar mixture and heat over medium high heat for 2 minutes while whisking constantly. Mixture will become very thick. Whisk well continuously and make sure to stir the bottom of pot and bottom edges of pot to avoid scorching
- Remove pot from stove, add butter, and stir well until all butter is melted
- If using liquor, add to finished cream and combine well.
- Cover with plastic wrap (ensure the top of the cream is in direct contact with plastic wrap or film will develop)
- Cool and then store in the refrigerator until ready to use
To make the flavored dipping syrup
- Add 1 cup of water, sugar, lemon and orange peels, cinnamon stick, peach jello, and vanilla extract to a pan and set over the stove. Heat and stir over medium flame for about 5 minutes
- Add a bit of the red food coloring (one drop at a time), and stir until desired color is achieved.
- Remove mixture/pan from flame and add remaining cup of water to dilute the mixture and cool it down a bit.
- Optional, add peach liquor to taste (add 2 tablespoons at a time and taste as you go)
To fill and decorate the cookies
- Organize an area for decorating cookies
- Set out everything you'll need: the carved cookies, the dipping syrup for dipping, and the pastry cream to fill the cookies. You may also need some paper towels to wipe up if the syrup drips. You will also need a baking tray lined with parchment or aluminum foil.
- We typically dip, fill, and put together one cookie at a time.
- Although most cookies should be similar in size, it might help to match up 2 cookies before proceeding to the dip, fill stage
- Dip 2 cookies (I dunk them three times), let excess syrup drip off, then fill each half with pastry cream and join the cookies together like a sandwich. Wipe excess cream that may ooze out with finger and place on nonstick paper lined baking sheet. Note that you should use a small and deep container to dip the cookies as the syrup starts to run low to make things easier.
- Continue until all the cookies are dipped, filled and joined together
- place the tray of cookies in the refrigerator for about 2 hours or so until they have dried slightly and then sprinkle with sugar (NOT powdered sugar but regular granulated sugar) and insert leaves to decorate. We use a sugar shaker but you can sprinkle with tablespoon.
Storage instructions
- Cookies can be made 3 or 4 days in advance and stored in the refrigerator. They do not need to be covered as they should be quite moist and are not subject to drying out quickly.
- Pastry cream can be made ahead and stored for 2 days
- It is not recommended to freeze pastry cream (see explanation in link above); however, you may freeze cookies ahead of time and then fill and decorate a day before needed.
Notes
- I like to make this recipe over 2 days
- Suggested schedule:
- Day 1: make, bake, and carve the cookies. Also, make the pastry cream
- Day 2: make the dipping syrup, and then fill and decorate the cookies.
- You will have some left over pastry cream, which can be eaten like pudding. (I had about 1 lb left)
- Dough is sticky! Have cooking spray onhand and spray hands if needed to prevent sticking when you are forming the cookies
- The cookies are intentionally a bit overbaked so that they can absorb the dipping syrup and so that they don’t fall apart when doing so.
- Carve out the bottom of the cookie while it is still warm so that you reduce the chance of breaking the cookies
- Before the final step of sprinkling sugar on the finished cookies, you should let them dry a bit in the refrigerator or else the sugar will simply melt away. Let dry for about 1 to 2 hours and then sprinkle with sugar. A sugar shaker really helps but is not necessary
-
- Cookies can be made 3 or 4 days in advance and stored in the refrigerator. They do not need to be covered as they should be quite moist and are not subject to drying out quickly.
-
- Pastry cream can be made ahead and stored for two days
-
- It is not recommended to freeze pastry cream (see explanation in link above); however, you may freeze cookies ahead of time and then fill and decorate a day before needed.
Marie,
I loved your moms peach cookies when I visited. They are my absolute favorite!
Cheryl ❤️ Thank you! I’ll always remember her peach cookies too. Let’s get together soon – been thinking of you lots!
Hi Marie!
This recipe looks gorgeous and I’m so excited to make it; I am vegetarian, and wanted to ask what you would recommend to substitute for the jello packet in the syrup ingredients.
Thank you, happy holidays! 🙂
For a gelatin-free option, I would try finely crushed freeze-dried fruit (raspberry or strawberry) and mix it with sugar to replace the amount of Jell-O powder called for in the recipe.
Hi Marie! I have made your recipe for the peach cookies and have also used this recipe with a different filling and coating to turn them into Christmas sugar plums. This year I am challenging myself and making them look like glistening snowballs with a hit cocoa flavored ganache and my marshmallow cream icing for a filling. My problem is that since the cookie is darker, I can’t get them covered enough to be as white as I need them to be. Do you have any suggestions? Can I use 2 eggs and 2 egg whites instead of four eggs to lighten the dough color?
What a fun idea! A few thoughts – first, I’d probably sub 3 egg whites for every 2 eggs and maybe use shortening instead of oil (adjust the dough consistency with flour as needed) to get a whiter dough – but also, I know when I make snowball cookies the cookie doesn’t show at all because it is double rolled in powdered sugar so that’s also a consideration (ie, how much coating you’ll be using and if you are double rolling). Your idea sounds fantastic – I wish you could post pictures! Also funny you mention the plums as I’ve always wanted to try that version too!
Thank you for your suggestions! I will definitely try that out! I am rolling my cookies in glistening white sanding sugar so that is what was making it hard to cover the cookie. I didn’t care for rolling them in powdered sugar. I’m trying to make them look more elegant. Now when I make actual snowball cookies (aka russian tea cakes), I roll those in powdered sugar , of course. I will send a picture of my sugar plums and if I get these the way I want them I will send a pic. Thank you!
How do I send you the photo of the sugar plums? I don’t see a way to upload it for a comment
I wish you could put it in the comments! Send me a photo and I’ll upload it! My contact info is marie@feelingfoodish.com
These are such special confections! Made for my kids baby shower and had many approaching me at the shower for the recipe. (I sent to your site) As a first-timer I did over 3 days- good advice to be able to concentrate fully on each step. Watching the videos is helpful. Had better success in the assembly when I dipped and sugared each half then filled with crème pat before matching halves. Added mint leaves and stems right before serving: They were so soft and beautiful! This is a keeper and will stay in my special confections rotation. Thank you!
This makes me so happy to read! They are a lot of work but they are so beautiful, unique and tasty!
I want to make these for my daughter’s bridal shower. Wondering, how far in advance can I make and freeze the cookie without harming the taste? Also, would you dip the cookie then freeze, OR freeze, thaw, dip and fill? (I will make the filling and assemble the day before serving)
I’d say 3 months in advance to stay on safe side, and I’d freeze, thaw, dip and fill! Congrats to you and your family!
I’ve made peach cookies before buy tryed this recipe because of the pudding recipe. Biggest waste of money i ever spent.
Sorry to hear that! We’ve been making these for many, many years, and they’ve received rave reviews. What went wrong? The center is not a pudding; it’s a pastry cream, which is thicker. Feel free to email.
Hello, these look delicious! Could mint leaves be used as leaves in your recipe? Otherwise, what do you suggest using? Thank you.
Yes, for sure! Many people use mint leaves – my mother used to use leaves from an outside bush and wash them, but mint is probably better as it’s edible.
I haven’t made the cookies yet, I’ve just been reading recipes. You dip your half cookies before they’re filled?? A lot of sites have you dip the whole cookie once assembled. Are they better this way?
Yes, we dip our cookies without the filling. We feel like it’s easier this way.
My cookies cracked. Do you know what I could have done wrong?
Is it possible that your oven runs hot? Otherwise, adding too much flour – try spooning the flour or even weighing. I’m sorry to hear that!
Hi Marie, my Grandson loves peach cookies but he can’t have gluten. Can these peaches be made with Gluten Free Flour and would they taste the same?
Thank You for your reply.
I haven’t tried that – I’m sure they could but best to try sample batches first to test. In my limited experience you might need to adjust the liquid in the recipe
Hi Rose!
My boyfriend doesn’t est gluten.
I literally just made a batch gluten-free today! I didn’t use the whole amount of flour. (There was almost like 2 cups left over) I did add more milk to the batter to make it more moist and left the dough sticky. (Popped it in the fridge for 3 hours)
They held shape perfectly for me. I’ll come back tomorrow when I fill and sandwich them together and let you know how I go 🙂
I’ll share the Gluten-free Flour I used. It’s called Ador gluten-free flour and it’s made here in Melbourne.
Hi Marie!
These peach cookies are so cute! I haven’t made them because I want to make your Lemon Ricotta cookies first! They seem to be easier to make, lol.
LOL, yes! The peach cookies are really best made over a few day in stages. Sometimes my mom would make and freeze the cookies for later assembling.