Italian Easter Bread (Pane di Pasqua)
This post may contain affiliate links. For more information, please see our disclosure policy.
Italian Easter Bread (Pane di Pasqua) is a staple in many Italian American homes during the Easter season. This sweet, enriched bread is similar to brioche or challah, but it has its own unique character.
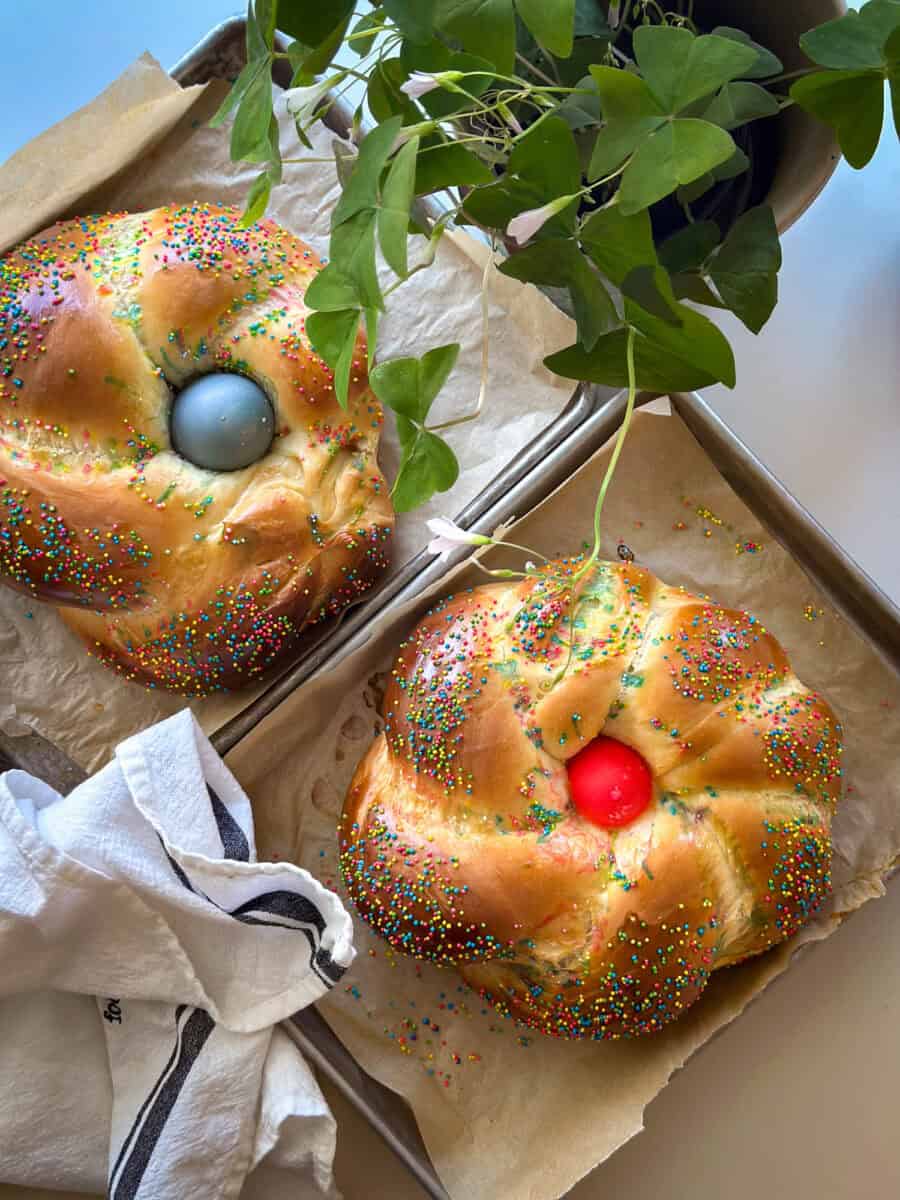
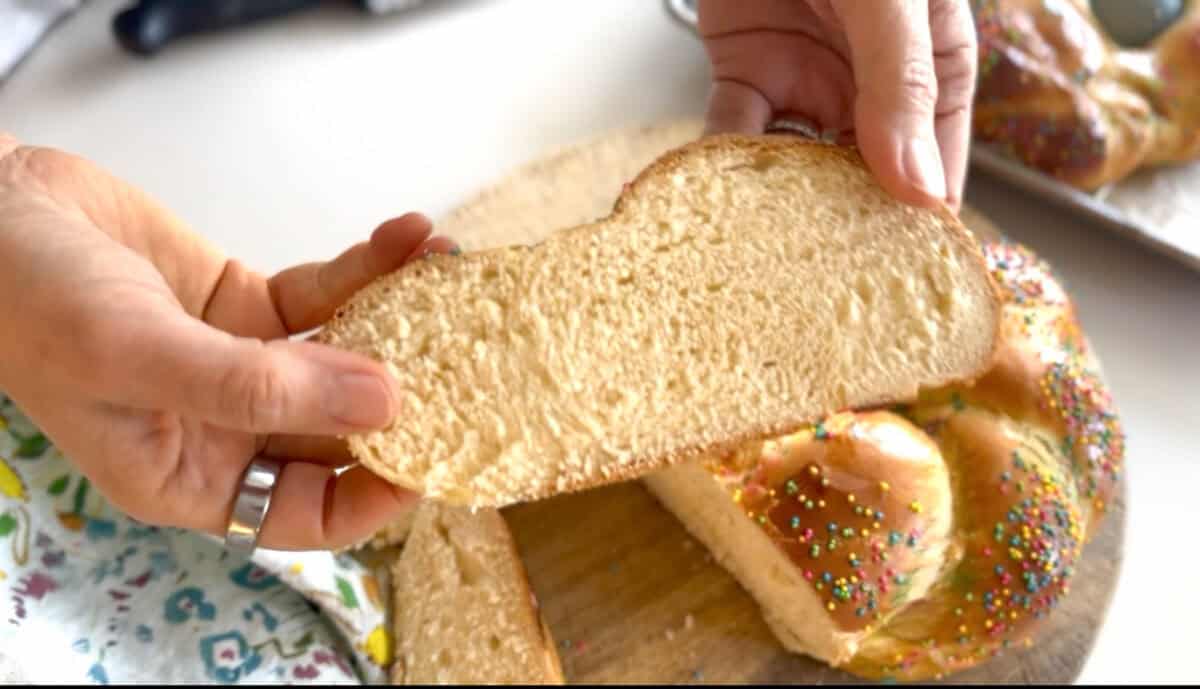
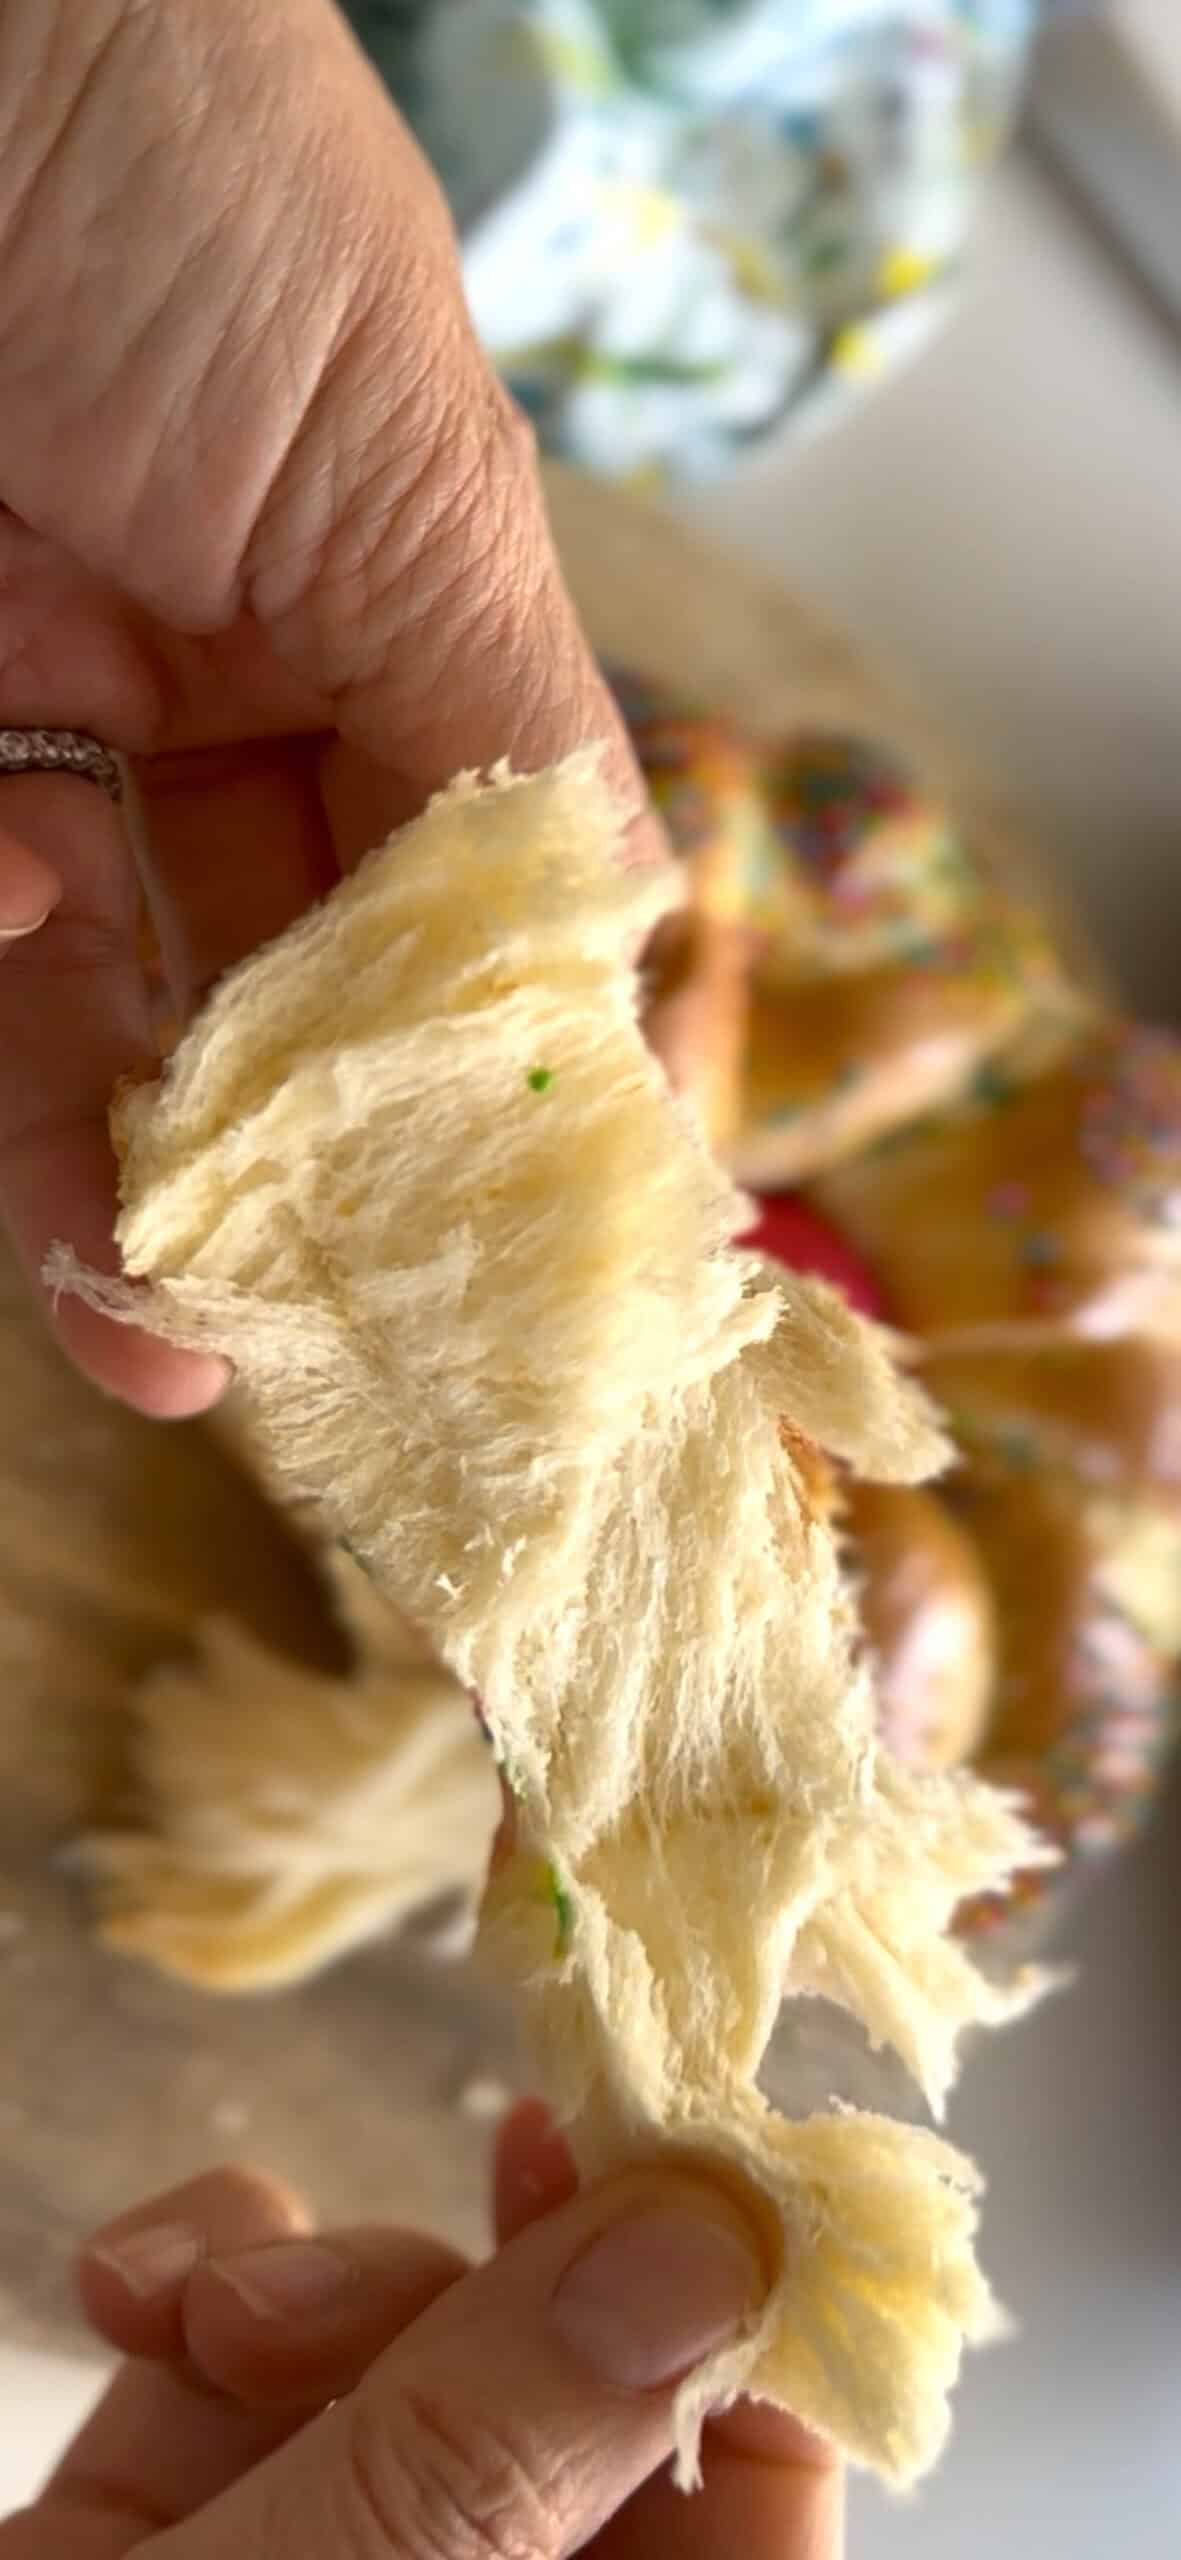
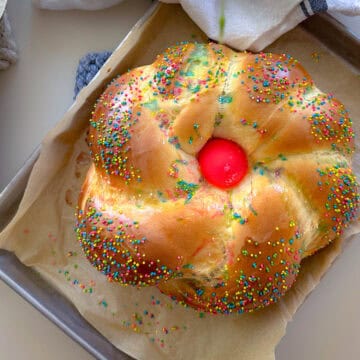
What makes this version special is the texture. It bakes up incredibly light and airy, almost feather-soft, with subtle citrus and vanilla flavor. The loaves are often braided and decorated with colored eggs and sprinkles, making them as festive as they are delicious.
If you have leftovers, slice them thick and make French toast the next morning. It’s incredible.
This recipe makes two large braided loaves of Italian Easter bread (recipe can be halved).
Why You’ll Love This
• Exceptionally light and airy crumb that stays soft for days
• Classic Italian American flavor with citrus zest and vanilla
• Beautiful braided loaves decorated with colored eggs
• Perfect for leftovers. It makes amazing French toast
An Italian American Easter Favorite
My mother made Italian Easter bread for as long as I can remember. Every year around Easter, it would appear in our kitchen alongside other holiday favorites like Easter pie and Italian rice pie.
When I was younger, my cousin was dating a guy whose mom made the BEST Easter bread. What made it unforgettable was the texture. It was unbelievably light and airy, almost like it weighed nothing. The secret? A double rise – if you have the time.
Ingredients You’ll Need
This Italian Easter bread uses simple pantry ingredients to create a rich, lightly sweet dough. Eggs, sugar, and oil give the bread its soft yellow color and tender crumb, while citrus zest and vanilla add a subtle flavor that makes it feel special for the holiday.
All-purpose flour forms the base of the dough, and yeast helps create the beautifully light and airy texture that makes this bread stand out. The dough is enriched but still surprisingly soft and fluffy once baked.
For decoration, the braided loaves are traditionally topped with dyed eggs baked right into the dough and finished with a simple powdered sugar icing or colorful sprinkles for a festive Easter look.
Overview: How to Make
The overall process for making Italian Easter bread: First, the yeast is dissolved in warm water. In a separate bowl, the eggs and sugar are beaten together until light and fluffy, then the oil, lemon zest, and vanilla are added.
Whipping the eggs with sugar helps dissolve the sugar and incorporate air, creating a light, stable base that gives the dough a softer, more tender crumb. It also improves structure and rise, especially in enriched doughs like Easter bread.
The flour is gradually mixed in to form a soft dough. The dough should feel soft and slightly tacky, not stiff, which helps create the light texture.
Once the dough is smooth and elastic, it is left to rise until puffy and increased by about 75% (not fully doubled). For the lightest texture, the dough can rise a second time before shaping.
I highly recommend allowing the dough to rise twice before shaping the loaves. That second bulk rise makes a noticeable difference and helps create the incredibly light and airy texture that makes this bread so special.

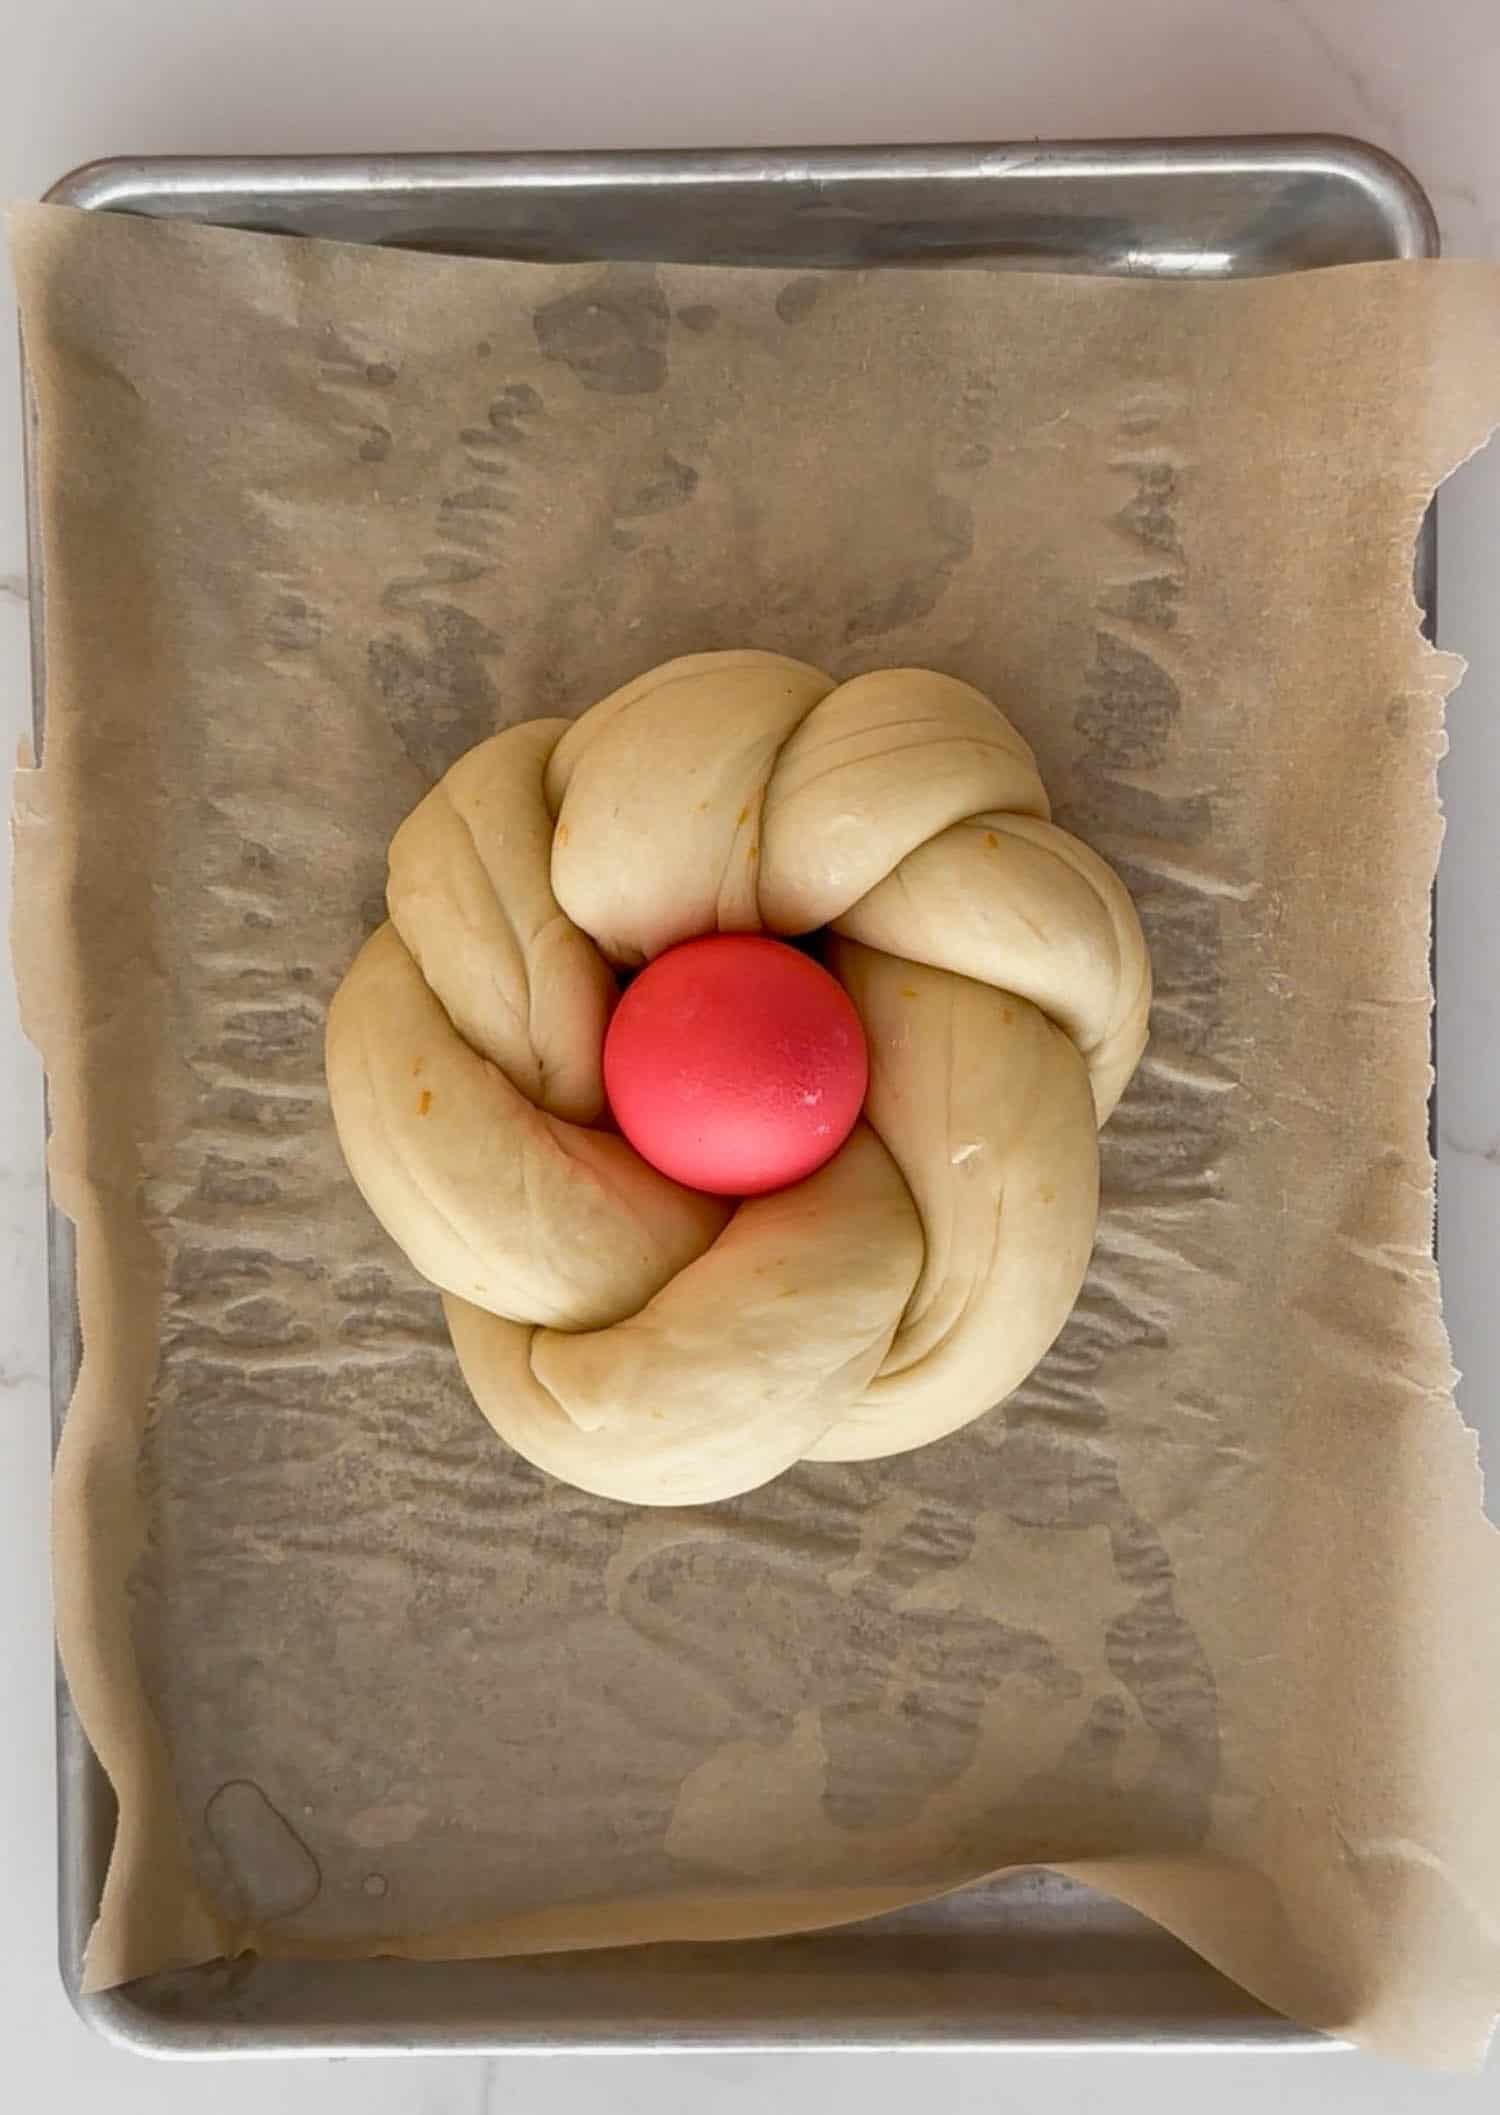
The dough is then divided, rolled into ropes, twisted into braided loaves, and allowed to rise again before baking until lightly golden.
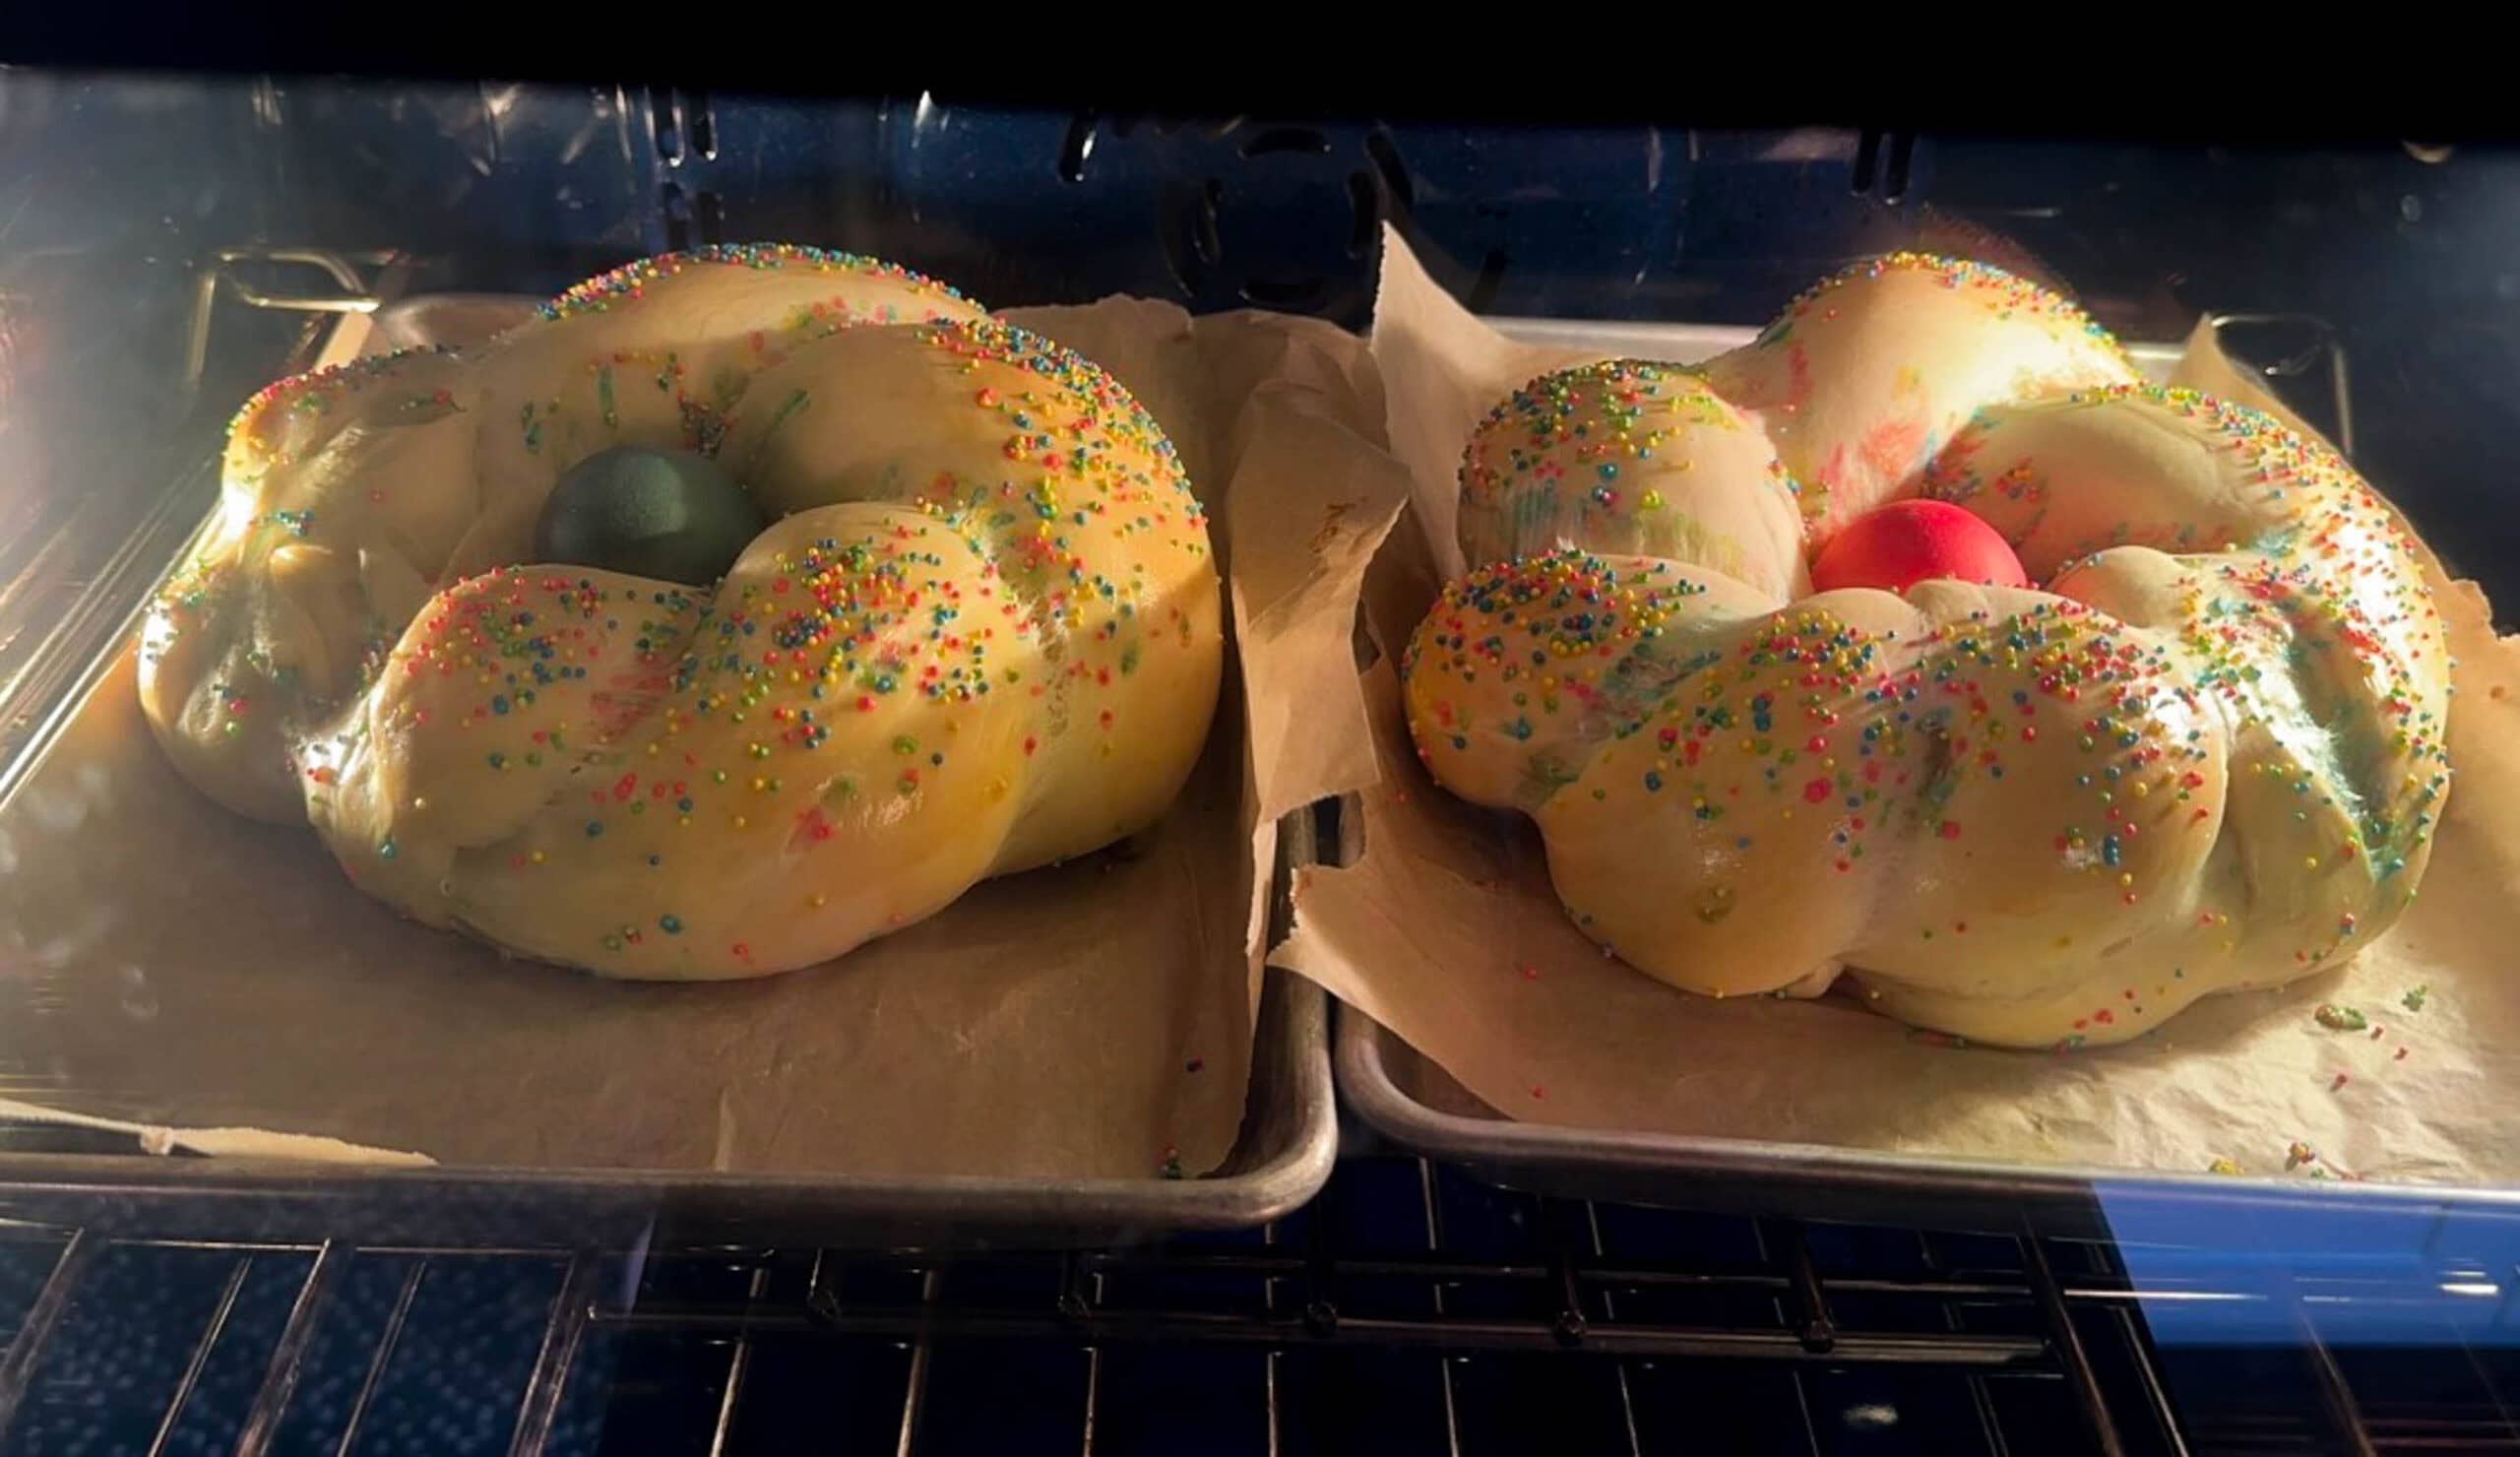
The result is a soft, beautifully braided Easter bread with an exceptionally light crumb.
Tips for Light and Airy Italian Easter Bread
The key to getting that soft, airy crumb comes down to a few simple techniques.
Let the dough rest before adding more flour.
After the first few cups of flour are mixed in, let the dough rest for about 10 minutes. This allows the flour to fully hydrate so you can better judge how much additional flour is needed. Adding too much flour too quickly is the most common reason Easter bread turns out dense.
Let the dough rise twice (optional).
This dough benefits from a double rise. Let the dough rise twice (optional). The extra fermentation helps create a lighter, softer texture.
Add flour slowly.
Too much flour will make the bread dense. Add it gradually until the dough is soft and smooth but not sticky.
Avoid overbaking.
This bread is baked at a lower temperature so it stays tender. Bake just until lightly golden and fully cooked through.
The result is a loaf that is soft, fluffy, and incredibly light.
Decorating with Colored Eggs
Italian Easter bread is traditionally decorated with dyed eggs baked right into the loaf. Place a dyed egg in the center of the shaped dough before rising and baking. Traditionally, this is a raw egg, but you can also use a hard-boiled egg (my eggs don’t always cook in the oven, so I use hard-boiled).
Make sure dyed eggs are completely dry before placing them on the dough to prevent the color from bleeding.
♥️ Loved this recipe? I’d be thrilled if you’d rate it ⭐️ and share your experience in the comments below! Your ratings and comments help other readers discover this recipe and keep this blog going. Did you add any special tweaks? Our community of home cooks would love to hear about it! ♥️
📖 Recipe
Italian Easter Bread
Click the heart icon ♡ above to save a recipe. To find your saved recipes later, click the heart icon on the right side of the screen near the search icon and select My Favorites.
Ingredients
For the Dough
- 1 cup (240 g) warm water or use half milk and half water
- 4 teaspoons (13 g) instant yeast
- 2 large eggs
- 3/4 cup (156 g) granulated sugar plus 2 tablespoons
- 1 small lemon or orange zest only
- 2 teaspoons vanilla extract
- 1/3 cup (78 g) neutral oil such as vegetable or canola oil
- 4.5 cups (540 g) all-purpose flour plus 1/2 cup more if needed to get a soft dough (add gradually)
For the Egg Wash
- 1 large egg
- 1 tablespoon water
Optional Decorations (Optional)
- 2 large dyed eggs hard-boiled
- Powdered sugar icing 2 cups powdered sugar mixed with 2–3 tablespoons milk or water
- Colored nonpareils or sprinkles
Instructions
Make the Dough
- In a small bowl, add the yeast to warm water (use about ½ cup from the total). The water should be lukewarm, not hot, or the yeast may die. Stir and set aside until the mixture becomes bubbly, indicating that the yeast is active.
- In a large mixing bowl, beat the eggs and sugar together for several minutes until light and fluffy. Add the lemon zest, vanilla extract, and oil and mix until combined. Stir in the remaining water along with the yeast mixture.
- Begin adding the flour gradually, mixing well after each addition. The dough should feel soft and slightly tacky, not stiff. Avoid adding too much flour, as this can make the bread dense. Let the dough rest for about 10 minutes so the flour can fully absorb before adding more.
- Mix the dough for about 10 to 12 minutes, or until it becomes smooth and begins to pull away from the sides of the bowl. If kneading by hand, knead for about 15 to 20 minutes, allowing short rests if needed. Once smooth, let the dough rest for another 10 minutes.
Bulk Rise
- Place the dough in a lightly oiled bowl, cover, and let rise in a warm spot until puffy and increased by about 75% (it should look noticeably fuller but not quite doubled), about 1½ to 2 hours depending on room temperature. The dough should look airy and feel elastic but not fragile. Avoid letting the dough rise too far, as overly fermented dough can become delicate and harder to shape.Optional Second Rise: For the lightest texture, gently deflate the dough and let it rise again for about 60 minutes, until it looks light and slightly puffy.
Shape the Loaves
- Lightly coat your countertop and hands with cooking spray or oil to make the dough easier to handle. Divide the dough in half to make two loaves or if you halved the recipe, skip this.
- For each loaf, divide the dough into two pieces and roll each piece into a rope about 18 to 24 inches long. Twist the ropes together, then form the twisted dough into a spiral circle and tuck the ends underneath.
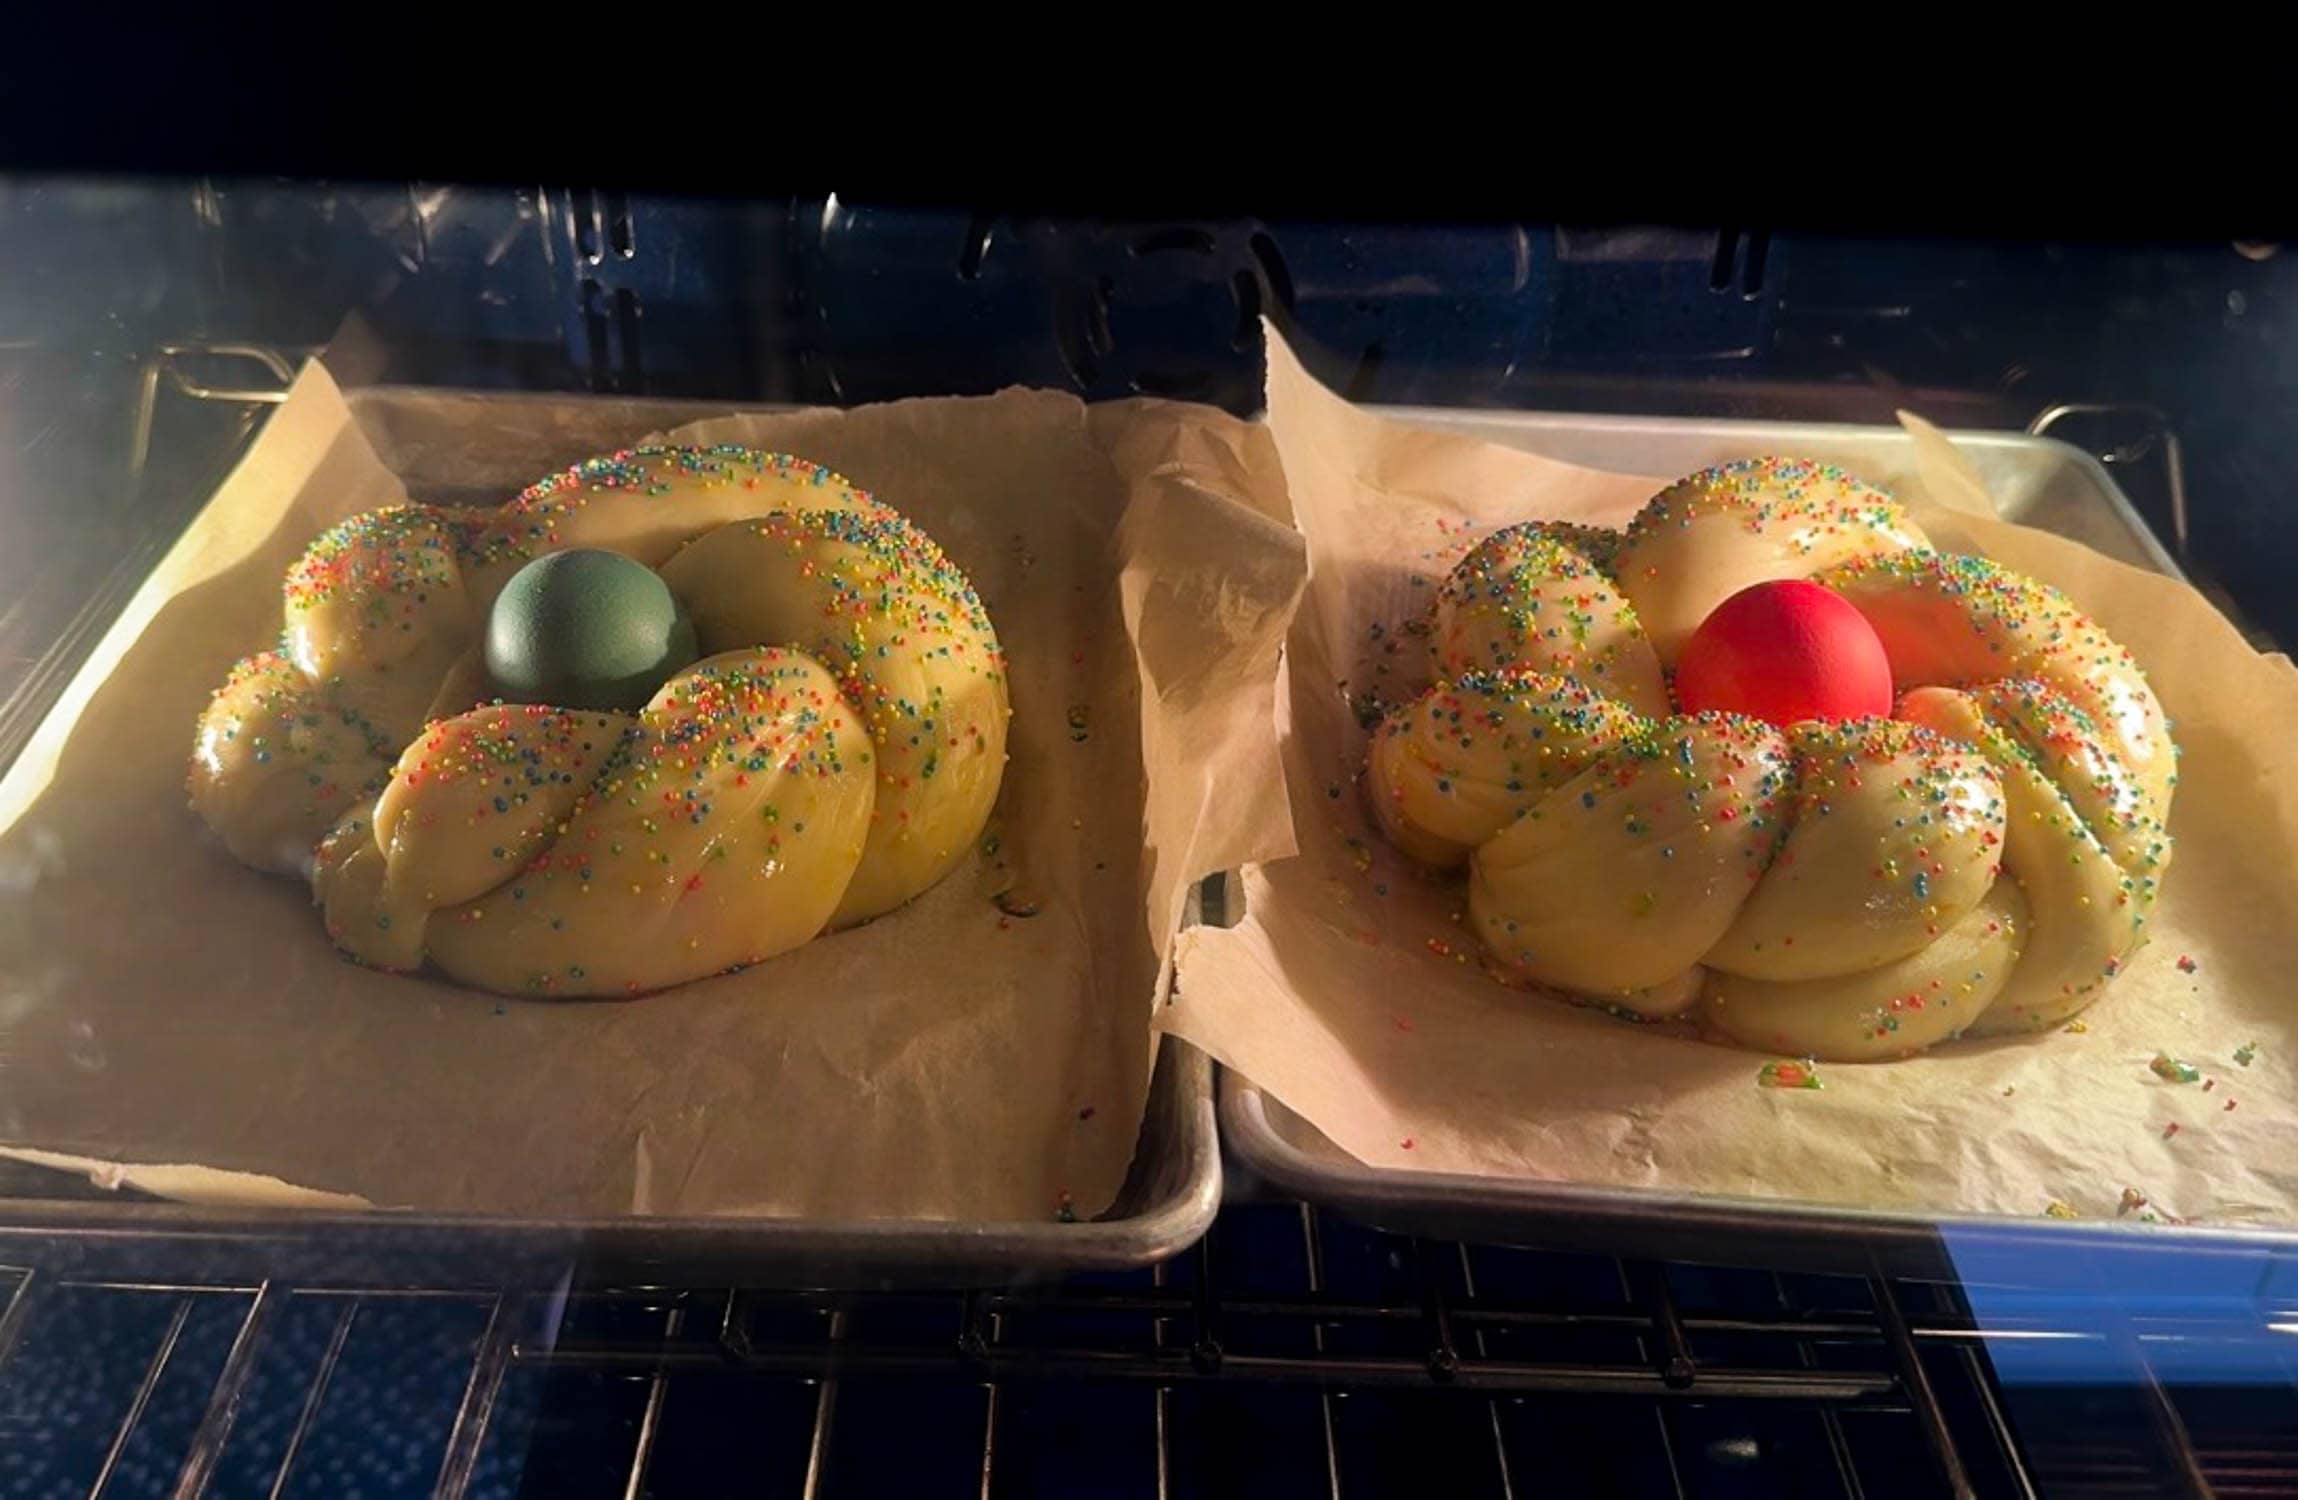
- Place the loaves on parchment-lined baking sheets, one loaf per sheet for large loaves. If using a dyed egg for decorating, tuck that in the center of the formed loaf. Brush with egg wash (being careful to avoid the area around the dyed egg), cover loosely with lightly oiled plastic wrap, and let rise for about 1½ to 2 hours. Alternatively, the shaped loaves can be refrigerated overnight for the final rise.
- If you refrigerated the shaped loaves for the final proof, keep in mind that rise times will vary depending on how cold your dough is going in, and how cold your refrigerator runs.Before baking, the loaves should look noticeably puffy. If they’re still a bit firm or tight after refrigeration, let them sit at room temperature until they finish rising.
Bake the Bread
- About 20 minutes before baking, preheat the oven to 325°F.
- Brush the loaves again with egg wash, avoiding the dyed egg.
- Bake in the center of the oven until lightly golden and fully baked through, about 45 minutes. Begin checking at 25 minutes and loosely cover with foil if the loaves begin browning too quickly.
- Allow the bread to cool completely before slicing.
Notes
For less color bleeding, make sure the eggs are completely dry before placing them on the dough. Storage:
Store in an airtight bag at room temperature for 2–3 days or freeze for up to 1 month. Optional shortcut:
If you’re short on time, you can skip the second bulk rise and proceed directly to shaping the loaves.
If I refrigerate the shaped loaves, I’m assuming I can bake directly without another rise, correct? Thanks, Marie, looking forward to having this on our Easter table! 💕
Great question and the answer is it depends… If the loaves don’t look puffy, they still need more time to rise. They won’t really start rising again until they’ve come back to room temperature.
If that’s the case, I usually let them sit out for about 30 to 60 minutes, then give them more time as needed until they’re nice and puffy before baking. Sometimes I’ll snap a quick photo to compare the rise. That really helps!
Hi! I read this recipe two days ago and it’s says the recipe was updated this morning. I can’t remember what the original amounts were, but I recall it was very close to my grandmother’s recipe. Do you mind stating what parts of the recipe were changed/their original amounts? ☺️
This is the recipe that had been up for a while – I believe you’ll need more flour – if you made it please let me know. Also it makes a larger quantity of dough and so I was trying to reduce the recipe to make only 2 loaves.
Hi Marie: I have always used anise oil in the bread. It kinda jazzes it up a bit. Thank you for all the wonderful recipes!
Hi Linda.
Sadly, I have missed placed my family’s recipe for Pane di Pasqua. I know the ingredients, but not the measurements. Your recipe is basically identical ingredient wise to what mine was.n
I wanted to let you know there’s one common mistake in the recipe. So often people get their yeast mixed up. In your recipe it instructs the reader to activate the yeast in warm liquid, but you have them using instant yeast. The only yeast that is used with warm liquids is called active yeast. Instant yeast is put right into the flour without any warm liquid. There’s nothing wrong with instant yeast, but adjustments with measurement would be needed.
Also someone asked if they can use butter. Yes, of course they can, but again the measurements would be different from the oil. However, oil gives a softer type of bread & crust. It’s perfect for this sweet bread. If they wish, they can also use Crisco.
Then someone wanted to know why salt wasn’t used. My family never used salt either for this bread. I checked around online & it would seem that those who use salt are the American style type of recipes. So I’m thinking the old Italians felt salt was not needed & they were right. The bread is delicious without it.
I did notice something a little peculiar while looking at recipes. Most used butter, not oil. One used Crisco & mixed a lot of Anice seeds into the batter.
Oh well, thank you for sharing the recipe. I’m am so happy to have found a recipe that was just like my family’s. Buona Pasqua.
Hi Angie, really great points! Only thing I want to add is that yes instant yeast doesn’t have to normally have to be activated. I normally never do this but there is some info that says it’s good to do this for breads with high amounts of sugar. Someday I’d like to try a comparison but for now it doesn’t hurt to do it this way and also, if someone is using active dry yeast, as you know, it’s recommended. Happy Easter! 🐣🐇🐰
Hi
Can butter be substituted for oil?
Also I remember anise flavor in our bread?
Steven
I don’t see why not – I haven’t tried it but it should work out fine.
Is the elimination of salt done for health reasons? Thanks
Hi John- this recipe was passed on to me so I can’t say but many traditional Italian Easter bread recipes use very low salt. I would imagine it was to help contribute to the very soft crumb. I may try to make it with and without to see the differences. But I wouldn’t say it’s for health because it has high sugar and fat.
This bread tasted EXACTLY like the bread my Italian grandma made every year, and we don’t have the recipe. She did individual loaves with and egg for each of us. I made the big ring. It was delicious. The only thing that went slightly wrong was the dough around the eggs was still pretty raw, and the eggs were soft boiled consistency. But the bread looked perfect and was hollow-sounding when tapped. It was rather dark already. So to fully cook it, what should I have done? I was thinking cover with foil so it doesn’t get too dark?
You did not state just how much flour you used. The recipe only says 10 when it comes to measurements for flour for the Easter bread. Need exact measurements for the flour please
10 cups, thanks for mentioning this!
This was amazing! So light and airy!!