Using the Ooni Volt Pizza Oven
This post may contain affiliate links. For more information, please see our disclosure policy.
Update: The Ooni Volt 12 is no longer available; this post covers tips and techniques specific to that version for anyone who already owns one or finds one used. The newest model, Ooni Volt 2, is discussed here.
All guidance below applies to the original Volt only (Volt 12), which is no longer sold on the Ooni website.
Do you have an Ooni Volt? I spent some time using the Ooni Volt to figure out how to bake the perfect Neapolitan. Because who doesn’t love that soft, thin-centered pizza with a puffy charred crust? And best part it’s all baked in under 90 seconds (at super high temperatures)! I’m sharing what I learned so you can make this too. Need a dough recipe? Try out my homemade Neapolitan pizza dough or create your own with our Neapolitan Pizza Dough calculator.
A very special thank you to Rosehill Sourdough (who I understand also loves pizza!) and the pizza community for sharing many of these tips!
The Ooni Volt
If you’re not familiar with this little pizza oven, let me give you a brief overview.
The Ooni Volt is an indoor/outdoor electric pizza oven (one of the features that I love). It reaches 850°F in 20 minutes, has precise temperature controls between 150-850°F, features dual heating elements (top and bottom) for even cooking, includes a cordierite baking stone (13.2-inch wide by 0.4-inch thick), and cooks Neapolitan-style pizzas in 90 seconds (wooo!). I make pizzas up to 12 inches in size in the oven comfortably. That may seem a bit small to some people, but remember that Neapolitan pizzas are meant to be personal pizzas, so that is plenty big.
It operates on standard 120V power, and has a compact 16.7 x 15.7 x 9.8-inch footprint (sitting on your counter). This oven also includes features like a timer display (first knob), temperature display (second knob), and a boost/balance function (third knob) that boots heat between bakes or balances the top/bottom heating elements (third knob).
New to the Ooni Volt? Start with Ooni’s excellent 10-minute guide on YouTube that covers everything from basic controls to maintenance. You’ll learn about the three main dials (timer, temperature, and balance/boost), plus essential operation, cleaning, and storage tips. Quick note: depending on your region, your oven may display temperatures in either Fahrenheit or Celsius. The video shows Celsius, but don’t worry if yours is different!
Essentials
Before you start your pizza, grab everything you’ll need.
Aside from the obvious, which is your Ooni Volt electric pizza oven, you’ll need a reliable infrared thermometer, and a pizza peel or peels to launch and retrieve the pizza. The peels are not optional, unfortunately. I didn’t have a small one on-hand when I bought this oven and quickly learned that I needed one to use this oven.
The word “peels” is pluralized because I prefer wood for launching and metal for retrieving, but you can use either. I feel like pizza dough slides more easily off of wood, and it is easier to retrieve with a thin metal peel, but that’s just my preference.
Make sure the peels are sized to fit inside the Ooni Volt. Since the stone is just a tad over 13 inches, you’ll want a peel 12 inches or smaller in diameter.
The infrared thermometer is needed to check your stone temperature. The temperature is vital to know when the oven is ready and if it’s too hot or not hot enough.
And, of course, you’ll also need your prepared pizza dough (65-67% hydration) and favorite toppings.
The 90-Second Perfect Bake
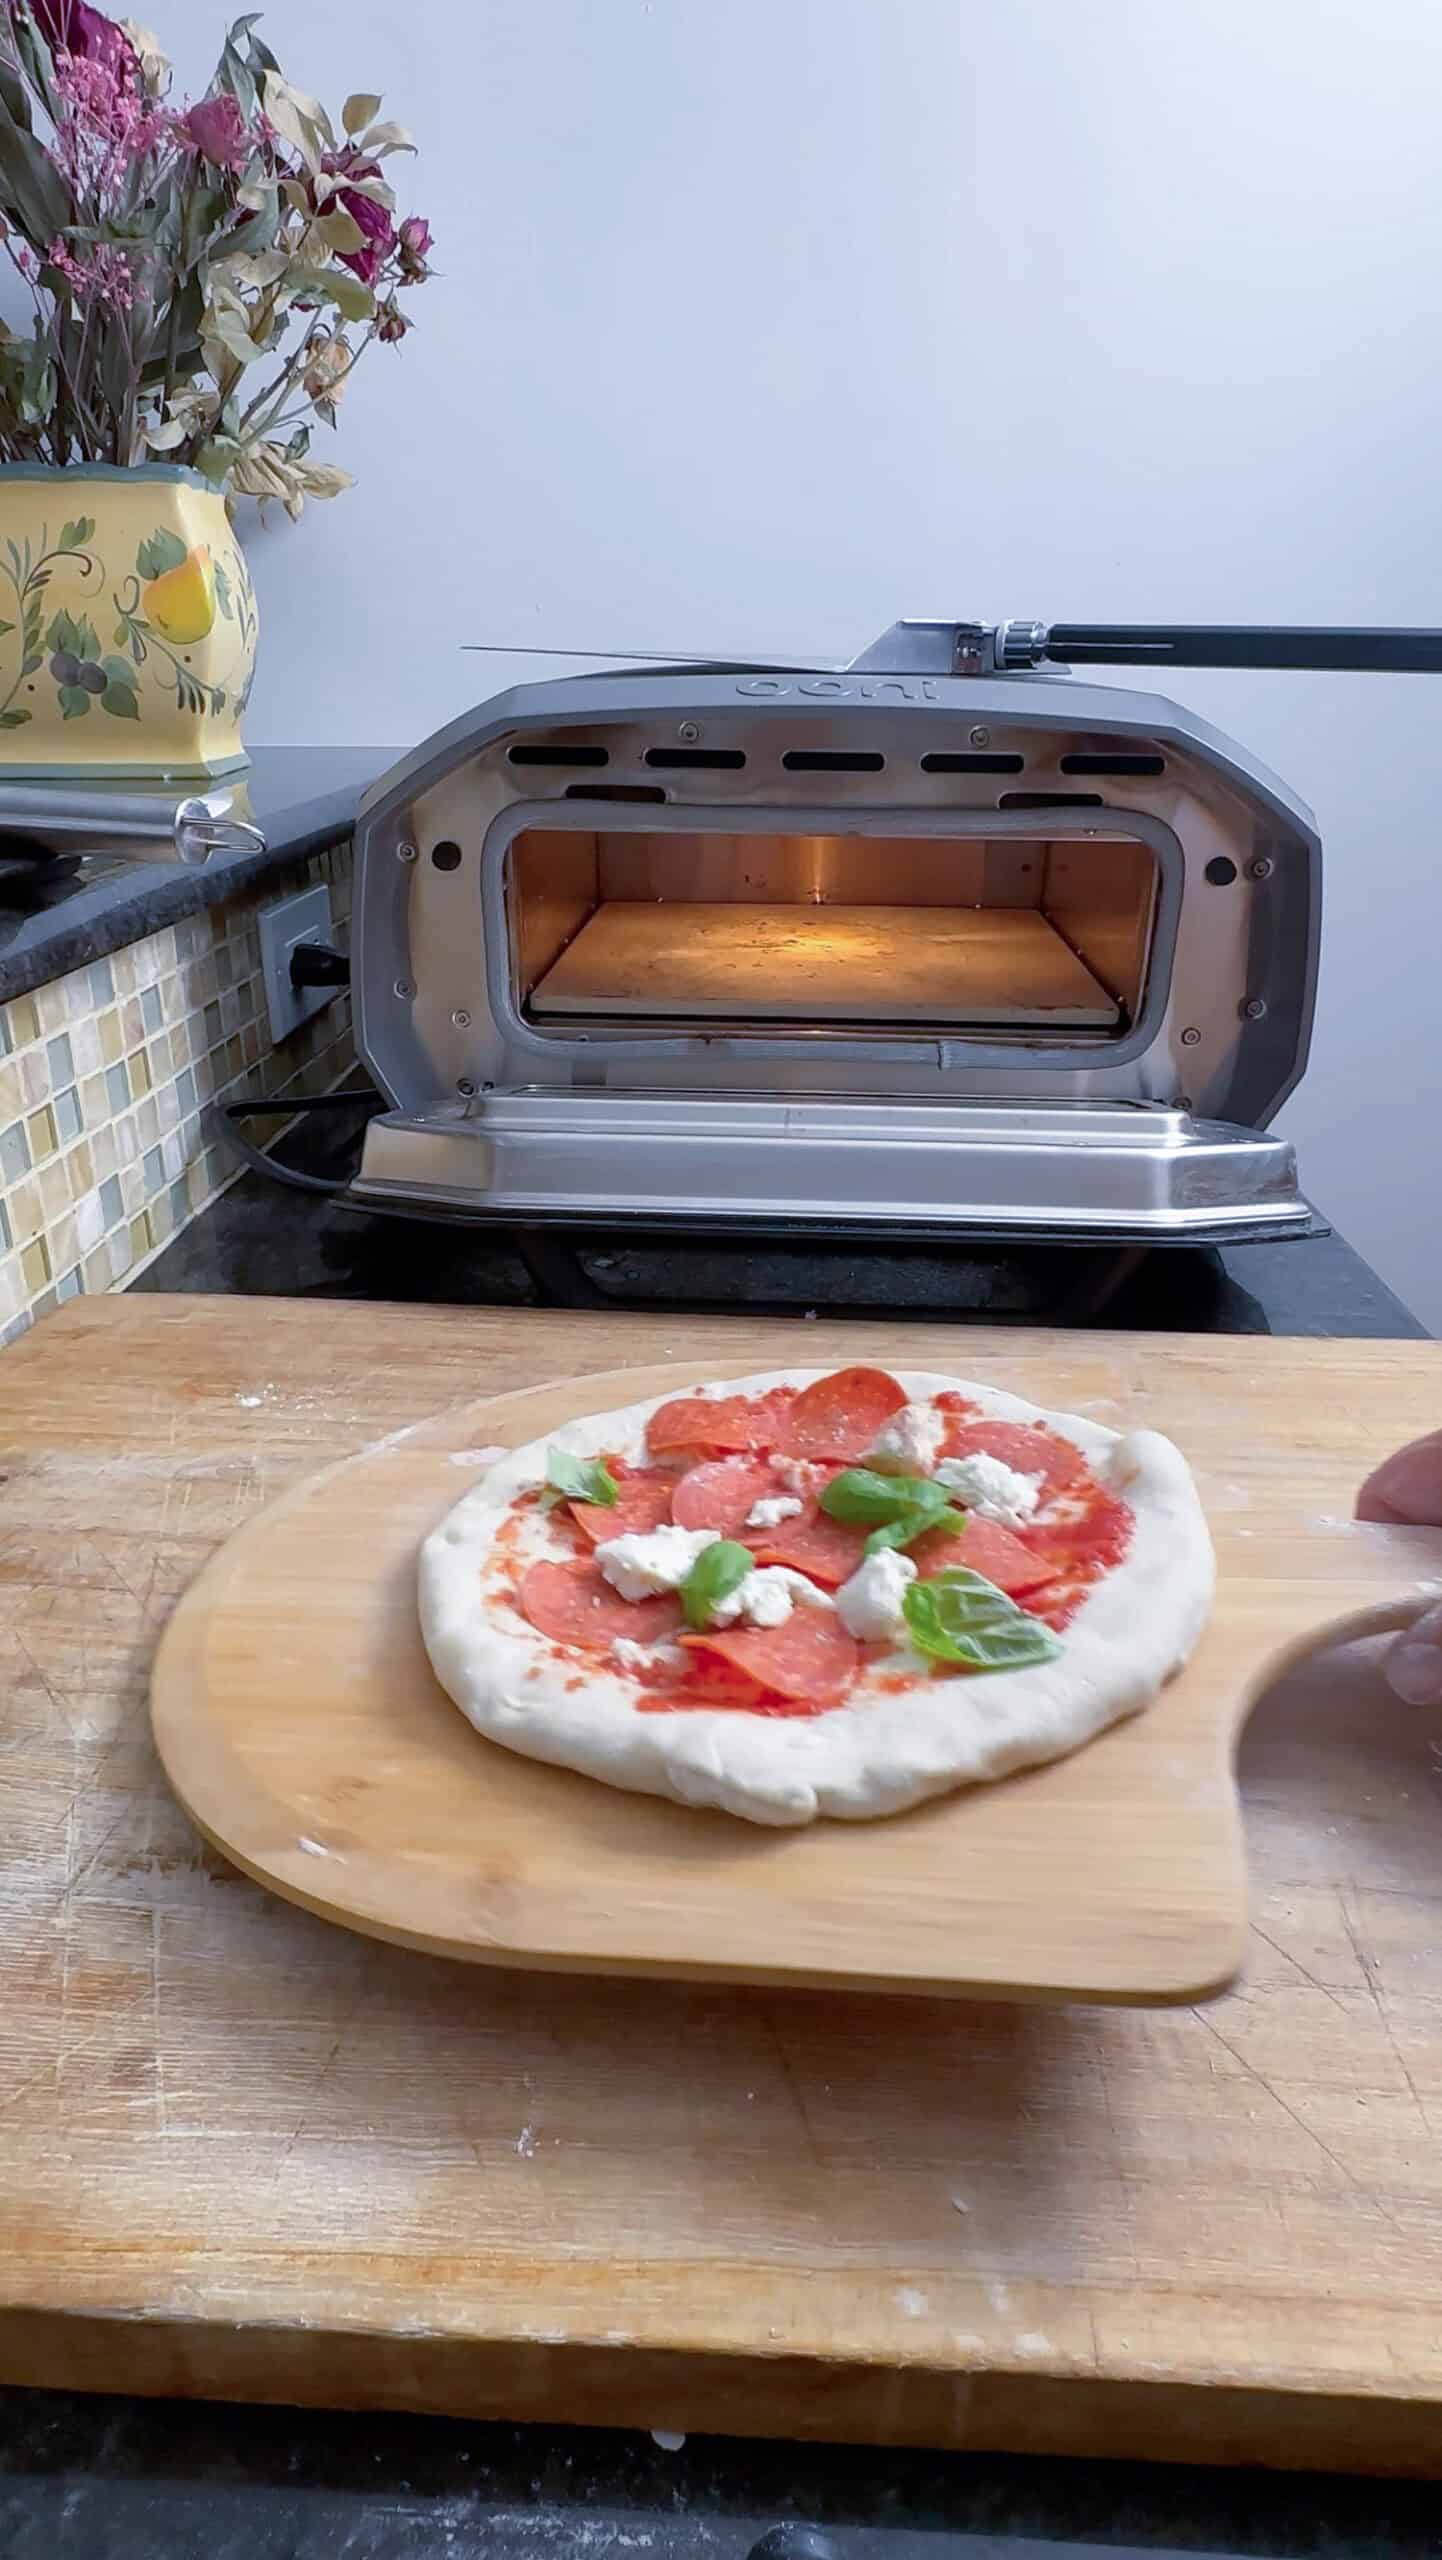
After making your Neapolitan dough (and this dough is traditionally only flour, water, salt and leavening/yeast), take your dough balls out of the refrigerator about 4 hours before baking in order to warm them up. Cold dough will puff up like crazy (baked cold) and also will be hard to stretch. The dough balls should reach room temperature, ideally between 68-72°F (20-22°C), before you begin stretching them to a diameter of 10-12 inches (25-30cm).
Set Up and Preheating
Place the Ooni Volt on a heat-resistant surface with good ventilation. If necessary, only when completely cool (!!), carefully flip the stone so that any residue from a previous bake is burned off during this bake.
Begin by preheating the oven to 800°F (427°C) and allow at least 20 minutes for complete heat saturation. Use your infrared thermometer to verify the stone has reached at least 750°F (399°C) across all zones, meaning test the stone temp in various spots.
Adjusting the Temp and Launching
Just before launching your pizza, increase the temperature on the dial to 850°F (454°C) and wait 30 seconds until you see the heating element (peek inside, and you’ll see it on the top) glowing bright red before launching the pizza.
Open the oven door fully and launch your pizza with a quick forward-back motion, positioning it slightly toward the back of the stone. Keep the door open throughout the entire bake to keep the top element burning hot.
Mid-way through the Bake
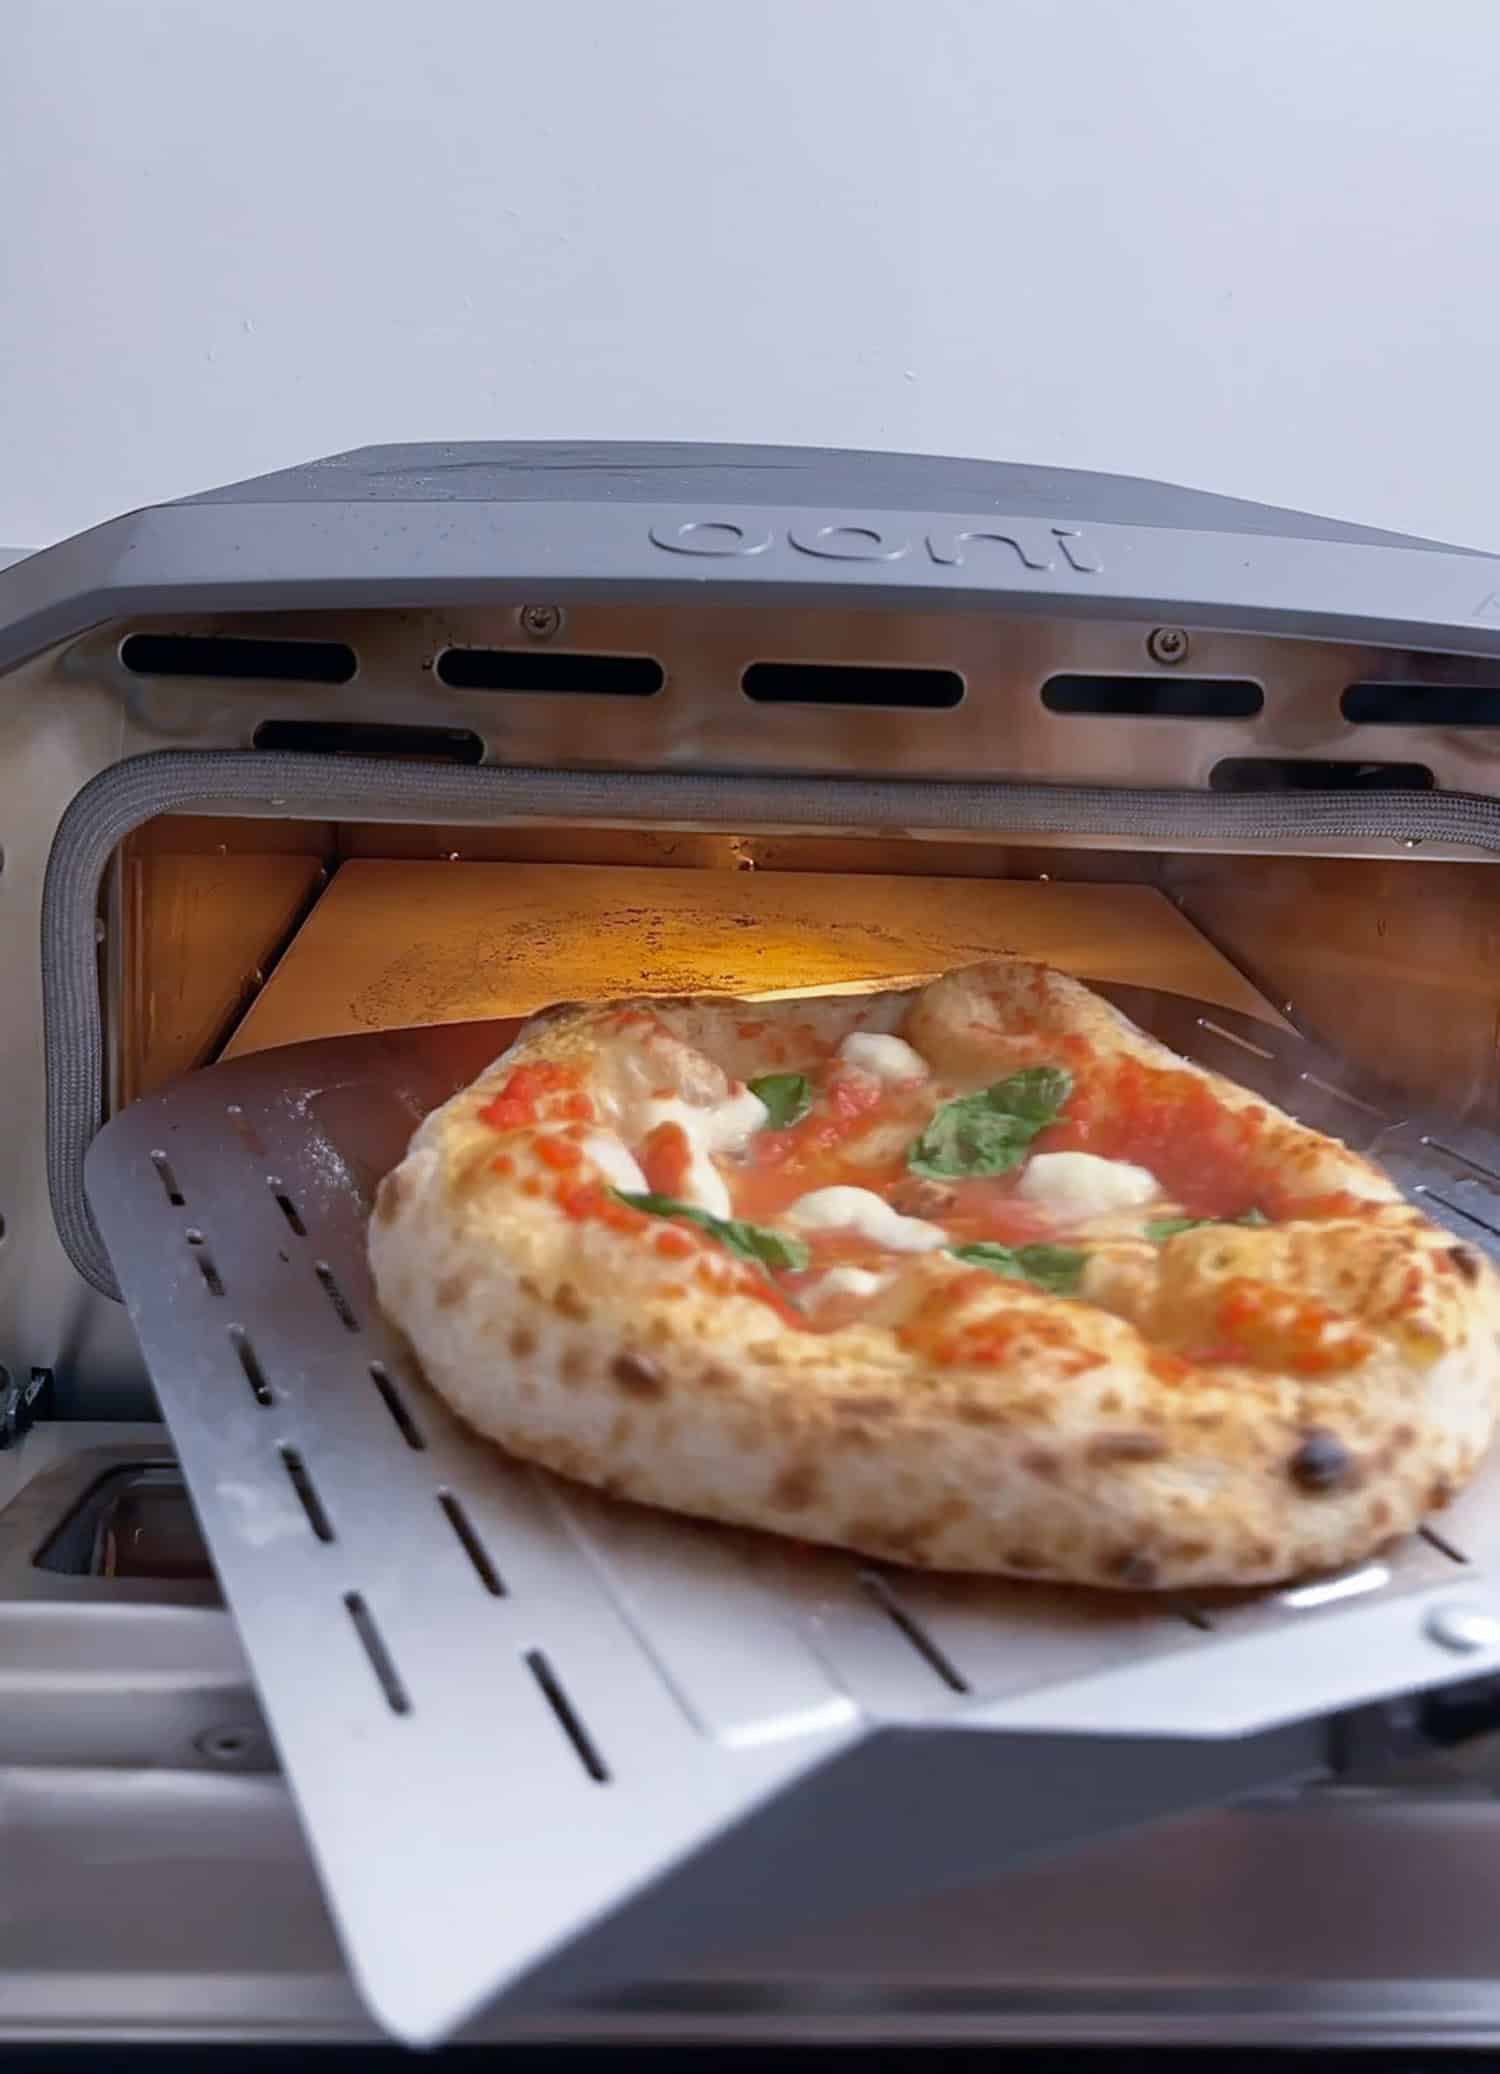
At the halfway mark (30-60 seconds), rotate your pizza 180 degrees (take the pizza out using the peel and check the bottom for even charring and turn it before popping it back into the oven).
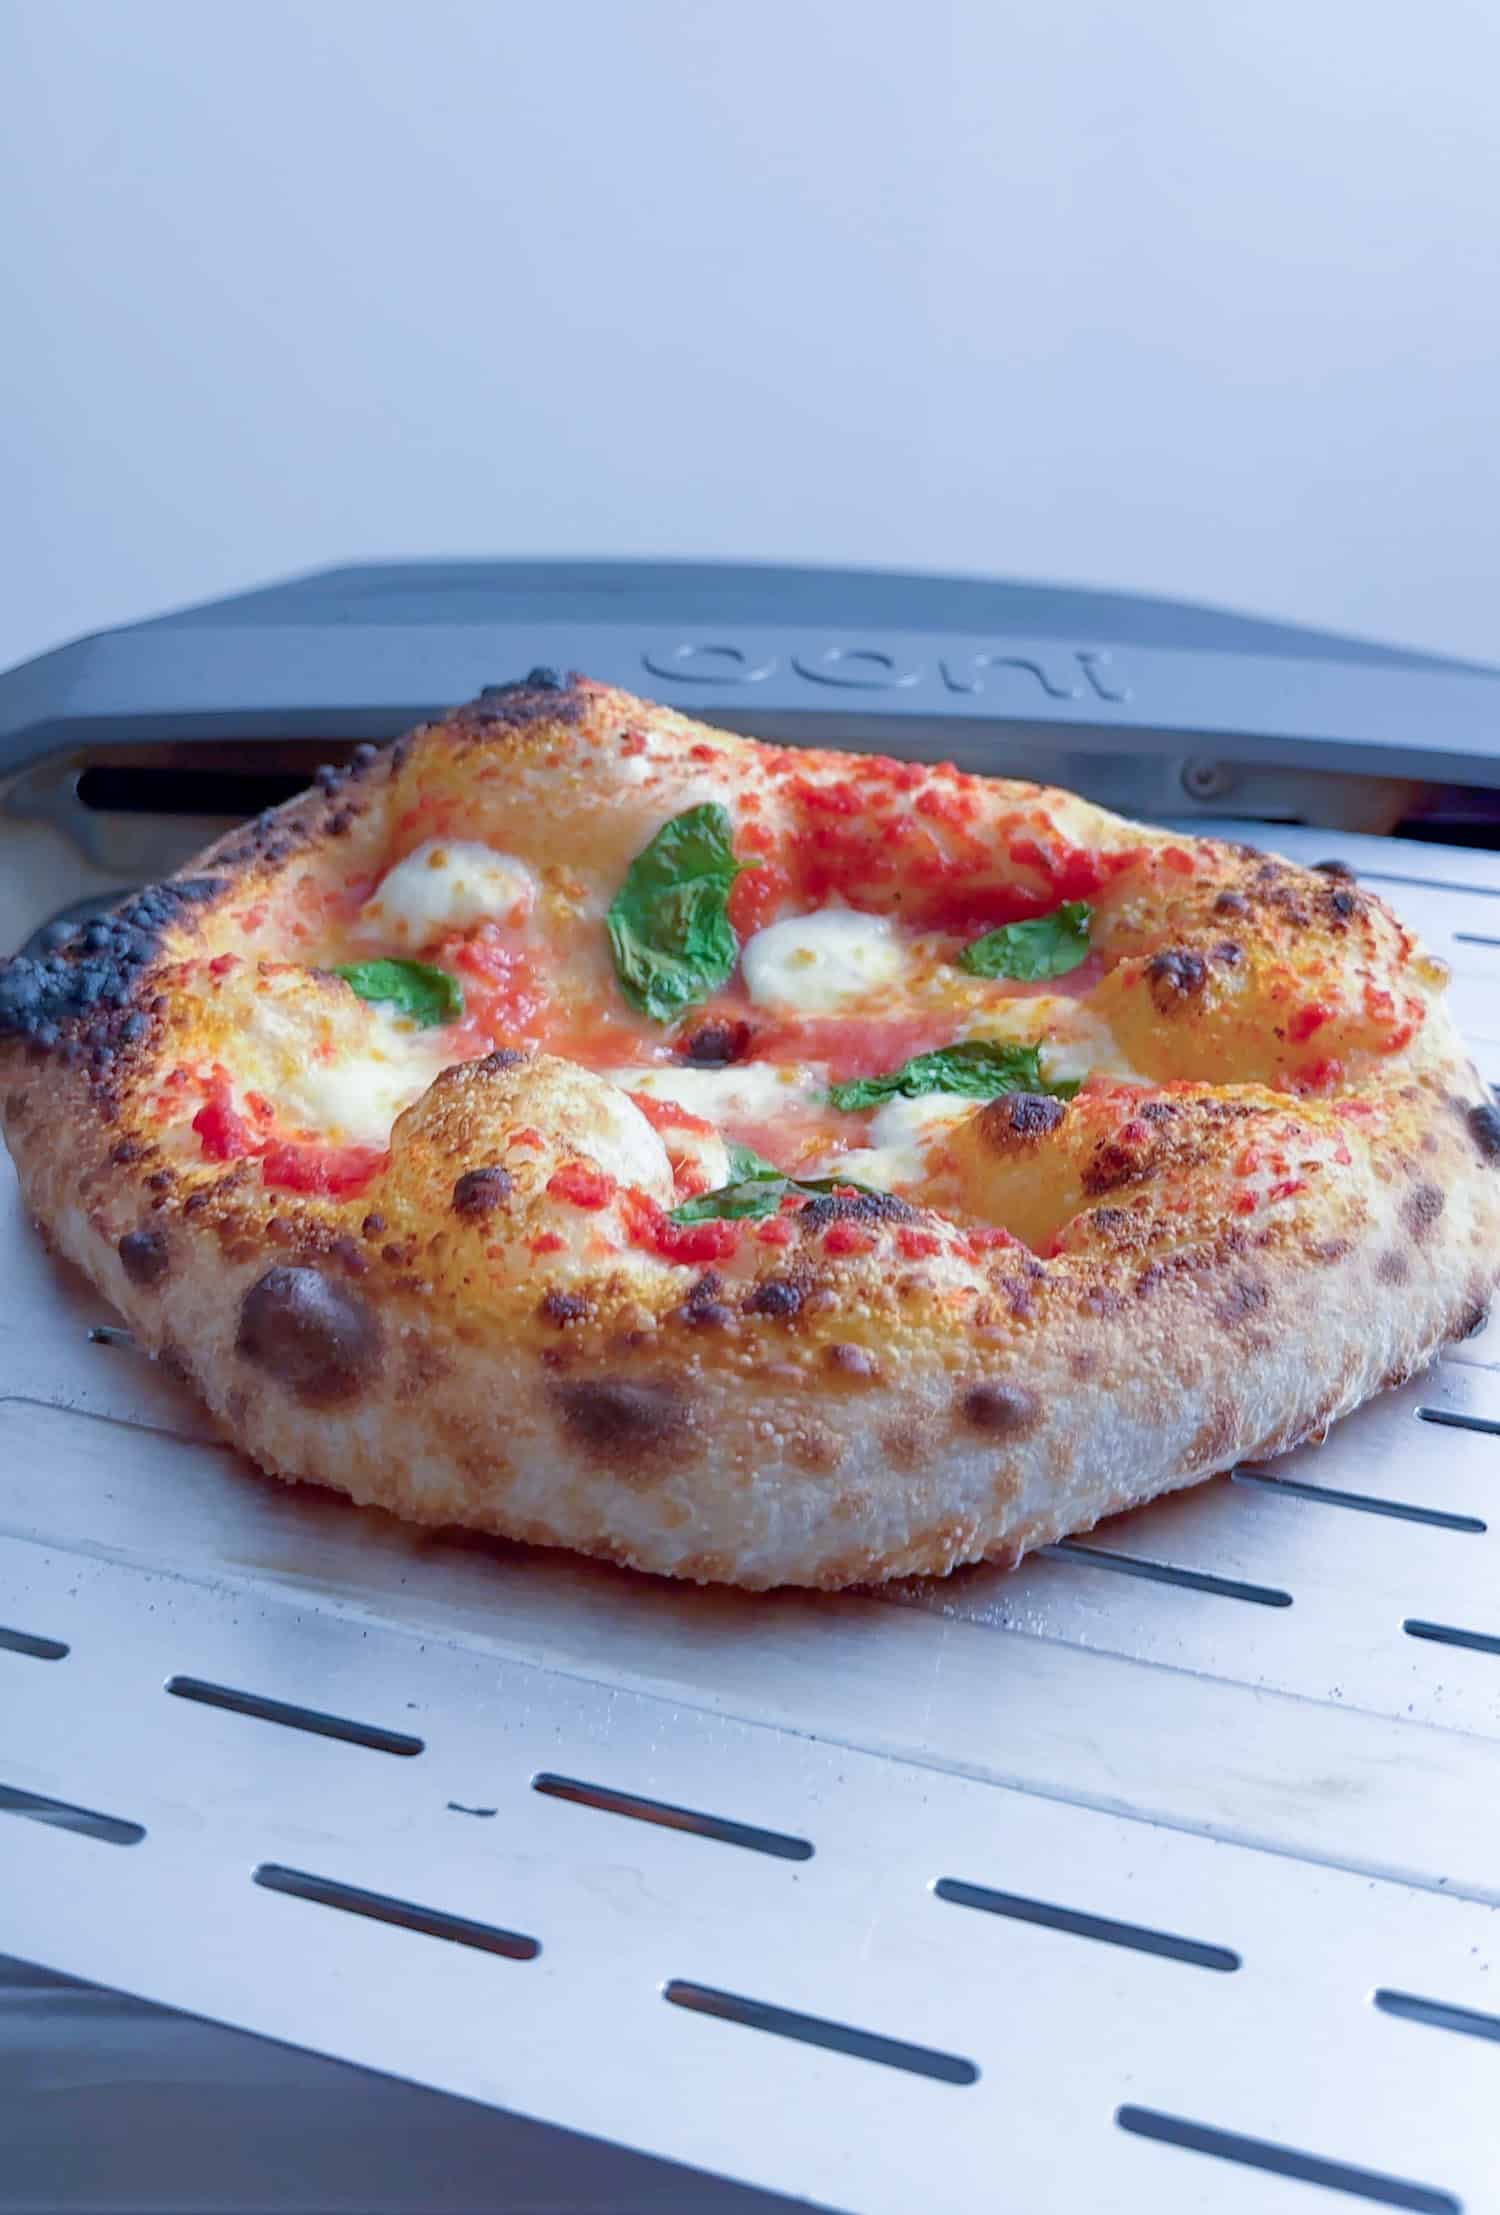
In the final part of the bake, monitor the cheese melt and crust color, looking for proper leoparding on the bottom and the right balance of dark spots and golden brown on the edges. And that’s it!
Managing Multiple Pizzas?
Between pizzas, close the door and verify the stone temperature remains at least 750°F (399°C).
You should also now about the boost function on the Ooni Volt, which provides a 45-second burst of maximum heat. This is activated simply by turning the balance dial fully counterclockwise, a feature designed to help quickly restore stone temperature between pizzas.
If needed, use the boost function by turning the balance dial fully counterclockwise – you’ll see a rapid flashing icon during the 45-second boost period. While waiting, pre-stretch your next dough, but only add any toppings when you’re ready to launch.
Here’s a clear explanatory sentence about the balance dial that could be added when you first discuss temperature controls:
The balance dial on the front of your Ooni Volt lets you control the ratio of heat between the top and bottom heating elements, allowing you to fine-tune how much heat hits the top of your pizza versus the stone beneath it.
Quick Tips Summary for Good Results:
- Keep the door open during high-temp bakes for better char
- Monitor stone temperature with IR gun – aim for minimum 750°F before launch
- If getting too much char before the bottom is done, reduce dough hydration by 2-3% (and make sure that stone is hot enough!)
- Between multiple pizzas, use the boost function (lightning bolt) to recharge stone
- Take IR readings in three spots – front, middle, and back of stone
- Pre-stretch next dough while current pizza cooks, but don’t top it until you are ready to launch
- For stuck residue, wait for stone to cool completely before scraping at 45-degree angle (I like using a bench knife) and flip the stone after each use (after it has completely cooled). One of my favorite tips!
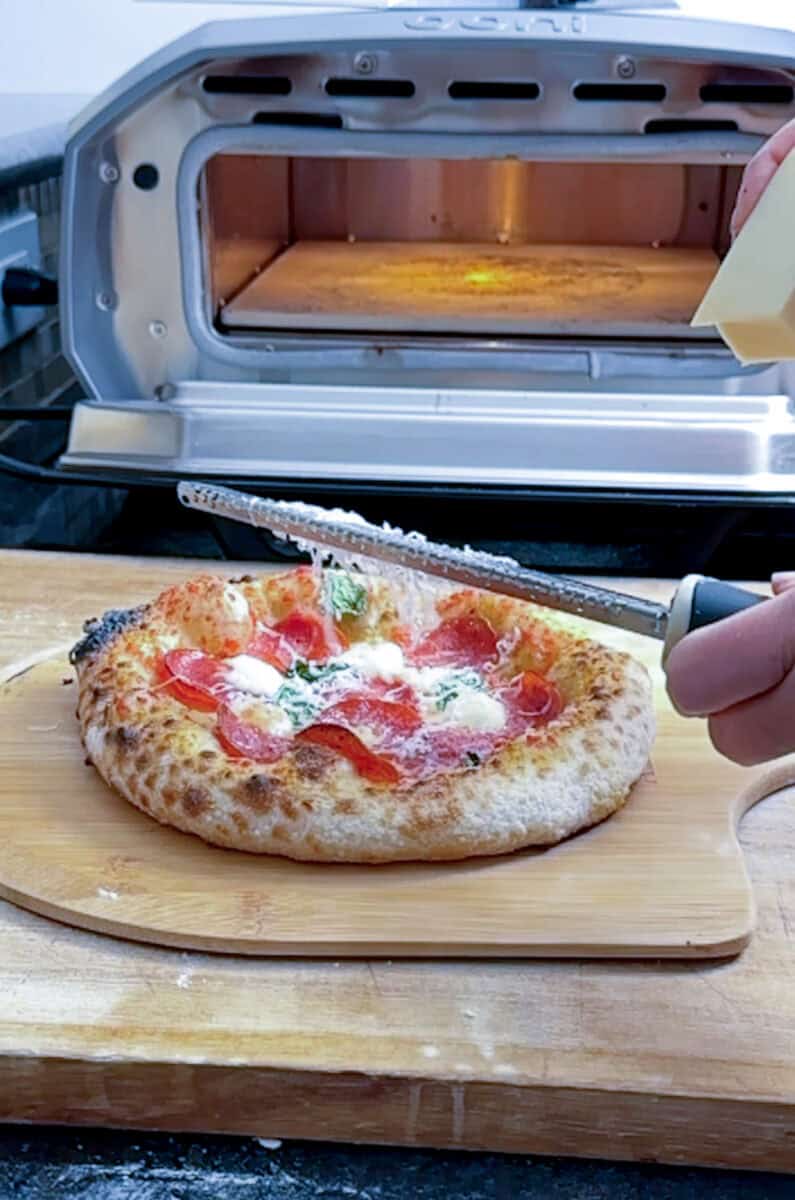
- Keep toppings and cheese to a minimum – these make the pizza soggy and also make it harder to launch the pizza. Also I like to dry off the cheese a bit as excess water tends to accumulate.
🍕 Equipment Recommended
These are the tools that I regularly use for this recipe:
Ooni Volt Pizza Oven – indoor baking with precise control
Digital Scale – essential for consistent dough
Steel Peel and Wooden Peel – for easy launches (wood) and retrieving (steel).
♥️ Loved this recipe? I’d be thrilled if you’d rate it ⭐️ and share your experience in the comments below! Your ratings and comments help other readers discover this recipe and keep this blog going. Did you add any special tweaks? Our community of home cooks would love to hear about it! ♥️
📖 Recipe

Baking Neopolitan-Style Pizza at Home in the Ooni Volt
Click the heart icon ♡ above to save a recipe. To find your saved recipes later, click the heart icon on the right side of the screen near the search icon and select My Favorites.
Equipment
- Infrared (IR) thermometer to read the stone temperature
- wooden and/or metal pizza peels 12 inches wide or smaller; it must be smaller than the oven cavity, which is a tiny bit over 13 inches wide.
Ingredients
- 250 g (8.8 oz) Neapolitan pizza dough 60-65% hydration (use our Neapolitan pizza calculator to change the hydration or use our Neapolitan pizza dough recipe) (see Note 1)
- 80 g (2.8 oz) San Marzano tomatoes crushed
- 80 g (2.8 oz) fresh mozzarella torn into chunks and patted dry
- Fresh basil leaves
- Extra virgin olive oil
- Sea salt
Instructions
- Preheat to 800°F (allow at least 20 minutes) and wait for the stone to reach at least 750°F (use IR gun and measure stone temperature in three spots)
- Stretch dough to 12 inches or your desired size, on a lightly floured surface
- Before dressing the pizza, brush off as much flour as possible from the dough (top or bottom).
- Transfer the dough to a lightly floured pizza peel (try to minimize this as excess flour will burn the bottom of your pizza), and then top with crushed tomatoes, leaving a 1/2 inch border, and add mozzarella chunks. Give the pizza a few shakes throughout this process to ensure it's not sticking.
- To prevent the pizza from sticking on the peel: (1) Make sure your wood peel is completely dry and rub flour INTO the peel, keeping very minimal flour on top. (2) If you are new to this, please minimize the toppings as they make the pizza more challenging to transfer.
- If the pizza sticks: (1) you can try carefully lifting an edge, throwing a bit of flour under it, and then shaking the pizza on the peel. (2) Ooni also suggests lifting the edge and blowing under the pizza to create air pockets (I haven't tried this yet).
- Increase the oven temperature to 850°F to get the top heating element fired up and wait 30 seconds for the element to glow red hot.
- Launch the pizza using a pizza peel (I like to use a wooden peel to launch and a metal peel to retrieve it) with the door open and leave the door ajar. Cook for 30 to 45 seconds, rotate 180 degrees, and bake for 30 to 45 seconds until charred.
- Remove the pizza, and add basil and olive oil. Rest for 1 to 2 minutes before cutting.
Making More than One Pizza?
- If you are making more than one pizza, keep the door closed between pizzas and use the boost function only if needed to reheat the stone (use an IR thermometer to measure the stone temperature).
- To use the boost function, turn the balance dial entirely to the left (ie, counterclockwise). You will see a flashing icon showing that it has been engaged to boost the temperature for 45 seconds. Note this function will not work if the oven is in the process of coming to temperature. Boost can be stopped by pressing or turning the dial at any time.
Notes
Quick Tips for Better Results:
- Keep the door open during high-temp bakes for better char
- Monitor stone temperature with IR gun – aim for a minimum 750°F before launch
- If getting too much char before the bottom is done, reduce dough hydration by 2-3%
- Between multiple pizzas, use the boost function (lightning bolt) to recharge stone
- Take IR readings in three spots – front, middle, and back of stone
- Pre-stretch next dough while current pizza cooks, but don’t top until ready to launch
- For stuck residue, wait for stone to cool completely before scraping at 45-degree angle and flip the stone after each use (after it has completely cooled).
- Keep toppings and cheese to a minimum – these make the pizza soggy and also make it harder to launch the pizza.
Comment Policy
I’d love to hear from you! Questions, tips, and respectful feedback are always welcome! Comments that are abusive, disrespectful, or intended to provoke may not be approved. (Updated 6/25/2026)