The Best New York Style Pizza Dough and 14 Tips for Success!!
This post may contain affiliate links. For more information, please see our disclosure policy.
This NY style pizza dough recipe has been winning over home pizza makers for nearly 15 years, earning rave reviews from professional pizzaiolos and native New Yorkers alike. Many years ago, my own quest for the perfect crust lead me to this tried-and-true formula based on wisdom from the pizza masters at www.pizzamaking.com and the late great Dough Doctor, Tom Lehmann. With thousands of successful bakes and countless testimonials from both pros and Big Apple natives who say “this is the real deal,” this recipe continues to help home bakers achieve that authentic New York pizzeria experience in their own kitchens.
Important Variables
Making NY style pizza dough is definitely somewhat of an art form. There are so many variables that can be changed aside from the ingredients alone. For example, these variables include:
- oven temperature
- temperature of the water used to make the dough
- proofing methods (room temp vs cold rise)
- order of adding the ingredients (yes, this makes a big difference!)
- mixing time
- use of autolyse
- use of poolish (I don’t do this or the one before, although I have in the past)
And then of course, the toppings which can be simple or as complex as you’d like. But don’t worry too much about all of this – my method is easy and straightforward. Plus, you will make better dough than 99% of the pizza chains out there. You will not want take out anymore!
The Big Secret (How You Proof the Dough)
My all-time favorite dough is NY style dough, which really is classic pizza dough that is stretched out into a thin crust pizza. This type of pizza dough contains water, flour, salt, instant yeast, and olive oil (and sugar especially when baking in a home oven, to help browning).
After it is mixed, it is proofed (left to rise/ferment) in the refrigerator for a minimum of 24 hours and up to 72 hours (it can also be frozen) – this is the big secret. I’ve used the dough up to 5 or 6 days afterwards, so you can essentially prepare dough for the week.
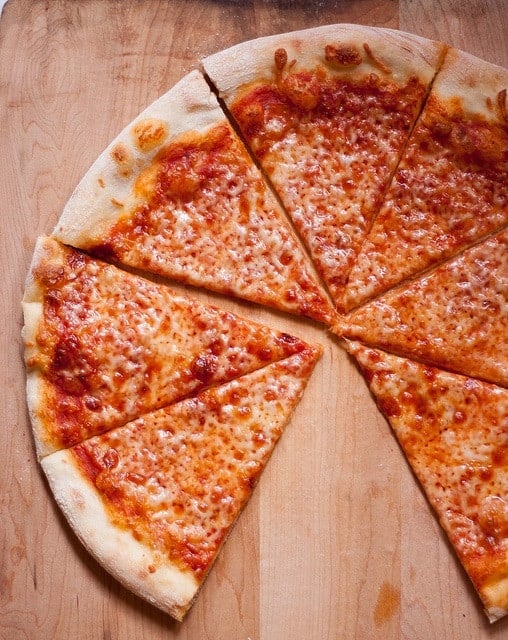
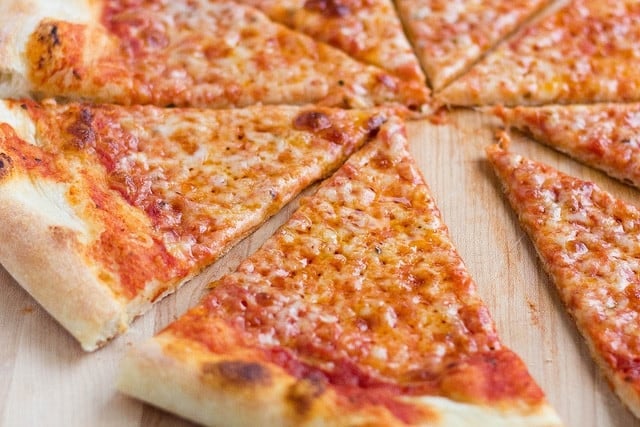
This recipe produces a crisp yet foldable crust that is tender, light, and flavorful and will make enough for four 14-inch pizzas. You can easily double or half the recipe to make 2 or 8 pizzas.
Fourteen Tips for Success
Tip 1: Choosing the flour
Use high-quality flour – I like to use King Arthur’s all purpose or bread flour; higher protein (ie, bread) flours work best. However, I prefer all-purpose flour because I like a lighter, airy crust.
Tip 2: Adding the yeast
Do not add instant dry yeast (IDY) directly to cold or cool water – you may shock the yeast (add the IDY to your flour instead) (please note that IDY differs from active dry yeast, which must be activated by adding it to water).
Tip 3: How much yeast?
Use only enough yeast to “get the job done” – yeast eats the sugar in your flour to produce its leavening effects – I find that if you use too much, your dough will be tasteless (this is just my opinion); however, it is a fact, that too much yeast can make your dough taste bad. Most recipes out there, some of them in well known, published books contain too much yeast!
Tip 4: Cold ferment that pizza dough!
Always use your refrigerator. The best NY style doughs “ferment” or “cure” in the refrigerator for at least 24 hours and up to 48 72 hours. This is called a “cold rise” (vs warm rise on your kitchen counter).
The refrigerator is used to retard (or slow) the dough’s fermentation, allowing that distinctive flavor to come through (ever wonder why some pizza crust tastes different than others, despite the fact that they are both made from just about the same exact ingredients? – this is a big reason why!)
When your dough rises too quickly, the flavor will not develop optimally. Slow rise = MUCH better flavor.
Tip 5: Weigh those ingredients!
Use a scale to weigh the flour instead of using a measuring cup – it is much more accurate and will yield superior results. I’ll admit, I resisted doing this for a loooong time. Just do it. You’ll be glad you did and your dough will be more consistent and much improved.
Tip 6: Add oil last
Mix the oil in as the last step, after the flour has all been incorporated. This is important to allow the flour to hydrate properly.
Tip 7: Flour your dough balls
Before tossing or opening your dough balls, flour them *very* well on each side (if you are a beginner) to ensure they do not stick to your counter or pizza peel. I sometimes use a bit more flour after I begin spreading them.
Tip 8: Keeping those rims a bit puffy
Take care not to “degas” the rim of your pizza as you are spreading your dough! Do NOT ever use a rolling pin! There are many different methods to spread/open your dough ball. I hope to add a few pictures someday of this process.
Tip 9: Baking pizza in a home oven
Ensure that your oven is preheated for a sufficient amount of time (about 1 hour) and bake the pizza within 6 to 8 inches of the top of your oven (ie, your broiler) so that the tops browns sufficiently in conjunction with the bottom of the pizza.
Do not place the stone near the bottom of your oven. I made this mistake for too many years.
After your stone has been preheated sufficiently, the heat from the stone will cook the pizza from the bottom and you can switch the broiler on if you find you need more browning on the top (I now use the broiler to bake my pizzas…more on this sometime in the future).
If you find that your cheese is browning well before your rim attains sufficient color, use partially frozen cheese (ie, place shredded cheese in the freezer while the oven is heating up) and cold sauce or you can drizzle just a bit of olive oil on top of cheese.
Tip 10: Use a pizza stone or steel
Use a pizza stone if you have one. The stone with draw moisture out of the dough and produce a beautifully crisp crust. I use a pizza steel because my stones kept breaking.
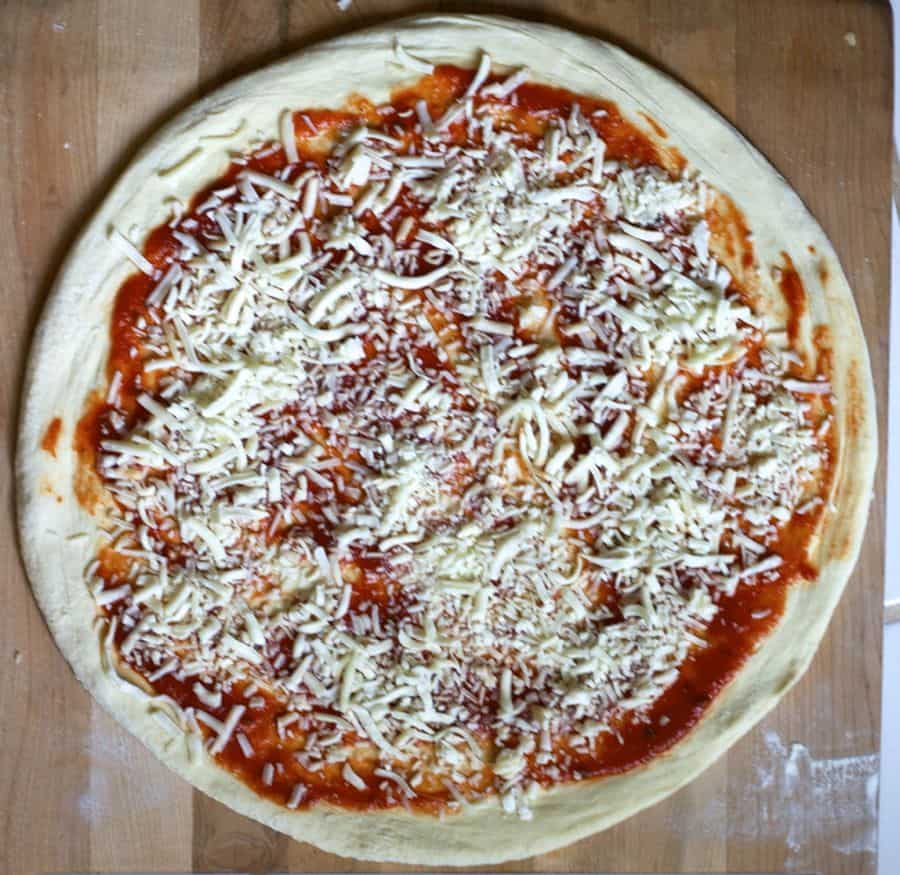
Tip 11: Use just the right amount of sauce
Do not use too much pizza sauce – it will make your pizza soggy
Tip 12: Find the right kind of cheese
Do not use low fat cheese to top your pizza or pre-shredded cheese (the former will not melt sufficiently and the latter contains additives that prevent the cheese from sticking together and therefore does not melt very well). The best is low-moisture, whole milk mozzarella.
If you must use pre-shredded cheese, I’ve found that adding the sauce on top of the cheese helps with the melting. Also, do not use too much cheese; apply it sparingly so that you can achieve that mottled NY pizza appearance.
Tip 13: Flour your pizza peel
Use semolina or flour on the bottom of your pizza peel to prevent the pizza dough from sticking but be careful not to overdo it because it will burn.
Tip 14: Learn to launch that pizza
Give the pizza peel a few very small quick jerks to make sure the pizza will easily slide off your pizza peel before attempting to transfer pizza to the oven, and more importantly, rub flour into the peel before placing the dough on top.
Stretching the Pizza Dough
A nice video (from The GoodFellas Pizza School of NY), showing how to stretch the dough:
Freezing the Dough
- After mixing dough and dividing into balls, place dough in refrigerator for at least 24 hours.
- Place dough balls on baking sheet lined with plastic wrap or parchment paper, cover loosely with plastic wrap and freeze until firm (~ 2 to 3 hours or up to overnight).
- Wrap frozen dough balls individually in plastic and store in zipper-lock bags for up to 4 weeks.
- When ready to bake, transfer unwrapped dough into the refrigerator for 12 to 24 hours before making pizza.
- Bring dough to room temperature for 20 to 60 minutes before baking (less time for hot kitchen/summer and more time for cool kitchen)
Pizza Dough Calculator
Need more dough? Less dough? Try out our new Pizza Dough Calculator to calculate the weights to get it just right!
More questions? Please see my NY Pizza FAQ
♥️ Loved this recipe? I’d be thrilled if you’d rate it ⭐️ and share your experience in the comments below! Your ratings and comments help other readers discover this recipe and keep this blog going. Did you add any special tweaks? Our community of home cooks would love to hear about it! ♥️
The Recipe
📖 Recipe

The Best New York Style Pizza Dough
Equipment
- pizza stone or pizza steel for baking
- Standing mixer optional or hand knead
- kitchen scale highly recommended instead of volume measures
Ingredients
Original Recipe for Four 14-Inch Pizzas; want to make more or less? Use the pizza dough calculator
- 6.5 cups (796 g) all purpose flour or bread flour (weighing is most accurate!)
- 2 1/4 cups (493 g) water barely cold water (17.4 oz per 2 1/4 cups)
- 1 teaspoon (3.5 g) instant dry yeast
- 2.5 teaspoons (15.6 g) salt
- 2 teaspoons (7.8 g) sugar
- 1 tablespoon (11.8 g) olive oil
1 Pound of Dough (~454 grams) (use the pizza dough calculator to make more or less dough)
- 2 1/4 cups (274.5 g) all purpose flour or bread flour
- 3/4 cup (170.2 g) water
- 1/2 teaspoon instant dry yeast
- 1 teaspoon salt
- 3/4 teaspoon sugar
- 1 teaspoon olive oil
Instructions
Mixing the Dough
- Place water in mixing bowl.
- In a separate bowl, mix salt and yeast (and sugar if using) into flour
- Combine flour/salt/yeast mixture into water and mix until all the flour has been incorporated.
- After flour has been totally incorporated, add oil and knead for about 4 to 5 minutes (see note)
- Test final dough temperature, which should ideally be between high 70s to low 80s (optional)
Dividing and Rising
- Divide dough into 4 equal pieces (using a digital scale if possible; each ball should weigh 11.5 oz [~326 grams]), shape into a ball, and place in greased, sealed quart-sized container or oiled/greased freezer bag and refrigerate overnight or up to 72 hours (After much experimenting, I have concluded that I like 3 days best but day 2 is good too).
Assembly and Baking
- The following day, remove your dough balls within 1 hour or less of baking and allow the dough to come to room temperature. (the dough will tend to blister more if the dough has not been allowed to come to room temperature however, I often bake coldish dough without problems, just some bubbling)
- In the meantime, place your pizza stone in oven and preheat at 550 degrees (depending on thickness of your stone and your oven’s power) for at least 1 hour
- Open each dough ball using care not to degas, transfer to a pre-floured pizza peel (or on parchment paper), and top with your favorite sauce, cheese, or other toppings.
- Transfer pizza from peel to oven or slide parchment paper onto preheated pizza pan/stone and bake for 4 to 6 minutes each until browned on top and cheese has melted but not burned.
- Enjoy!
Notes
- Use of weight based measurements is highly recommended instead of US Customary. You will need a kitchen scale.
- METRIC amounts DO NOT correspond exactly to the US Customary amounts because, for example, 796 grams equals 6.4 cups (and most can’t measure 0.4 cups or 0.22 cups). Recipe was based on grams.
- Use the Pizza Dough Calculator
- If you want to use the dough the next day, knead a little more (slow speed for about 8 to 10 minutes)
- If you have time to let the dough rest for 3 days, knead for 4 to 5 minutes, low speed or hand knead.
- After mixing dough and dividing into balls, place dough in refrigerator for at least 24 hours.
- Then, place on baking sheet lined with plastic wrap or parchment paper, cover loosely with plastic wrap and freeze until firm (~ 2 to 3 hours or up to overnight).
- Wrap frozen dough balls individually in plastic and store in zipper-lock bags to store for up to 4 weeks (longer may work, but results might vary).
- Before using, transfer unwrapped dough into the refrigerator for 12 to 24 hours before making pizza.
- Bring dough to room temperature for 20 to 60 minutes before baking (less time for hot kitchen/summer and more time for cool kitchen).
- calculate your own using baker’s percentages: 62% hydration, 0.4% yeast, 2% salt, 1.5% oil, and 1% sugar or use my pizza dough calculator.
Omg I tried the dough and for so e reason it came outin shreds n would not come out smooth. Wha am I doing wron?
I will be trying this for my daughter bday party! Very excited but my question is, if I don’t have instant yeast how will I work in the active dry in room temp water? It won’t foam if its room temp right? Also my oven only goes to 500, will that be a problem?
Hi Leslie – you can substitute the active yeast for the instant yeast using the same amount (1 teaspoon). You don’t have to activate the yeast first in water, just mix it in with the dry ingredients as you would the instant yeast. If you feel it’s necessary, test some of your yeast by adding some extra yeast to warm water and sugar and see if it foams. There are some links in my reply to Sophie on 3/21.
Thank you for your quick reply!! 🙂 n I should of kept reading lol I tried to find the oven temp problem n I hope I didn’t skip it. I have an oven that only goes to 500. Is that a problem?
I wouldn’t say that it’s a problem – the higher the better but you can certainly still bake it at 500 degrees. it might take a minute or 2 longer…
Hi Marie,
I have been using an almost exact recipe which is from America’s Test Kitchens. They use ice water and no sugar. I use honey which is recommended by Wolfgang Puck for his pizza dough recipes, and I like it’s mild flavor and browning that it adds to the finished product. I also always use KAF, just 1 tsp. olive oil, and 3 tsp. salt. Always the oven cranked to the highest it will go, and I have a stone and I also sprinkle my peels with corn meal. Also, ATK, recommends that after pre-heating the stone, to transfer it to the top rack of the oven when you begin baking the pizza. They say it’s because it is hotter up there and contributes to a better browning heat.
Sometimes I do a 24 hr. fridge rise, and sometimes I do up to 3 days, but never a same day! I also have a mature sourdough starter that I began in February, which I keep on the counter and feed about every 3 days. I added about 1/4 of it, and adjusted for more water, into your recipe today. Previously, I have been using Nick Malgieri’s pizza dough recipe for a thick and poofy crust and it calls for a whole packet of dry yeast.
But I am excited about your recipe because I have yet to succeed in a good and foldable NY thin crust! Thank you so much.
Hi Gary – I hear you about the same day pizza dough! I had to do one last week because I was behind schedule and it was just ooookay. No flavor. That day or 2 in the fridge makes such a big difference. I used to use starter all the time in my doughs, but I stopped because I found it to be too time consuming (to activate the starter each week) and I felt that I was wasting too much flour (between pouring off all the excess starter and the amount needed to activate it ). It was so good but I feel like this is a very good substitute. I used to bake my pizzas on the bottom shelf, but now I just place my stone on the upper rack about 6 to 8 inches under the broiler and have much better browning than shown in my photos. I need to update the pix. Some folks at pizzamaking.com recommend switching on the broiler after the stone has heated for an hour since the stone is baking the bottom of the pizza but I didn’t have luck with that approach. I think my broiler isn’t hot enough. I’ll have to try Nick M’s recipe. My kids like the thicker crusts…thanks for the tip and hope you like the recipe:)
Tonight was the second time making this pizza, the first time I didn’t have a peel, and it was difficult getting the pizza from a pan to the stone. So I purchased one for under 15 bucks. It was worth every penny. The pizza was excellent the first time but this time was even better. I love NY style pizza, in college there was a NY style pizza place that sold it by the slice. I was a regular, ever since graduation I have been trying to make the prefect home made pizza, I have found it. Thank you so much for the recipe, and the tips. This summer we are going to try to bake pizza on a homemade hog smoker pit. I will let you know how it goes.
Glad to hear that you like it! I’d like to try it on the grill too this summer
I enjoyed reading your post because I too have been trying for years to find the right recipe for a NY style pizza dough. I will be trying this method and hopefully I will have found the end to my search. I was wondering though, can I use self rising flour instead?
Hi Heather – no, unfortunately you can’t use the self rising for this recipe. From what I understand, self rising flour includes baking powder as the leavening agent. I use either active dry or instant dry yeast. The percentage of yeast is very important and what most recipes out there get wrong for NY style dough. I have seen recipes for pizza dough that use self-rising but that wouldn’t work for this particular dough…good luck!
Perfect, I will grab a bag of the Gold as you suggest and try this one out. I really need to stop the search and find a dough I love. I have never heard of a recipe where you do the cold-rise so I am excited to try! Thanks!
I have to say thank you so much! I successfully made homemade pizza that was devoured. I don’t have a pizza stone and wanted to try something a little different so I grilled it on our charcoal grill. I cut the recipe in half and just did 2 crusts. My husband, who is extremely picky and only likes ordering pizza (NY style a must) from one particular place, ate a whole pizza himself. Thank you for the recipe. The video you posted was a tremendous help. That guy really makes it look effortless.
Glad u liked it. I live using the grill but cracked my stone last time so I’m weary of breaking another one….maybe will tr again without
I did it without the stone. I grilled one side, then topped the grilled side and grilled the bottom. I did finish the top under the broiler because the cheese wasn’t quite melted enough. I didn’t want to burn the crust.
I love idea of letting dough sit in fridge. But i have a question: At one of the best NYC pizza restaurants i found out that part of tge secret was using eggwhites in the dough as part of the ingredients. Havent tried it but curious what effect they would have. And not sure if eggwhite in dough or just coated. All i know is that they used eggwhite. Has anyone tried this?
There is a guy named Chau Tran (nickname is “jackie tran”) on the pizzamaking.com website who uses egg is his pizza. He swears by it and says that the egg whites add crunch. I think he may have some YouTube videos out there. I read that the yolk gives flavor and color. I don’t use egg whites or the yolk and so I can’t speak from personal experience, but I suppose it can’t hurt to try!
Or pretty firm and not very sticky?
It’s not a sticky dough and definitely not too stiff either – I’d say soft but not sticky. I plan to post pictures someday. Hopefully that will help.
mine was pretty smooth and soft so i think i did it right! Cant wait to make it on sunday! Will update how it works out for me!
Ok i just made the dough. What should the dough feel like if i am going to let it rise for 3 days? Sticky but not too sticky?
Will the dough differ in texture or taste with active dry?
How do I adjust the recipe TO use active dry yeast?
Hi Sophie- yes u can use active dry yeast. Increase amount by 25 percent (1.25 ts for 4 dough balls) and make sure u activate it first in some of the water that the recipe calls for
So use 1.5 instead of 1 teaspoon for the original recipe? Activate in all the water called for? Or just some of it?
Sophie, I’m going to change my mind and say to use 1 teaspoon- the same as if it were instant. Read the section on active vs instant yeast in this article here: http://www.kingarthurflour.com/recipe/yeast.html
I actually have heard that some people like the taste of active dry yeast better than Instant
Also see response to question number 2 here: http://www.redstaryeast.com/tips-troubleshooting/frequently-asked-questions
Hi again! is it ok if the yeast is active dry yeast in those little jars?
Hi Marie- I live the the Florida Keys and grew up in Philadelphia so I know the difference of good pizza and excellent pie. I’ve tried so many versions of dough down here and just can’t seem to get it right. Up north I had no problem with my dough. Do you have any thoughts on the water type, because we have a different type of water then up north. I made your recipe today and can’t wait until 2 days from now! FYI-I always use kosher salt so I double the amount and, also used active dry yeast and added 1/4tsp. more to it. Does that sound like the correct thing to do. Looked online for conversions. I’ll let you know how I fared. Thank you!
Hi Joe – I’ve read that the mineral content of the water can affect the dough. High mineral water can speed fermentation while lower mineral content can slow it down but I’m not sure that you’d see a big difference in a 2-day cold fermented dough. I’ve never had a problem making dough in Michigan, NJ, or PA, but never made it in Florida:) Your conversions sound good to me. Hope it works out for you! I’m keeping my fingers crossed…
EDIT: Joe, if you are reading this, please see the links in my reply to Sophie, dated 3/21 at 11:24am. The links basically explain that you can now use active dry yeast and instant dry yeast, 1 for 1, interchangeably. No need to increase the amount of active dry yeast next time you make the dough.
I was just about to give up on making homemade pizza until I came across and tried this recipe (and tips for success).
This is exactly what I’ve been looking for! I can’t wait for Football season later this year, it’s going to be wings, ribs, and pizza!
Glad it worked for you!! Enjoy;)
Sorry one more question! Does the dough taste more like NY style if is left to rise 3 days?