Soft, Fluffy Shokupan (Milk Bread): A Must Try Bread !
This post may contain affiliate links. For more information, please see our disclosure policy.
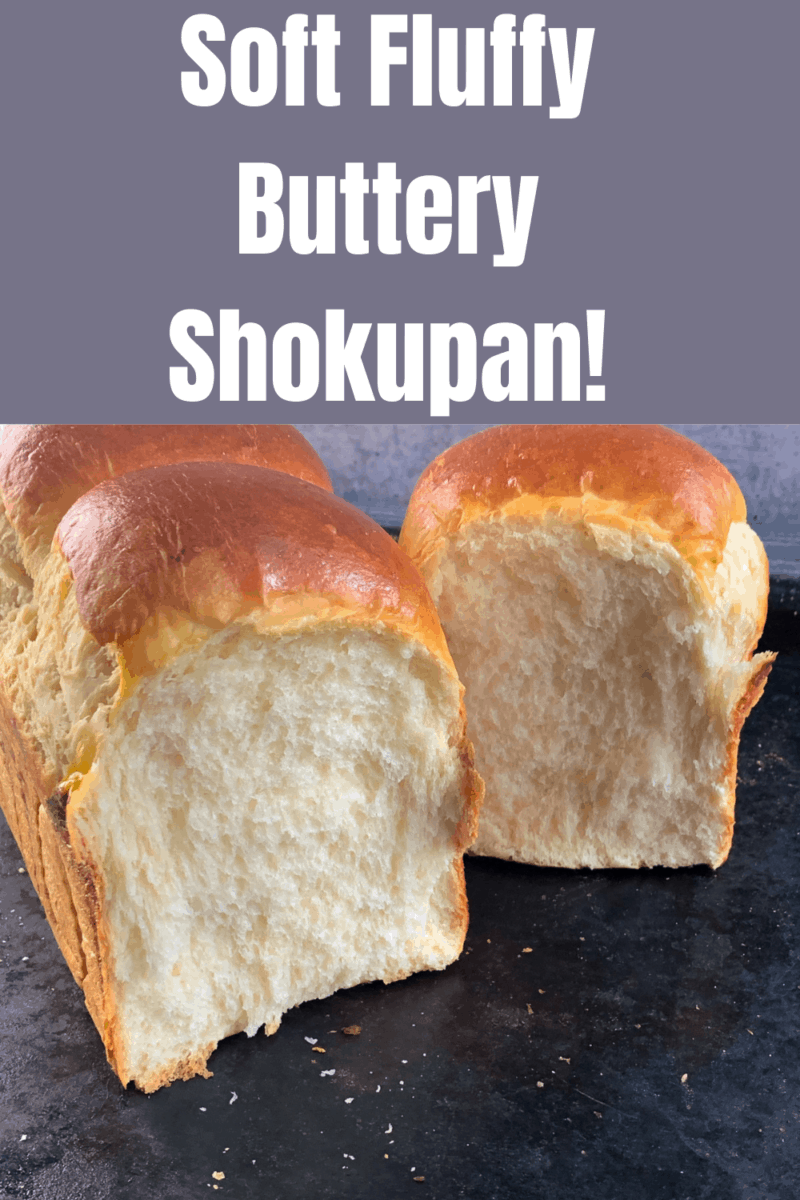
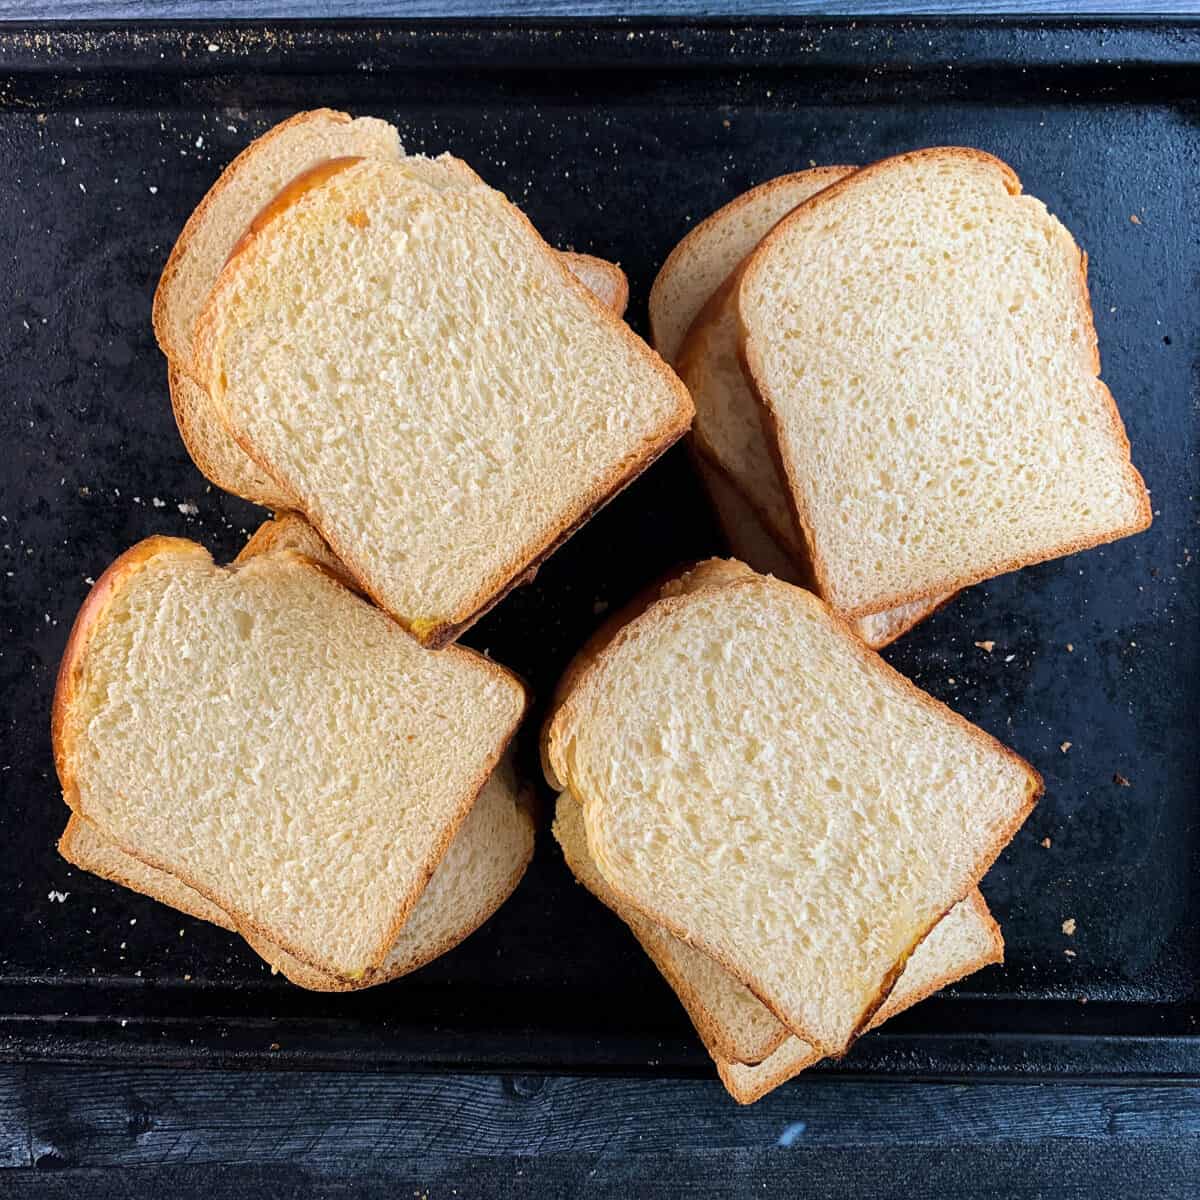
Shokupan (milk bread) is American white bread’s much more sophisticated Japanese cousin – it’s a much more flavorful and substantial bread, despite its soft, fluffy, buttery crumb. Think of shokupan as a fancy white bread! Great for sandwiches. Once you bake this, you’ll probably never want to buy or eat another slice of boring store-bought white bread again! Make a loaf, start to finish, in about 3 hours or less.
Jump to:
- What is Shokupan? And Why We Love It! 🥰
- Factors that Contribute to the Softness
- Ingredients
- What is Tangzhong?
- Tangzhong: Mixing and Storage
- Water Roux Methods: Tangzhong vs Yudane
- Shaping Method
- Tips for Making
- Baking in a Pullman Loaf Pan
- When is the Bread Finished Baking?
- How to Enjoy Milk Bread
- 🍕 Equipment Recommended
- 📖 Recipe
What is Shokupan? And Why We Love It! 🥰
At its most basic definition, “shokupan” is the Japanese term for sandwich bread. So, shokupan is simply a form of white sandwich bread, also referred to as milk bread..
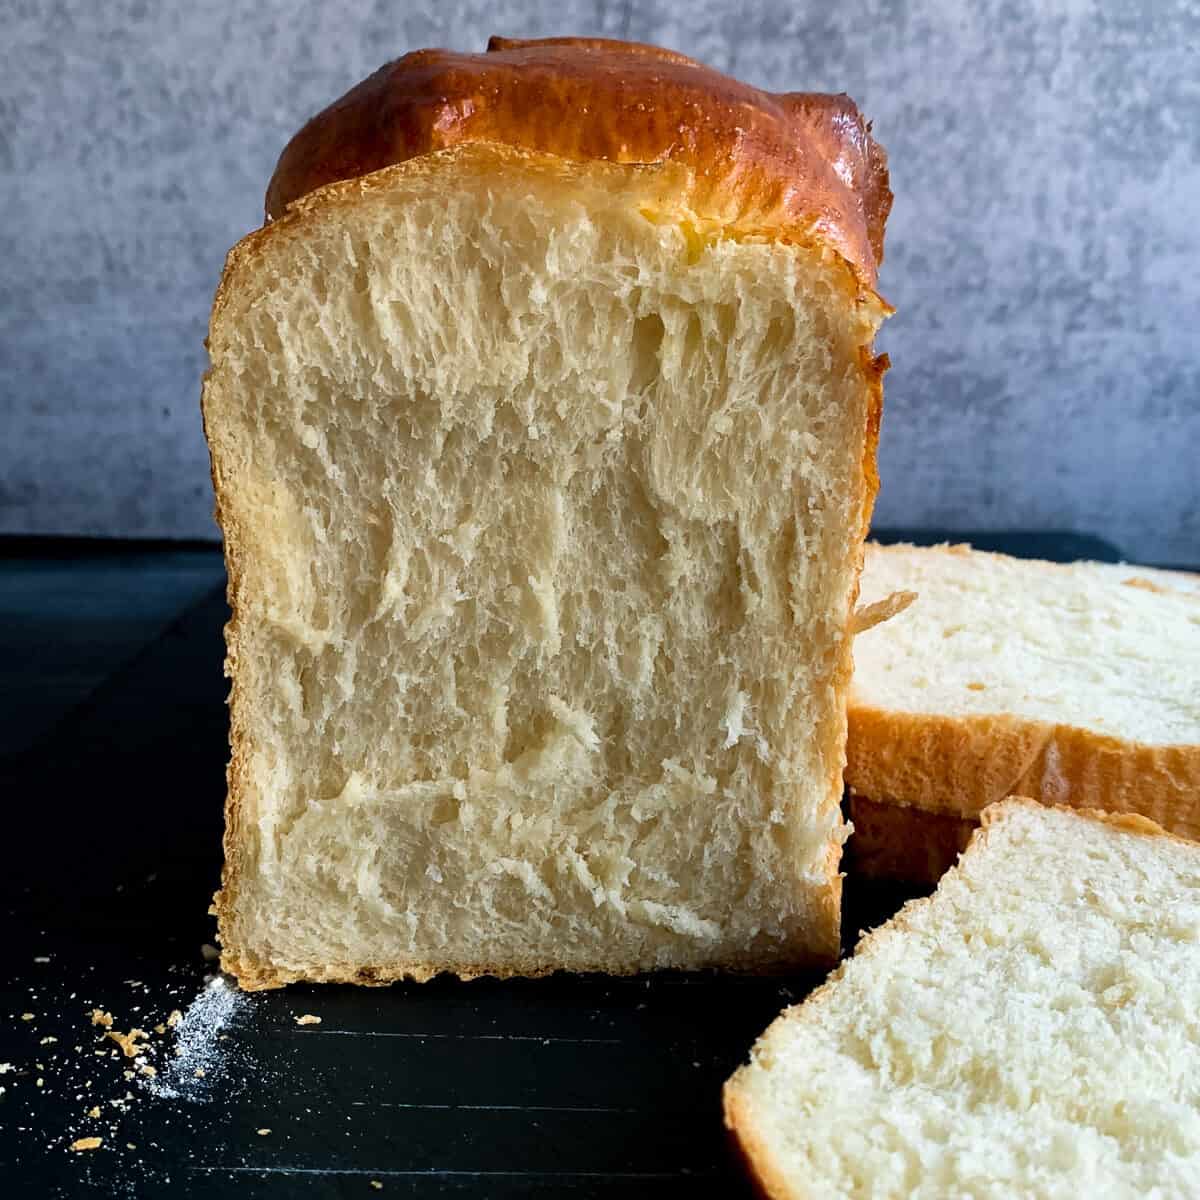
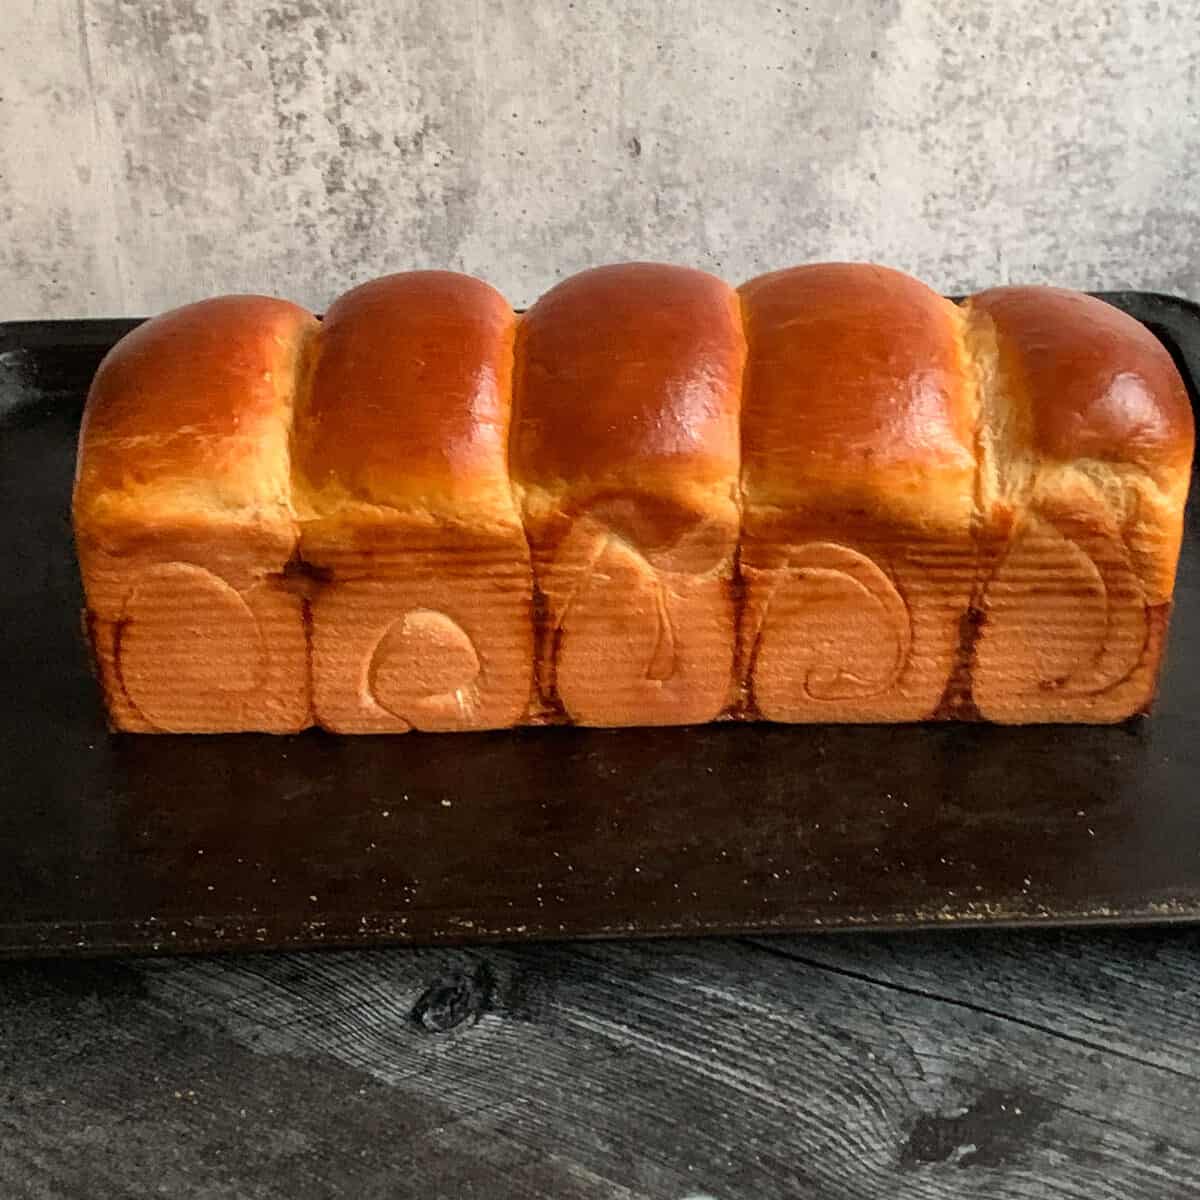
In fact, shokupan can be found at most Japanese bakeries, much like baguettes can be found at most French bakeries. Most shokupan is shreddably soft, and often appears perfectly square, a characteristic that reflects how the bread is baked (for example, in a Pullman style loaf pan, with the lid on). This version is based without a lid, so it’s not perfectly square.
Because many Asians are rumored to favor sweet milky bread, the term shokupan appears to be synonymous with Japanese milk bread. Typical Japanese milk bread has been said to have 7 times the fat compared with American white bread according to Modernist Bread’s Larissa Zhou.
However, one of the benefits of baking with a water roux (tangzhong), as will be discussed below, is the production of a moist loaf of shokupan without the need for a very high fat content.
According to the NY Times, milk bread was developed in 20th century Japan, using tangzhong. Although, curiously, I have seen at least one recipe for Japanese milk bread that do not contain milk.
Factors that Contribute to the Softness
The tender soft crumb you see in most shokupan can be attributed to several factors:
- Shokupan is an enriched bread, meaning the bread often contains one or all the following: milk (in addition to or in place of water), sugar, and butter (and sometimes egg) – all of which contribute to a more tender crumb.
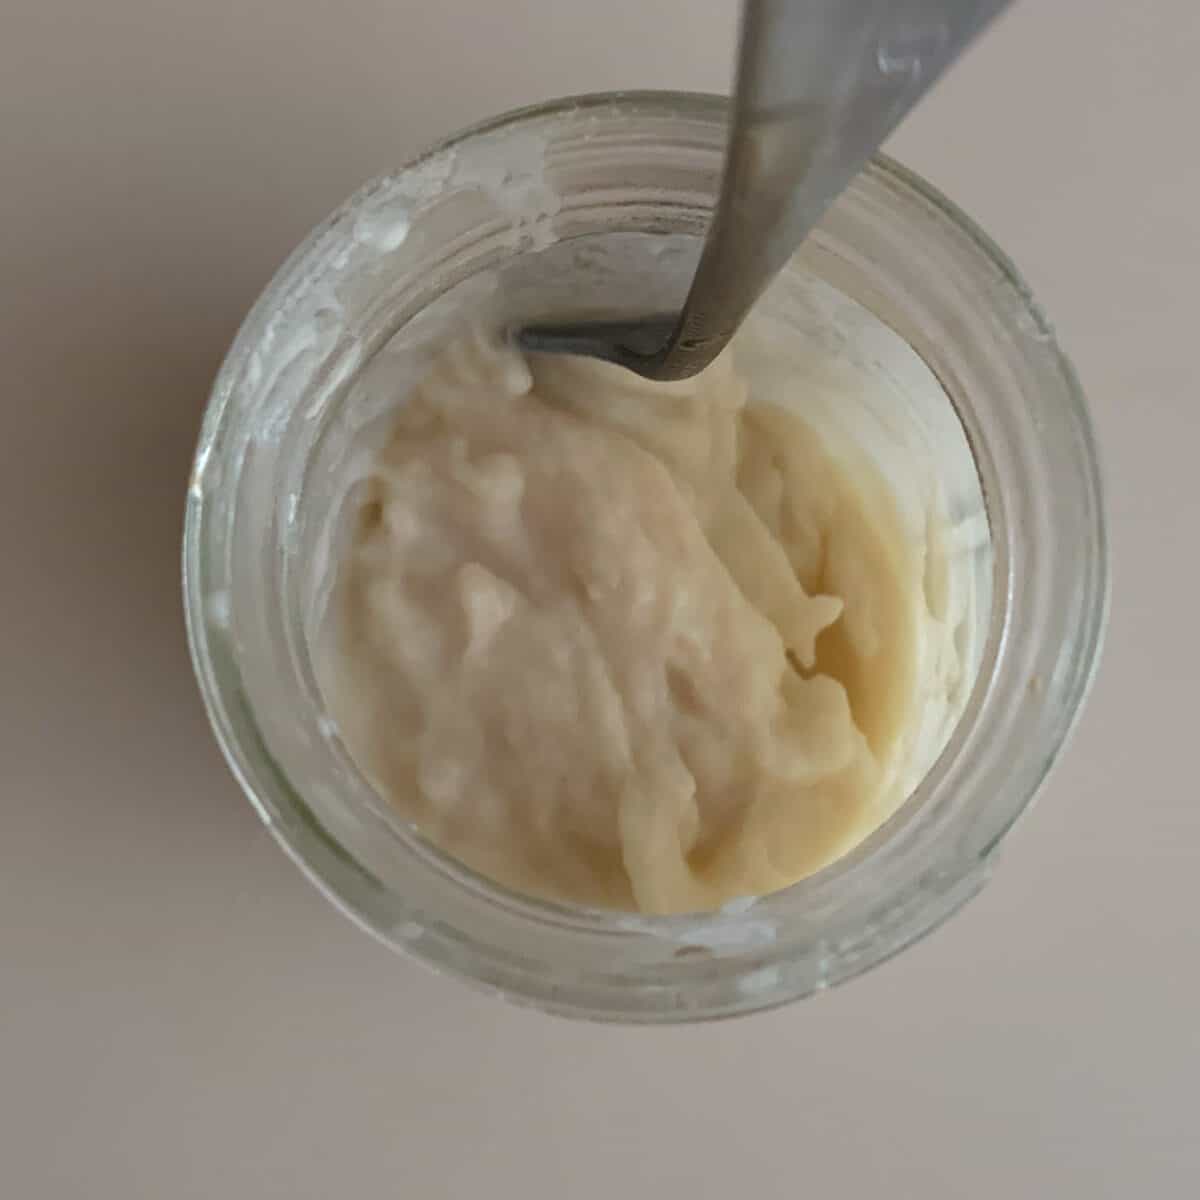
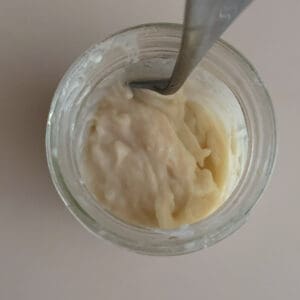
- A roux is often used to make shokupan. This roux, commonly called tangzhong, is simply flour and water that have been mixed together and cooked until thickened into a pudding or paste-like texture and then cooled before use.
- The tangzhong both increases moisture in the shokupan and is reported to extend the shelf life.
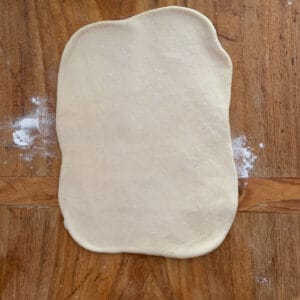
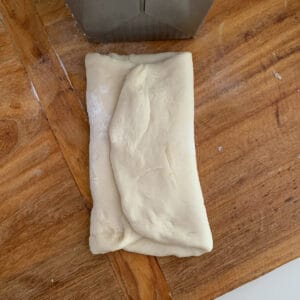
- The bread is often shaped in a unique manner, which enhances the crumb/shred-ability. For example, rather than shaping the single dough ball directly into a loaf, the baker typically divides the dough into multiple balls, flattens the into a rectangle, and then folds and rolls each before placing into a bread loaf pan.
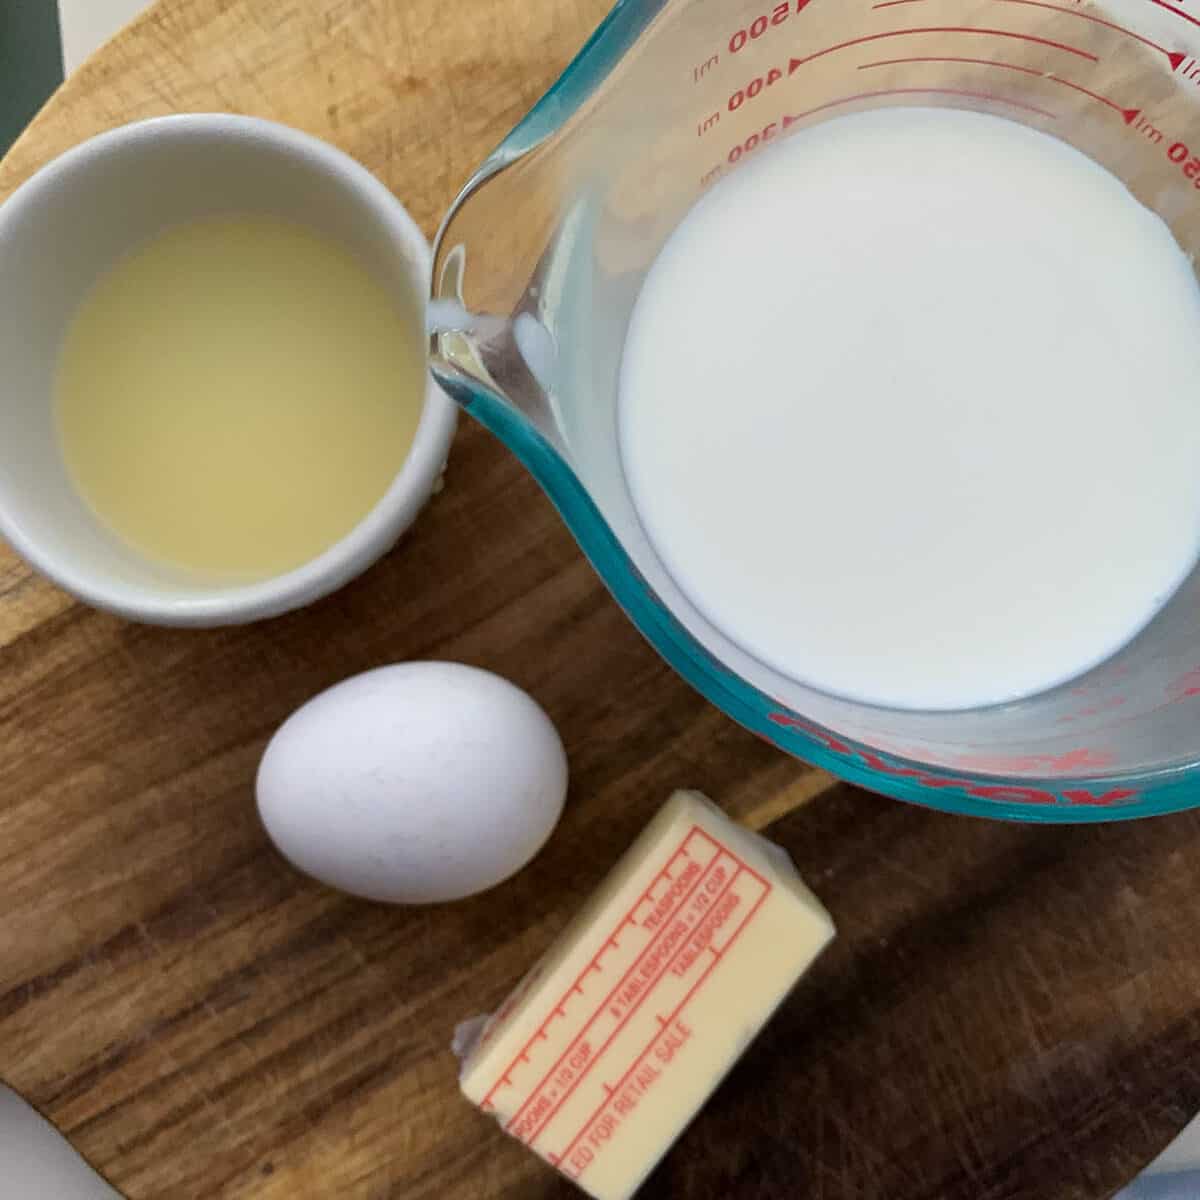
Ingredients
- Tangzhong: a roux that is popular in Asian baking and is used to increase moisture of bread and helps extend freshness (very easy to make using flour and water)
- Bread flour: higher gluten content than all purpose flour that helps the bread to rise more
- Instant yeast: used to leaven the bread quickly
- Sugar: helps the bread brown and may add flavor in certain amounts.
- Salt: tightens the gluten network, add flavor to bread
- Milk: used to soften the bread crumb and add flavor.
- Egg: used to enhance color, volume, and flavor; also helps ingredients bind together
- Butter: used to add moisture and flavor
- Lemon juice (optional): used to increase bread rise

What is Tangzhong?
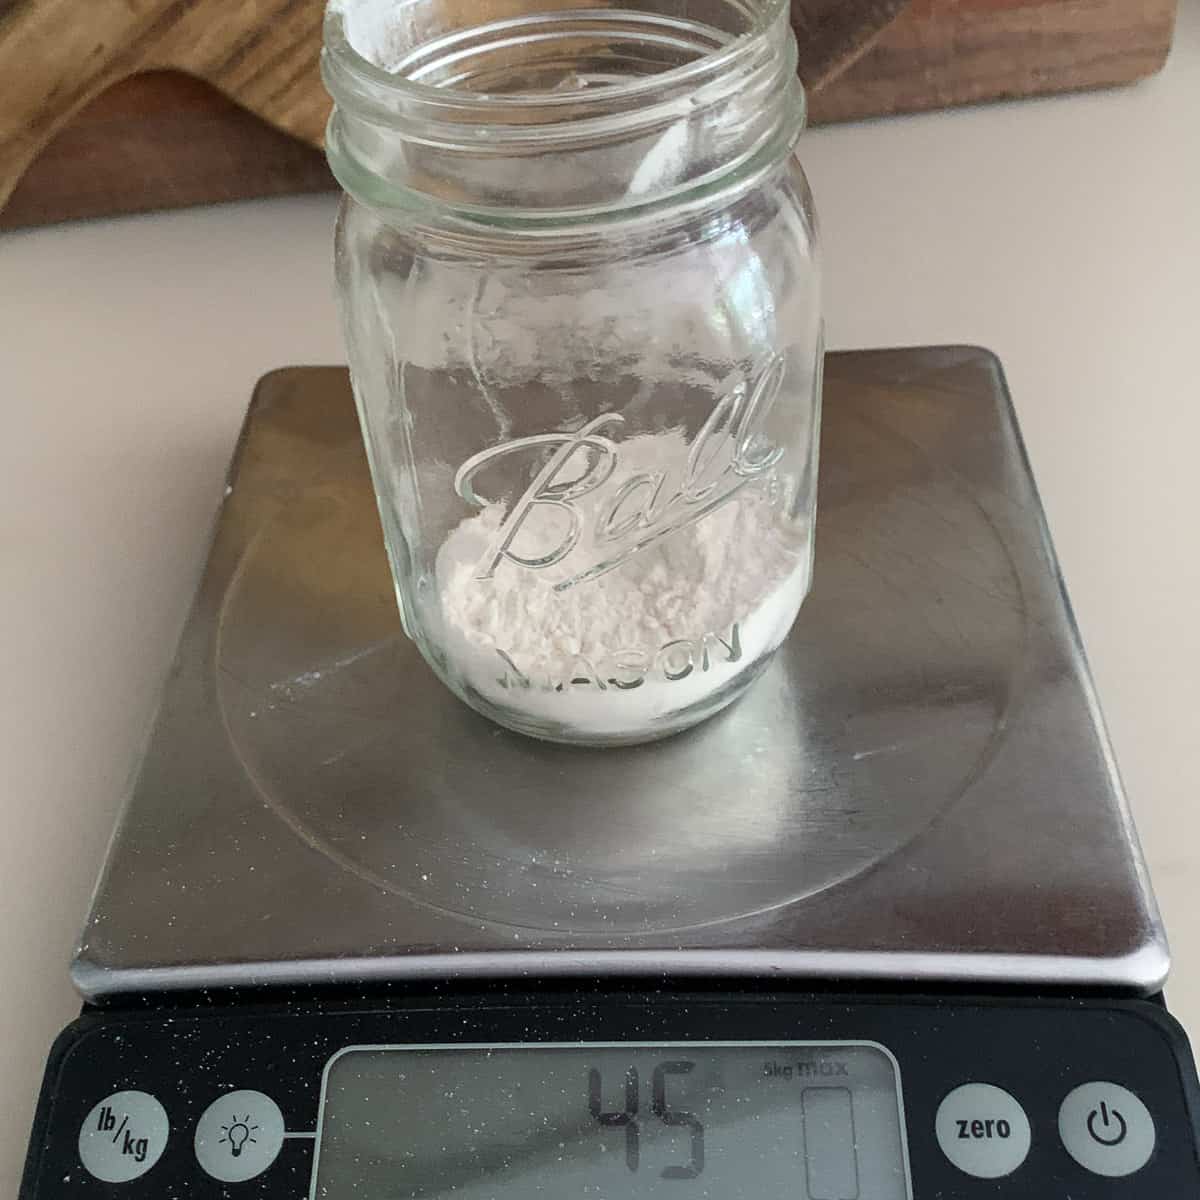
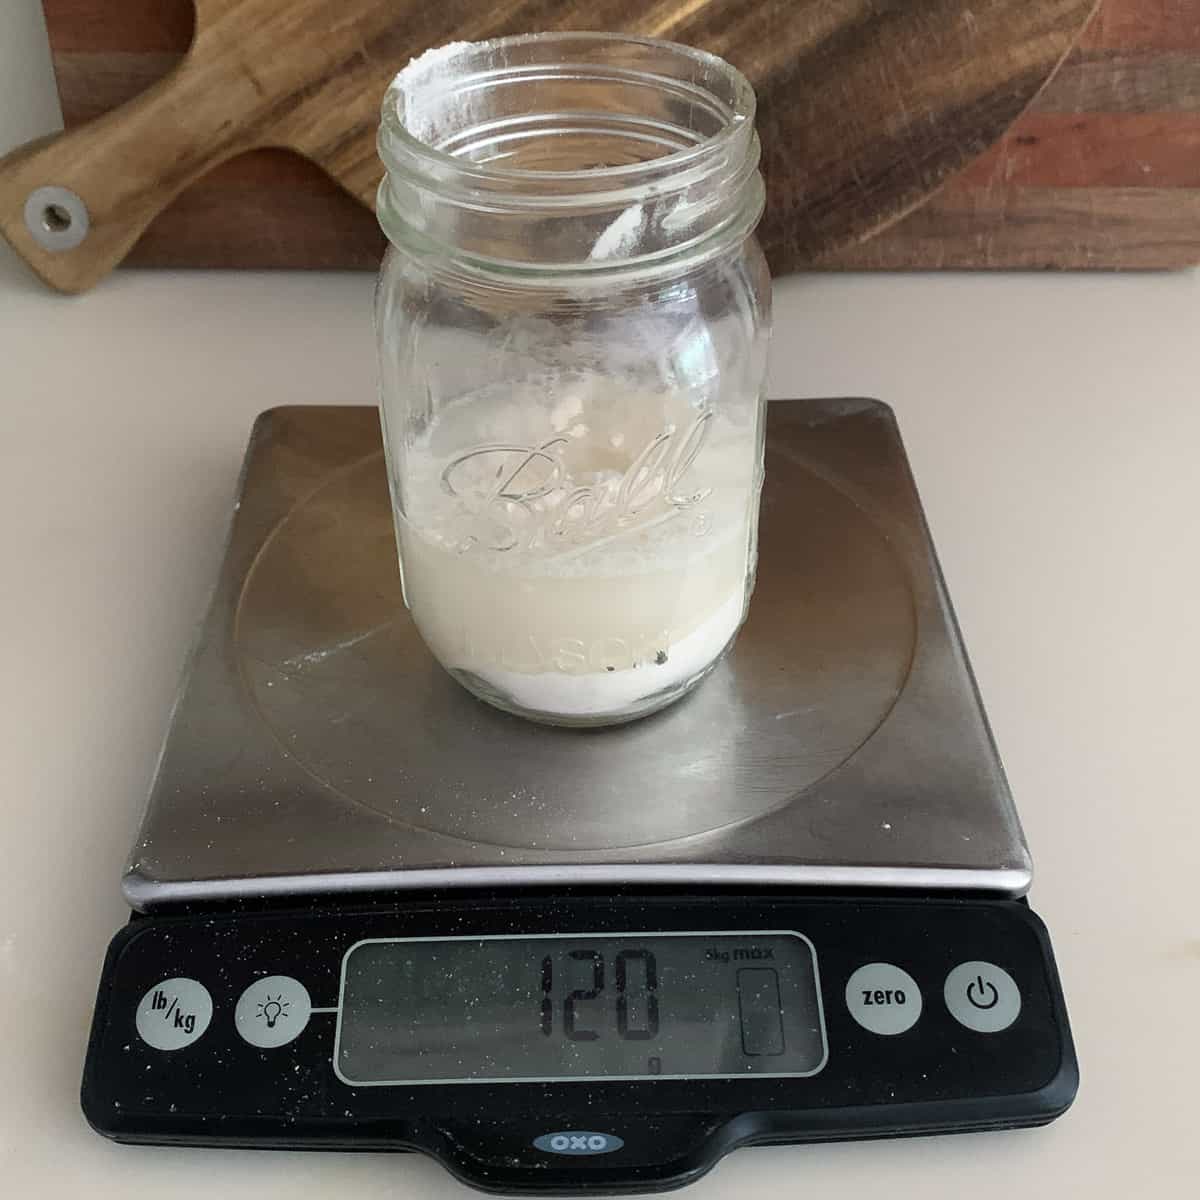
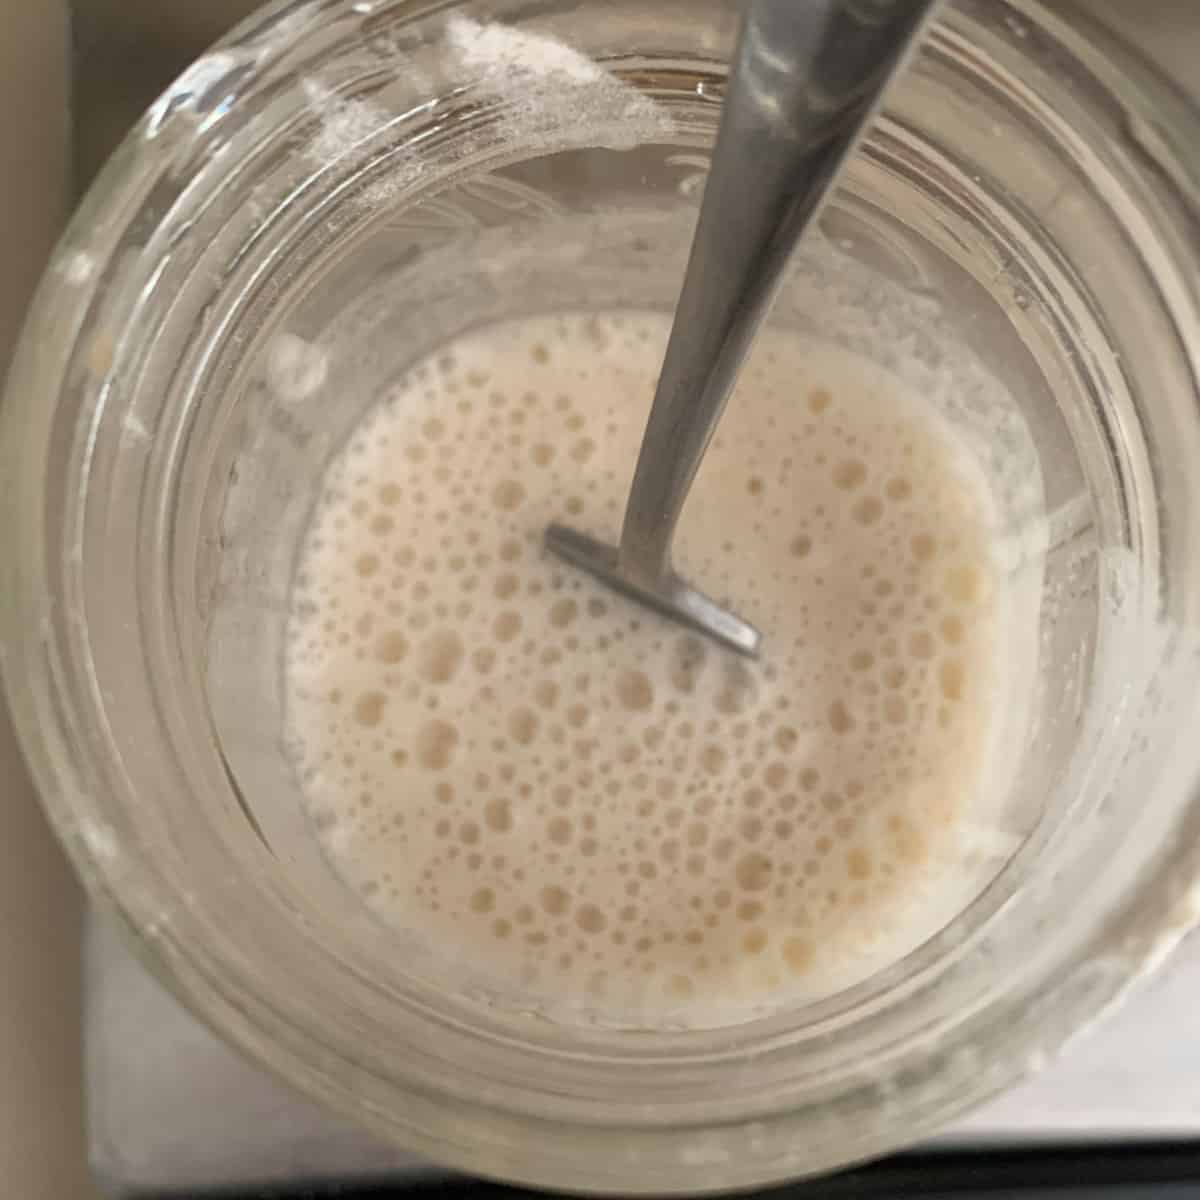
The short answer is that tangzhong is a roux, made of flour and water, at a ratio of 1:5 (ie, for every 1 part flour, add 5 parts water) created by heating the mixture until it reads ~65C (~149F); at this temperature the tangzhong turns into a smooth paste/pudding-like thickness.
I use the microwave method and find it is consistently the correct temperature using the method I describe below. The mixture is then cooled down to room temperature prior to use.
It is kind of similar to adding pudding to your cake to make it more moist.
Tangzhong, popularized in the 1990s by Yvonne Chen who wrote the book The 65º Bread Doctor, lends moisture to the loaf, even after baking because the water is trapped inside the pudding like roux.
When describing how tangzhong works, Mini Oven, one of the seasoned contributors over at the Fresh Loaf forum, states that “the gel will hold the water in the dough and slowly release it during the bake so one gets the affects of high hydration without a soupy dough to handle.”
Tangzhong: Mixing and Storage
Typically, bakers calculate the amount of tangzhong required in any given recipe by calculating 5% to 10% of the total flour in a bread recipe.
So, for example, if your bread recipe has 600 grams of flour, you’d need between 30 g (5% x 600 g) to 60 g (10% x 600g) of flour to make the tangzhong. Since the roux/tangzhong is made using 1:5 ratio, the amount of water added to the flour to make the roux would be 150 ml to 300 ml (30 g x 5; 60 g x 5).
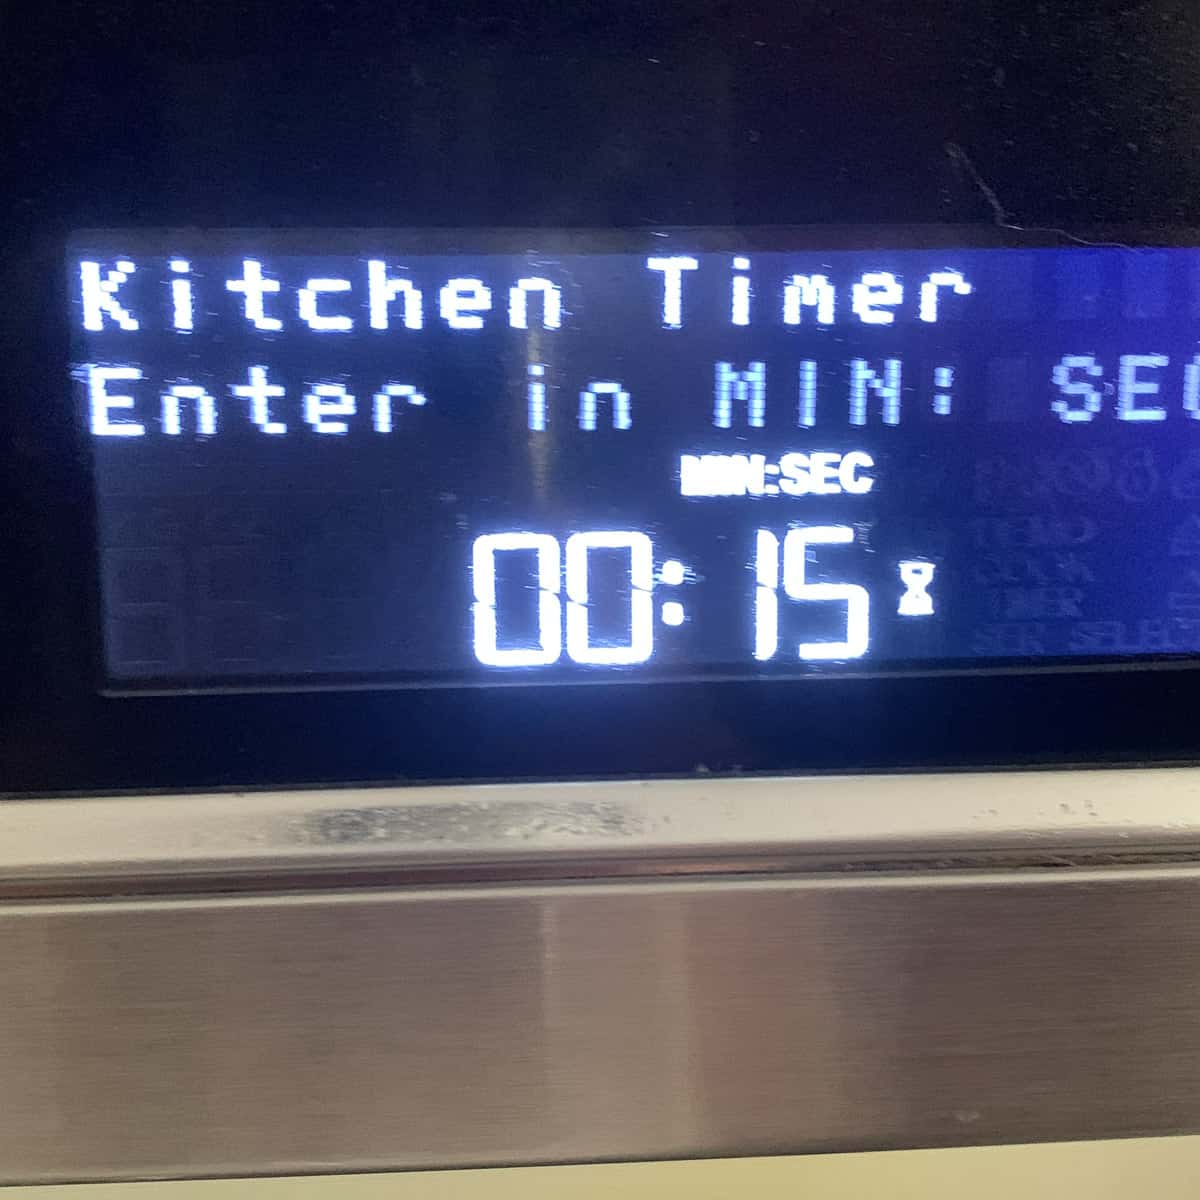
The tangzhong can be made by cooking the mixture over the stovetop until thickened or by warming it in the microwave in 25-second followed by 15-second increments until thickened (stopping in between to stir intermittently) (I need 3 intervals of 15 seconds).
I love the convenience of using the microwave, just make sure to stir well between intervals and to use a microwave proof jar (I like Ball jars).
Using the microwave, the mixture will start out very watery but after it reaches the target temperature, it will be thick and paste-like. Make sure to stir between the cooking intervals!

Rumored to be best when aged up to 12 hours in the refrigerator (will firm up when refrigerated but softens after it returns to room temp), but okay to use as soon as it cools down to at least 120 F.
Tangzhong can be stored for up to 2 days; discard if it turns grey.
If refrigerated, bring to room temperature before using.
Water Roux Methods: Tangzhong vs Yudane
There are two common methods in Asian baking that use the water roux method including the yudane and the tangzhong techniques. The tangzhong technique, described earlier, combines water to flour in a 5:1 ratio and heats to produce a pudding like texture.
Yudane, by comparison is a bit more straightforward and is simply made by combining boiling water with flour in a 1:1 ratio. Autumn Kitchen, a very popular bread baker on Instagram, has recommended using yudane as 20 to 25% of the flour in a bread recipe.
For example, if your bread recipe calls for 200 grams of flour, you’d use 50 grams flour and 50 grams boiling water to make your yudane. You just mix it together and you’re done. Pretty straightforward.
The swollen, gelatinised starch not only allows the starch to take in more water, increases the elasticity of the dough and increases its sweetness. Using either method for the bread dough, makes the bread softer, moist and sweeter, with a fine and delicate crumb. The bread also lasts longer.
Chef Herve Guillard of the International Culinary Institute, described the results of an experiment he conducted to compare the effects of tangzhong vs yudane vs neither (ie, a control bread) on bread quality, taste, and shelf life.
His results suggested that both tangzhong and yudane resulted in a bread lasted days later than the control bread. Whereas the tangzhong resulted in the softest bread, the yudane contributed to the highest loftiest bread and the tightest texture.
Shaping Method
Asian bread makers also use a characteristic method for shaping sandwich bread loaves that results in a more velvety texture.
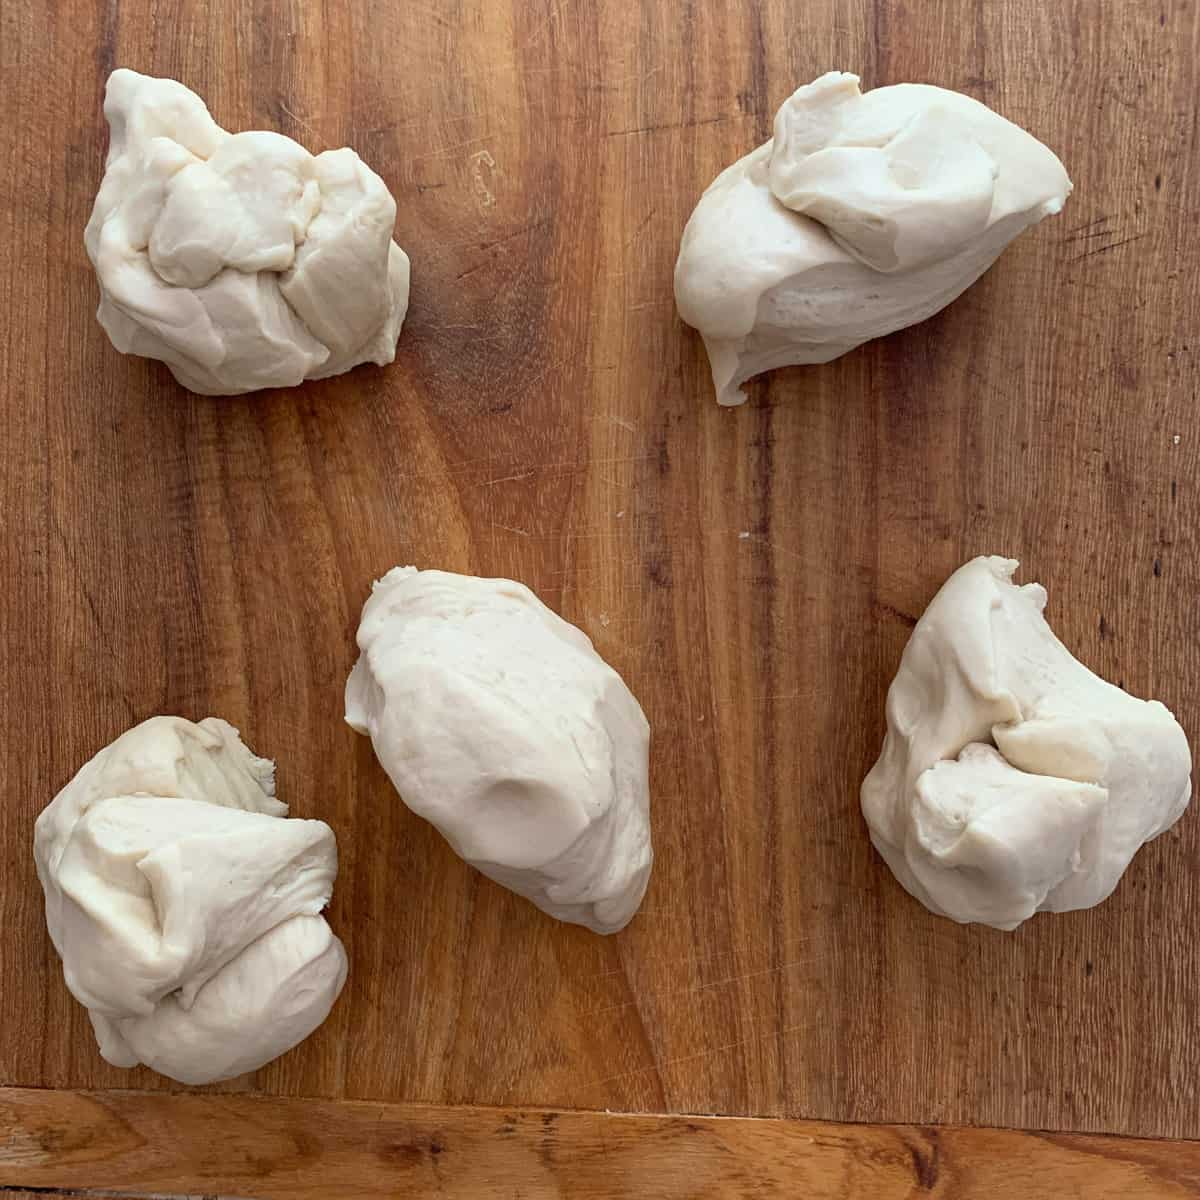
Depending on the size of the loaf, the bread dough is typically divided into 3 to 5 portions, then shaped into balls, and allowed to rest.
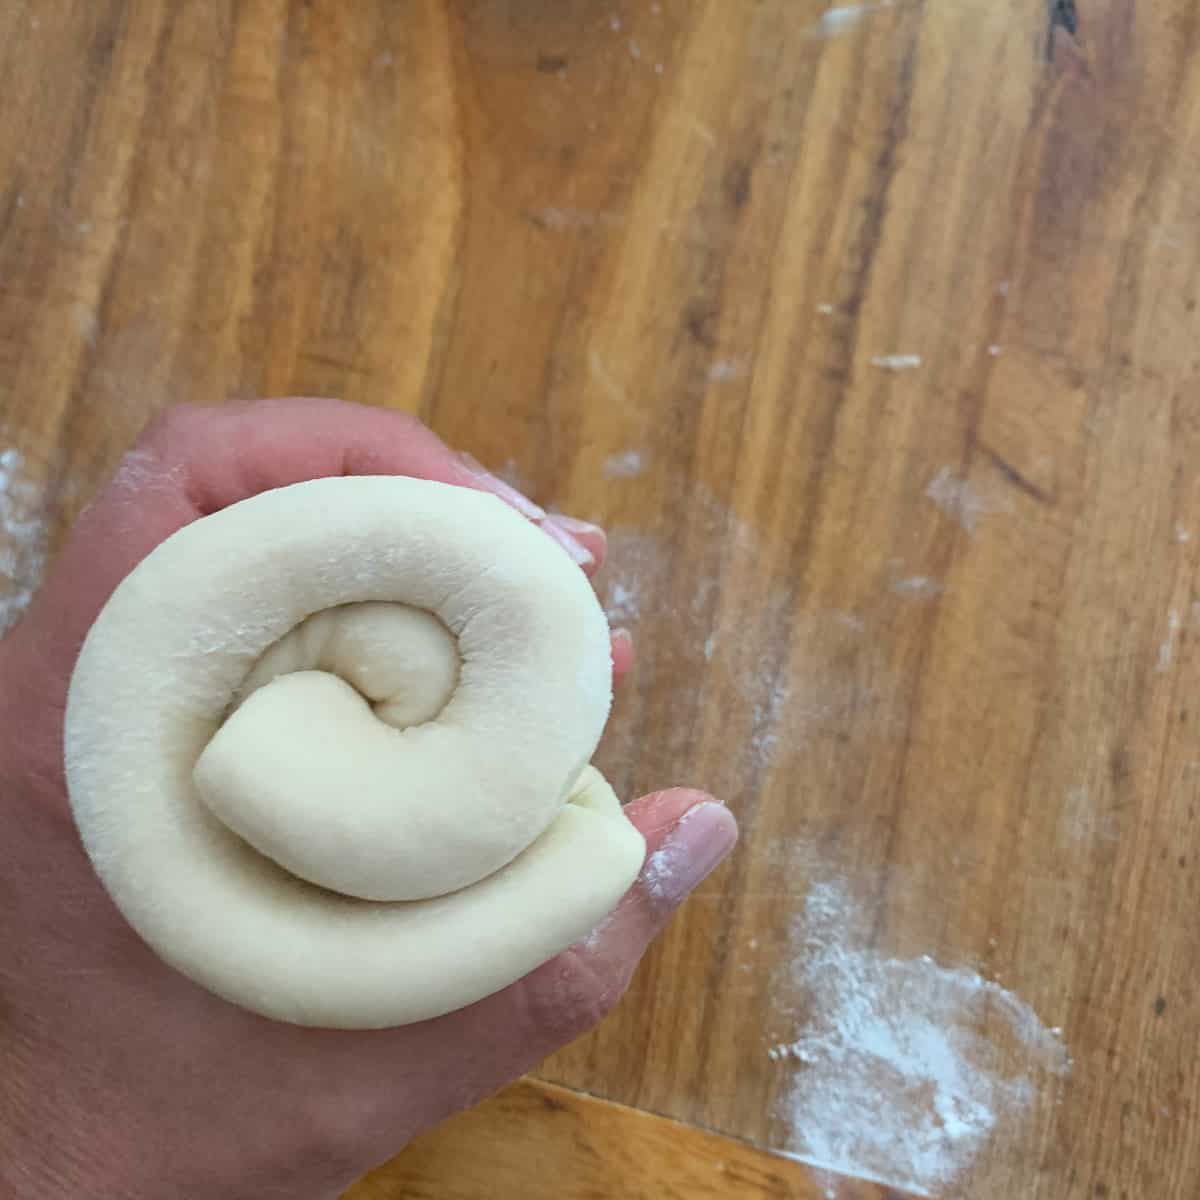
After the rest period, the balls are flattened (rolled out flat) and then rolled up (kind of like a cinnamon roll but without filling) and then they are lined up in a loaf pan and allowed to rise.
I like to allow the rise to within 1 inch of the top of the pan for the best oven spring.


Tips for Making
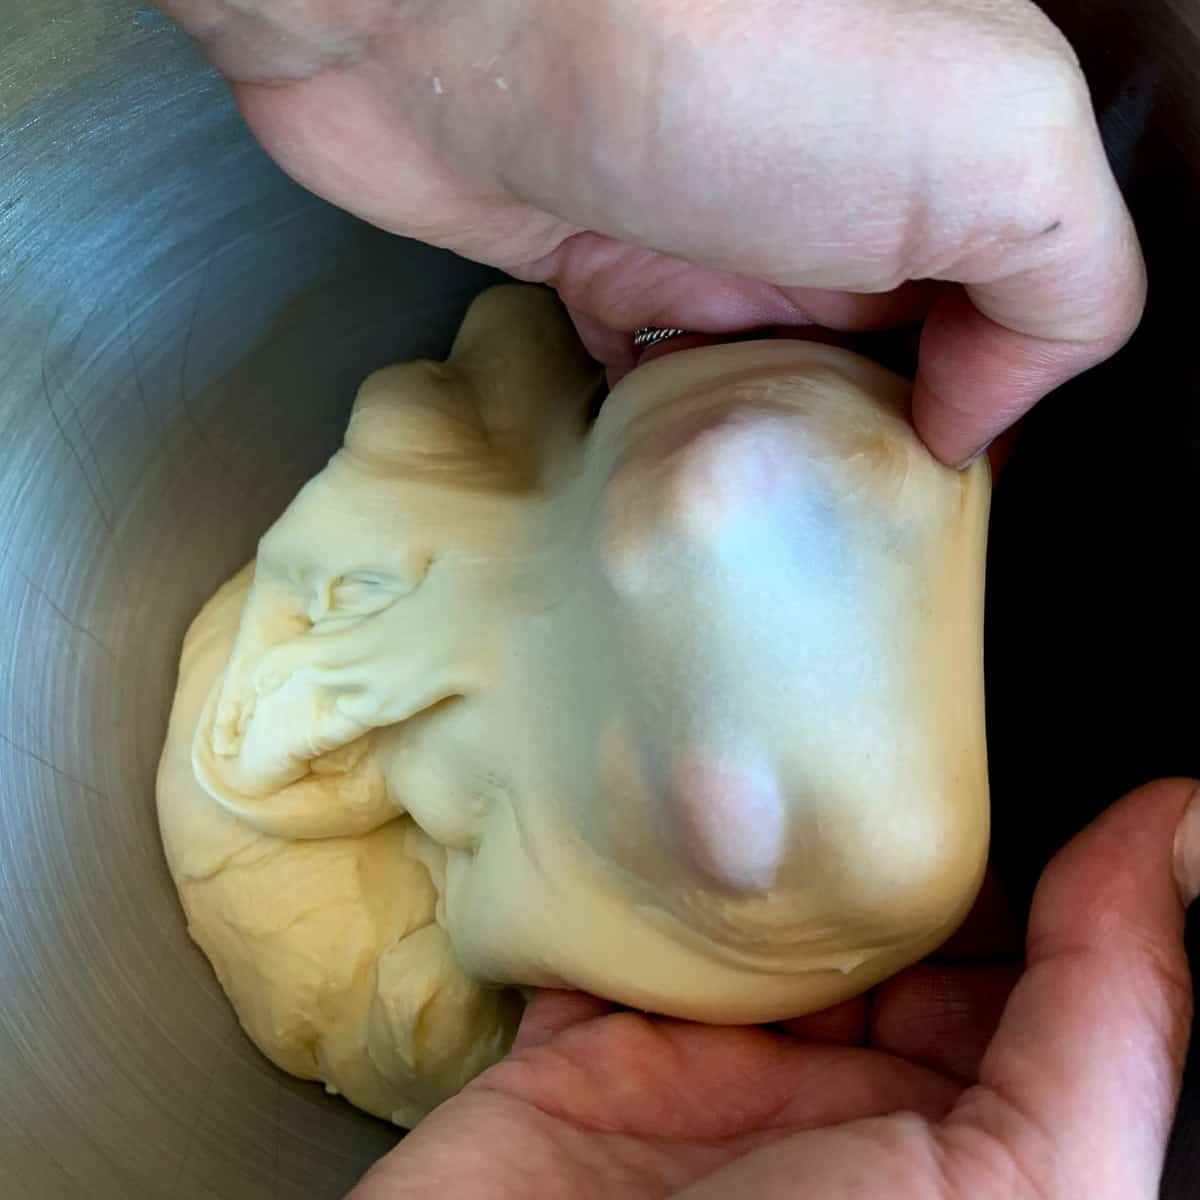
- Kneading: Make sure your dough is strong and can pull a windowpane when tested at the end of kneading. The time for this to occur will vary depending on your mixer and recipe. You can let the dough rest for a few minutes intermittently if it’s taking a while to develop.
- Kneading: The dough will be smoother and less sticky compared to when you started; those are signs that the dough has strengthened.
- Kneading: You’ll need a stand mixer for making this bread.
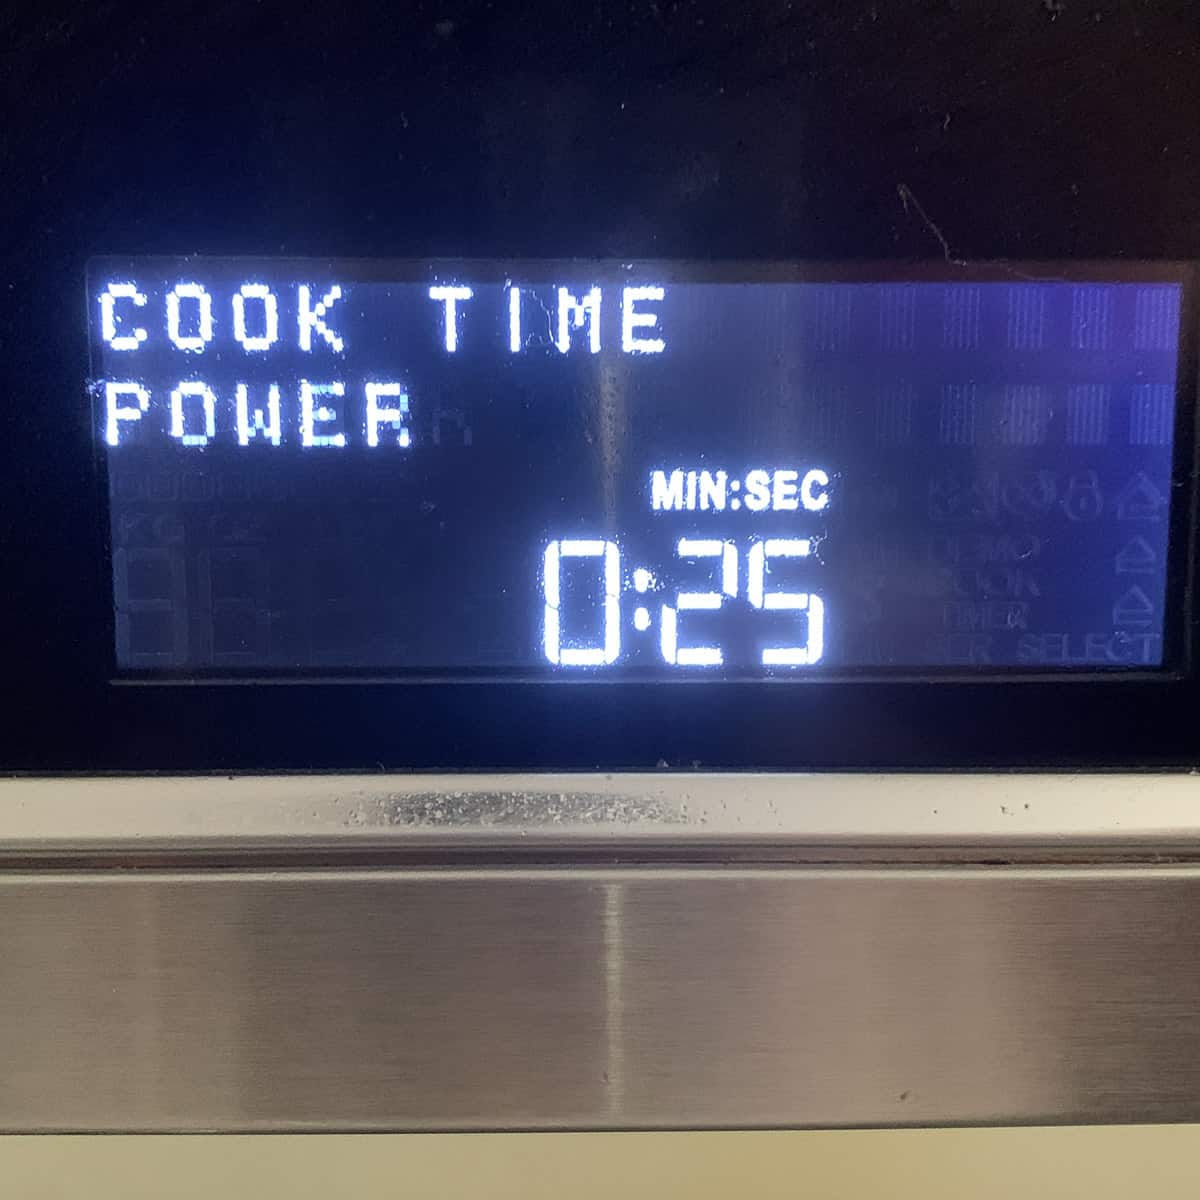
- Baking: Make sure to bake this bread for 45 minutes – I’ve had the bread collapse inward all four sides because the bread was under baked (and the “walls” of the bread were not firm enough).
- Proofing: Let the dough rise to with inch of so from the top and then bake it (this will require some estimation on your part in order to have the oven ready when the bread is finished its final proof).
Baking in a Pullman Loaf Pan
I strongly recommend using a USA Pullman loaf pan if you like to make sandwich bread. It’s a small investment, as they are pricy compared with other bread pans, but they are so worth it in my opinion.
These pans wipe clean so easily, they do not need to be greased/seasoned (they are nonstick), and they always seem to look new.
There are two sizes: the regular/larger Pullman USA loaf pan and the smaller Pullman loaf pan. The regular/larger sized Pullman loaf tin measures 13x4x4 inches and the smaller Pullman loaf pan is about 30% smaller by comparison (9x4x4 inches).
Using the regular/larger Pullman USA loaf pan, use about 1000 grams of dough (lid on) to 1300 grams of dough (without lid). If you’d like to get perfectly square bread slices, you will bake with the lid on and use the lower end of the range (ie, 1000 grams of dough) if using the 13x4x4 sized pan (measurements are in inches). Conversely, feel free to use the higher end range when baking without the lid in the 13x4x4 pan.
Considering the smaller Pullman USA loaf pan is about 30% smaller, I’d estimate using 700 grams of dough (lid on) to 900 grams of dough (without lid).
When is the Bread Finished Baking?
I’ve tried several different recipes. Each have been delicious! One important lesson that I learned is that the bread must be cooked for at least 40 to 45 minutes (using a 13-inch bread pan) and a bread thermometer is not as helpful as one would think.
Typically, many bakers know that a core temperature of 200 F or so indicates that a loaf of bread is finished. This belief was recently clarified by Jeffrey Hammelman of King Arthur flour on the Fresh Loaf forum who said:
The maximum temperature when baking bread is reached two-thirds of the way through the bake. In other words, you cannot rely on bread temperature alone to determine the duration of baking because the high/peak temperature is reached significantly prior to the end of the bake.
I learned this the hard way when I recently baked a Pullman loaf and after removing and cooling the bread, all four sides collapsed inward (it caved in on all sides). It is postulated that the sides were not firm/baked enough even though the internal temperature was on target.
How to Enjoy Milk Bread
- Use as a sandwich bread for peanut butter and jelly, egg salad, luncheon meats, and more!
- Toast and serve with butter and/or jam in the morning.
- Toast and serve with eggs.
- Top with peanut butter, banana and honey.
- Toast and top with smashed avocado.
- Top with hummus and sprouts.
- Make cinnamon toast
- Make French toast
🍕 Equipment Recommended
These are the tools that I regularly use for this recipe.
13-inch Pullman-style loaf pan – can use with or without lids.
Digital Scale – essential for consistent dough
♥️ Loved this recipe? I’d be thrilled if you’d rate it ⭐️ and share your experience in the comments below! Your ratings and comments help other readers discover this recipe and keep this blog going. Did you add any special tweaks? Our community of home cooks would love to hear about it! ♥️
📖 Recipe

Soft, Fluffy Shokupan (Milk Bread) Recipe
Click the heart icon ♡ above to save a recipe. To find your saved recipes later, click the heart icon on the right side of the screen near the search icon and select My Favorites.
Equipment
- bread loaf pan (for 1 kg dough; I used a 13x4x4 Pullman loaf pan)
- standing mixer with dough hook attachment
Ingredients
For the tangzhong
- 45 grams (0.3 cups plus 1 tablespoon ) bread flour
- 120 grams (0.5 cups) water or milk
For the bread dough
- all tangzhong from step 1
- 650 grams (5 1/4 cups) bread flour
- 30 grams (2.5 tbsp) sugar
- 2 tsp instant dry yeast
- 2 tsp table salt
- 1 large egg
- 320 grams (1.31 cups) whole milk may also use reduced fat
- 4 tbsp butter sliced and softened/room temp
- 1 tbsp lemon juice plus 2 teaspoons (OPTIONAL)
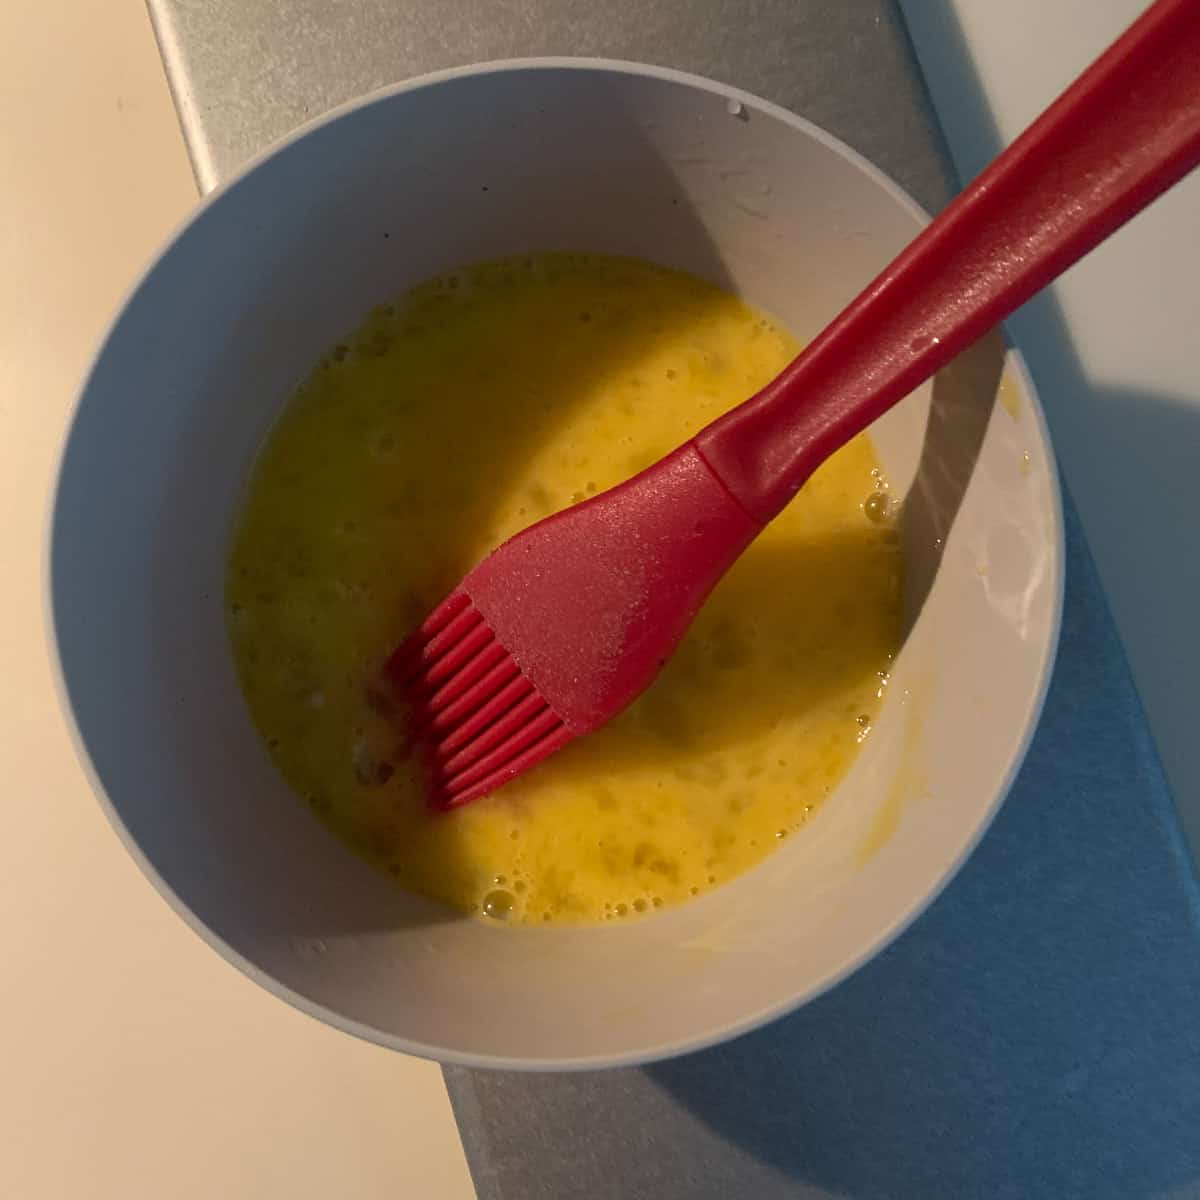
For the egg wash
- 1 egg yolk
- pinch salt
- water or milk 1 tablespoon or so to thin mixture
Instructions
To Make the Roux/Tangzhong (stovetop OR microwave method)
- Stovetop: Combine ingredients in a small pot and place over medium heat
- Stir and continue to heat until the mixture turns into a pudding-like consistency.
- If you have a digital food thermometer, the mixture should reach ~149 F
- Microwave method (preferred for its ease): Add ingredients to a microwave proof jar (I like to use glass canning jars like Ball).
- Stir ingredients very well and then microwave for 25 seconds; remove and stir well again.
- Return to microwave and cook for 15 seconds, then remove and stir very well. Repeat this process until the mixture has thickened up when stirred (typically requires a total of three 15-second cycles).

- Cover and cool until it is room temperature or at least 120 F (can be stored for up to 2 days in the refrigerator; remove and bring to room temperature before using)
To Make the Dough
- Combine all dry ingredients in a bowl of a standing mixer
- Add tangzhong (cooled), egg, milk, and butter.
- Mix on low speed until all the ingredients are well incorporated.
- Increase speed to medium and knead for 8 to 10 minutes.
- Allow dough to rest for 5 minutes before testing for windowpane.
- Knead until the windowpane develops (windowpane is when you break off a walnut sized piece of dough and stretch it gently until super thin; "almost see through").

To Proof
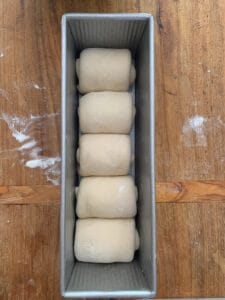
- After kneading and achieving the windowpane, divide dough into 5 equal pieces and form into balls.
- Cover balls and let rest for 15 minutes (using a damp lint free towel or plastic wrap sprayed with cooking spray so it does not stick to the dough).
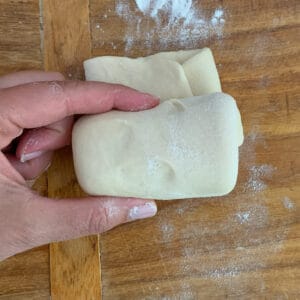
- After the dough has rested, flour each ball on both sides and then, using a rolling pin, flatten each ball into an rectangular shape that is about 1/4 thick.
- Fold the edges of the dough over so they meet in the middle.
- Roll up the dough into a cylindrical shape.
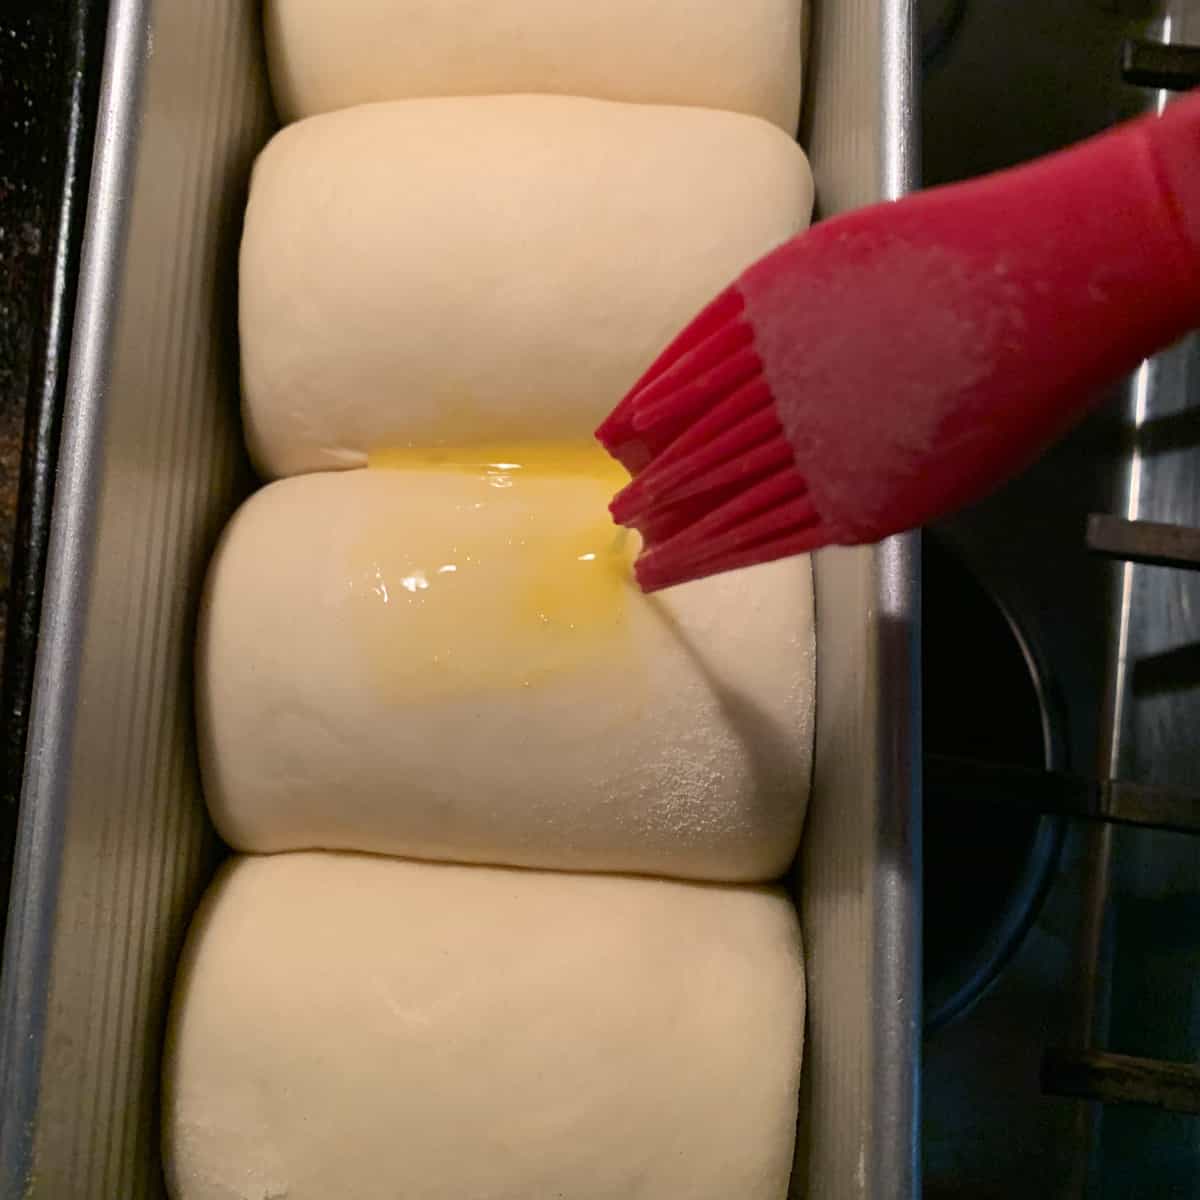
- Place each log in loaf pan (make sure seam is on bottom of pan and the rolled parts are facing front and back of pan). Note that the USA pullman pan that I use does NOT require greasing; please grease your pan if not using USA pan

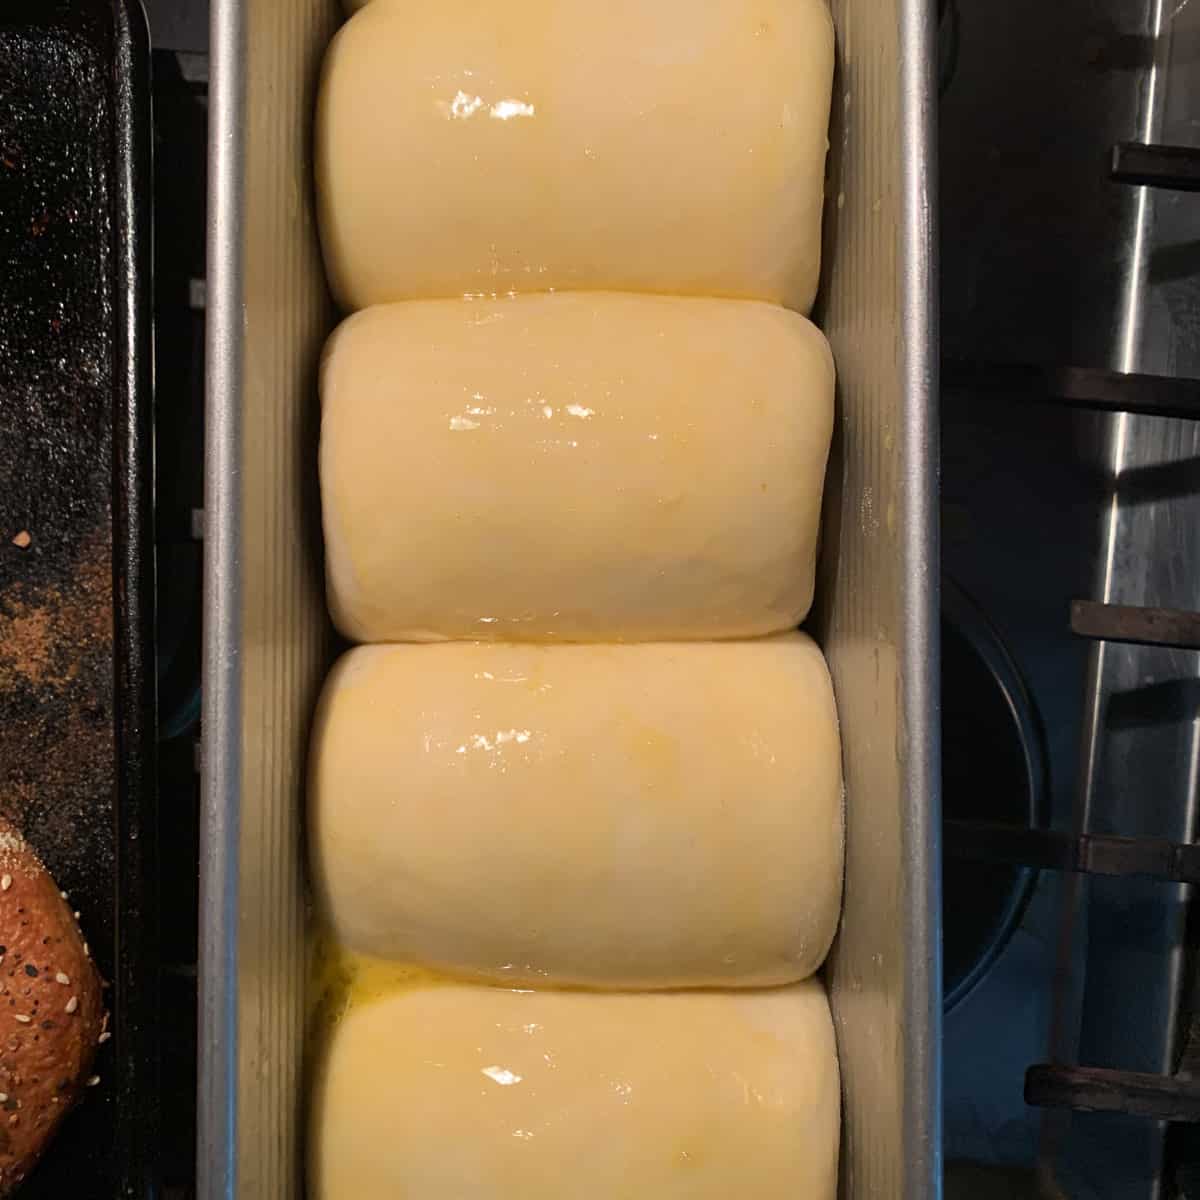
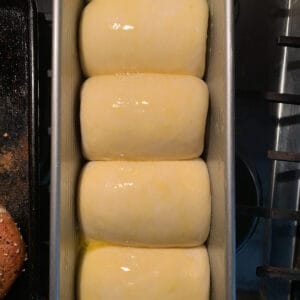
- Cover pan with lid (if you have one) OR lightly oiled plastic wrap, and proof from 45 to 70 minutes (total time will depend on temperature of dough and of kitchen)
- The bread dough is ready to bake when it rises to just within an inch of the top of the pan. Note that when it gets close to this, begin to preheat your oven (365 F).
- Just before baking, brush the top of the bread with egg wash.

To Bake the Bread
- About 15 minutes before bread has finished proofing begin to preheat the oven.
- Preheat oven to 365 F and position rack in bottom third of oven for baking the bread.
- When bread has risen within 1 inch of top of pan, brush the top with egg wash,, place bread in oven and bake the bread for 45 minutes.
- Check bread after 20 to 30 minutes of baking for browning and place aluminum foil loosely over top of bread if it has picked up too much color or is browning too quickly.
- After 45 minutes of baking, remove bread and gently tilt loaf pan to remove bread. Let bread cool completely before slicing or storing.
- Slice into 1/2 inch slices or to taste.
- After it has completely cooled, store wrapped for up to 4 days or freeze for up to 3 months.
Ive made this recipe so many times and it always turns out really nicely for me
I don’t have a stand mixer so I do it by hand but it’s really nice and fluffy and pillowy
This is my go to recipe for shokupan Soo good
Thanks Jay! Fluffy, pillowy shokupan by hand is a win, and I love that it’s become your go-to!
Im making this recipe now & I don’t see what the rectangle should measure?
This is somewhat flexible but a good rule of thumb is to make it as wide as your loaf pan and maybe half as long (even if you are balling as the directions state)
This is the best bread recipe. It doesn’t fail. Makes the best toast, French toast, sandwiches. Soft and fluffy with a nice crust.
I do sub honey for the sugar, and have subbed half whole wheat flour for the bread flour. It still has a nice rise and a soft, fluffy texture.
Thank you, Liz. It’s absolutely one of my favorites as well!!
Can this recipe be used for dinner rolls?
Absolutely!