Classic Italian Pizzelles
This post may contain affiliate links. For more information, please see our disclosure policy.
Italian families have been making these cookies for generations. In fact, this is one of the oldest Italian cookies that are still made today. This particular recipe comes straight from my mom and her sister, who brought their old-school Italian know-how to every holiday table.
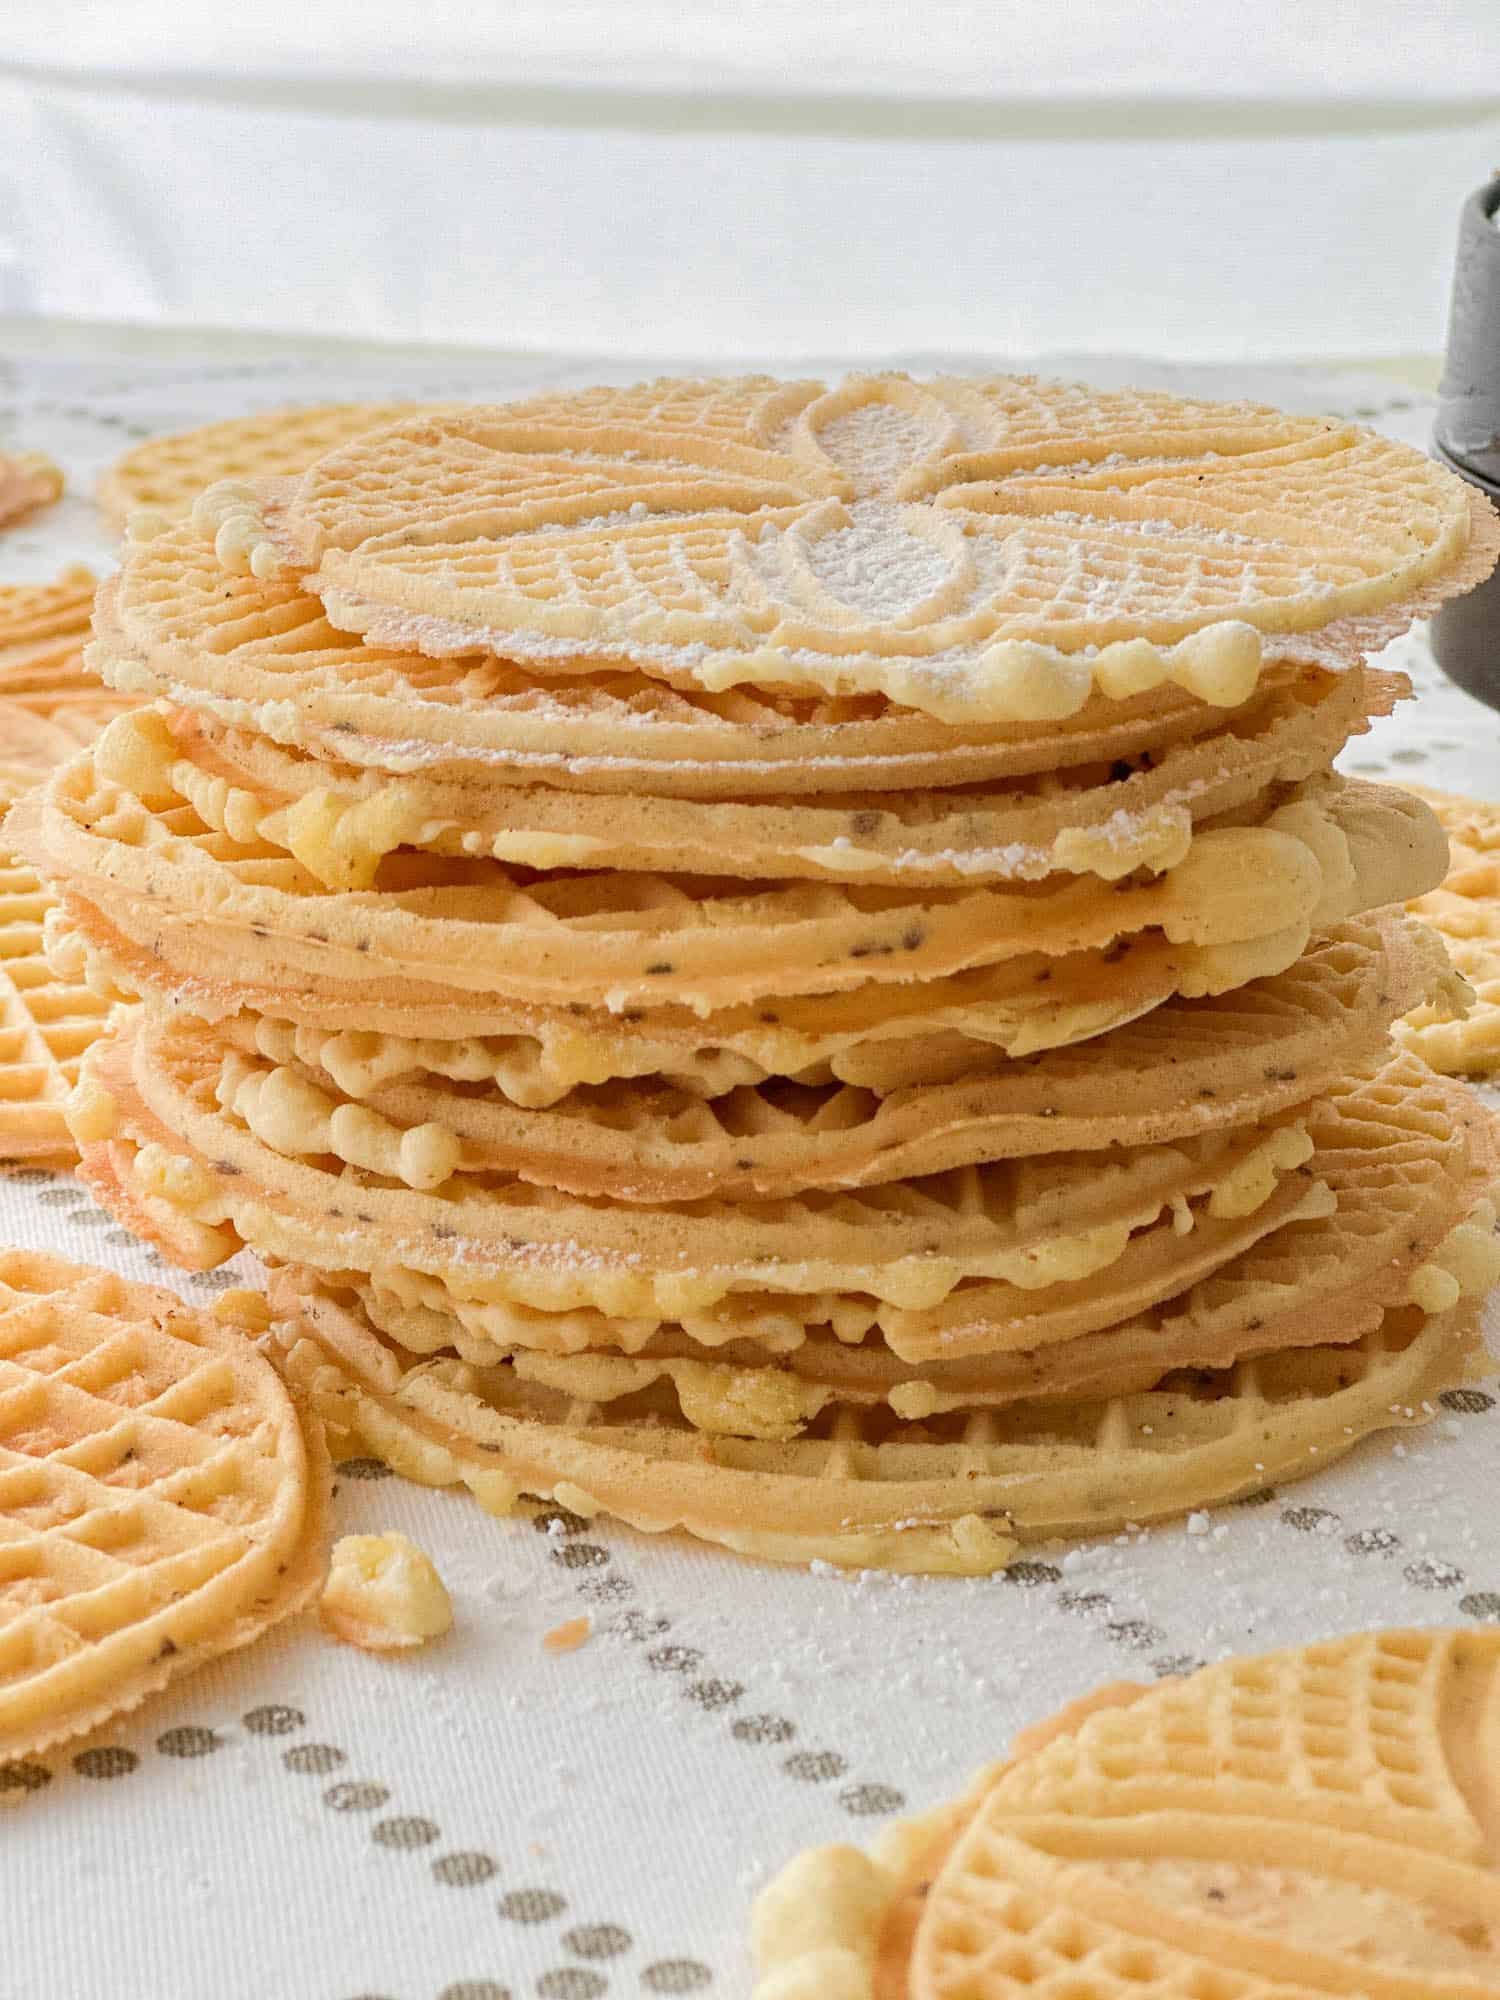
Perfectly flavored and impossibly easy, these pizzelle cook up light, lacy, and beautifully crisp every single time. They’re the classic cookies that disappear as fast as you can lift the iron.
I love this recipe because the sugar–flour–egg ratio is spot on, and using oil—the old-school method—keeps the pizzelle beautifully crisp. It’s the kind of recipe every Italian family in our Philly neighborhood made.
If you love traditional cookies like Italian Wedding Cookies, Biscotti, or Pignoli Cookies, this pizzelle recipe is a must.
Why You’ll Love These Pizzelle
Italian pizzelle are so easy to make and are perfect for gifting, dunking in coffee, or serving alongside other holiday favorites. The batter comes together in one bowl, and you can easily switch the flavor—anise for traditional, or vanilla and lemon for a milder twist.
Ingredient Notes
- All-Purpose Flour: Standard flour gives pizzelle their delicate crispness — no need for specialty flours.
- Vegetable Oil: Light oils (like canola or vegetable) keep cookies crisp longer than butter.
- Eggs: Provide structure and richness. Bring to room temperature before mixing.
- Sugar: Regular granulated sugar gives these cookies balanced sweetness and that light golden color.
- Anise Extract: The traditional flavor for pizzelle — use 0.5 teaspoon for a classic taste, or swap for vanilla (or both), or use lemon extract/lemon zest, if you prefer. I also absolutely love to mix in anise seeds (pounded)!
- Baking Powder: Helps the cookies puff slightly and release easily from the iron.
Flavor Ideas
You can keep these classic with anise and vanilla, or change things up with almond extract, lemon or orange zest, cocoa powder, or a little instant espresso. For a fun twist, fold in rainbow sprinkles right before cooking to make “birthday pizzelle.” Although you should expect your iron to get a little messy. You can also tint the batter with food coloring for Christmas (red or green), Easter (pastels), or any holiday theme. Warm spices like cinnamon or nutmeg work well for winter, and a some crushed anise seeds add a more traditional Italian flavor.
A Note About Anise
When it comes to flavoring pizzelle, you can use anise seeds, anise extract, or anise oil—each gives a slightly different result. Most Italian American families use anise extract.
Anise seeds offer a mild, warm flavor with little crunchy pops, while anise extract delivers that classic sweet, aromatic pizzelle taste most of us grew up with. Anise oil is the most intense option: just a drop or two adds a deep, Italian-bakery-style punch. If you want a well-rounded flavor, my favorite combination is a half teaspoon of extract plus 2 teaspoons of lightly crushed anise seeds (per batch of cookies). It gives you that nostalgic pizzelle aroma, with just enough texture to enhance the cookie without overpowering it. I found anise seeds at my local farmers’ market.
Method Overview
To make pizzelle, whisk together eggs, sugar, and oil, then stir in anise extract (or whatever flavorings you’ll be using). Add flour and baking powder and mix until a thick, smooth batter forms. Preheat your pizzelle iron for at least 15 minutes. Drop about 2 tablespoons of batter in the center of each pattern, close the lid, and cook for 30–45 seconds or until golden. Let them cool flat on a tablecloth or cookie rack for a crisp texture, or roll them while they are still warm to shape cones or cannoli shells.
Ways to Use Pizzelle
I love to serve these plain, but there are so many ways to use them. Here are some ideas:
- Mini Cannoli Shells: Quickly roll hot pizzelle around a metal cannoli form to cool. Fill with ricotta cream once crisp.
- Ice Cream Tacos: While warm, drape pizzelle over a wooden spoon handle or the edge of a loaf pan to form a taco shape. Once cooled, fill with ice cream and drizzle with melted chocolate.
- Pizzelle Sandwich Cookies: Spread with Nutella, cannoli cream, pastry cream, or buttercream and sandwich two together.
- Chocolate-Dipped Pizzelle: Dip half of each cooled pizzelle into melted chocolate (milk, dark, or white). Add crushed pistachios, sprinkles, or toasted coconut.
- Rolled Cigars: Roll warm pizzelle into loose cigar tubes. Perfect for dipping into chocolate or espresso cream.
- Pizzelle Bowls: Press hot pizzelle over an inverted small bowl or ramekin to form edible dessert bowls. Fill with gelato, berries, or whipped cream.
- Crumbled as Topping: Crush pizzelle and use as a crunchy topping for tiramisu, ice cream, yogurt, or ricotta parfaits.
- Holiday Gift Boxes: Stack different flavored pizzelle (vanilla, anise, chocolate) and tie with twine for simple edible gifts.
Pro Tips
- Make sure your iron is preheated. If your iron is not hot enough, they will stick!
- Spray your pizzelle maker before using it for the first batch, or they may stick!
- Close the iron completely and clip it shut. This is what gives you those nice thin crispy cookies.
- See your pizzelle iron instructions for how long to cook. Mine is 35 to 40 seconds. Use a timer if you have one handy.
- Test a few first: Every iron is different. Adjust batter amount or cook time until you find your perfect golden shade.
- Cool completely: Store only after cookies are fully cool — any trapped steam softens them, and they get crisper as they cool.
- Shape options: For cannoli-style shells, roll while hot; for cones, wrap around a wooden dowel.
♥️ Loved this recipe? I’d be thrilled if you’d rate it ⭐️ and share your experience in the comments below! Your ratings and comments help other readers discover this recipe and keep this blog going. Did you add any special tweaks? Our community of home cooks would love to hear about it! ♥️
📖 Recipe
Classic Italian Pizzelles
Equipment
- pizzelle iron (electric) I use a Palmer iron; I've also heard Vitantonio pizzelle irons are excellent irons; some people also like Cucina Pro
Ingredients
For the Batter
- 3 large eggs
- 1/2 cup oil (neutral) vegetable or canola recommended
- 3/4 cup sugar up to 1 cup
Flavoring (see Notes for other Flavor Ideas)
- 0.5 teaspoon anise extract may add 2 teaspoon lightly crushed anise seeds
- 1 teaspoon vanilla
- 1 tablespoon Sambuca optional
Dry Ingredients
- 1 1/3 cups flour up to 2 cups for thicker/heavier pizzelle ; see Notes
- 1/2 teaspoon baking powder
- 1/4 teaspoon salt
Instructions
- Read tips below in Notes Section.
- Mix the wet ingredients: In a large bowl, whisk the eggs, oil, and sugar until well combined and slightly thickened. Stir in your flavorings (eg, vanilla, anise extract, and Sambuca).
- Add the dry ingredients: In a separate bowl, whisk together the flour, baking powder, and salt. Add the dry mixture to the wet mixture in two additions, stirring just until a smooth, thick batter forms.
- Heat the pizzelle iron: Preheat your pizzelle maker according to the manufacturer’s instructions. I recommend heating no less than 15 minutes!
- Cook the pizzelle: Spray the iron lightly with cooking spray or use a little shortening (for the first batch). Then, drop 1.5 to 2 tablespoons of batter onto each circle of the hot iron (the exact amount depends on your machine). Close and cook until lightly golden, usually 30–40 seconds.
- Cool: Transfer pizzelle to a tablecloth-lined table and cool in one layer. They will crisp as they cool.
- Store: Once completely cool, store in an airtight container for up to 1 week or freeze for longer storage.
Notes
Pizzelle Tips
- Greasing the iron: Some modern pizzelle irons don’t need to be greased, but mine does. If you’re unsure, check your pizzelle iron instructions.
- The first one is a tester: Expect to discard (or snack on) the first 1–2 pizzelle. They help you judge heat, timing, and batter consistency.
-
Adjust batter thickness:
- If the first pizzelle spreads too much or looks thin/see-through, add a tablespoon of flour at a time.
- If it doesn’t reach the edges or feels thick and heavy, mix in a splash of oil to loosen it.
- Use the right amount of batter: Start with 1.5 tablespoons or so, then tweak as needed. Too much batter oozes out; too little won’t fill the pattern.
- Heat matters: Let the iron preheat fully. An under-heated iron is the number one reason pizzelles stick! Heat for at least 15 minutes.
- If they start sticking: Give the iron another minute to reheat, and gently lift the edges with a small silicone spatula or wooden skewer. I also like to use a wet paper towel to clean the grates.
- Cooling for crispness: Lay pizzelle flat as soon as they come off the iron. My mom would spread a clean tablecloth over a big table and fill it with pizzelle to cool—this helps them crisp evenly.
- If they soften: Return them to a 300°F oven for 3–5 minutes to refresh the crunch.
- Storage: Once completely cool, keep them in an airtight container with a small piece of dry paper towel to absorb moisture.
Pizzelle Flavors
🇮🇹 Traditional Italian Flavors
- Anise (oil, extract, or seeds)
- Vanilla
- Lemon (zest or extract)
- Almond
- Orange
- Amaretto-inspired (almond + a hint of citrus)
✨ Modern / Fun Variations
- Chocolate (cocoa powder)
- Cinnamon
- Espresso
- Hazelnut (crushed finely)
- Nutella Swirl (mix 1 tablespoon of softened nutella into 1 cup of batter)
- Maple
- Cocoa + Orange (orange zest or extract)
- Mint Chocolate (cocoa powder and a few drops of peppermint oil)
🎄 Holiday & Seasonal Flavors
-
- Peppermint (use drops sparingly)
- Pumpkin Spice
- Gingerbread Spice
- Anise + Orange Zest (Christmas classic)
- Chocolate-Dipped with Sprinkles (may roll and dip)
- Almond + Cranberry Zest (almond extract and crushed dried cranberries)
Nutrition
🍪 Italian Pizzelle FAQs
Why do my pizzelle come out soft instead of crisp?
They were either undercooked, the iron wasn’t fully heated, or they cooled on a plate instead of a rack/tablecloth. Batter that’s too wet can also cause softness. Always cool uncovered.
Why are my pizzelle sticking to the iron?
The iron may not be fully preheated, may not have been clipped shut, or may need seasoning (depending on the model). Batter that’s too moist can also cause sticking.
Why are my pizzelle too thick or puffy?
The iron wasn’t clipped shut, wasn’t hot enough, or the batter has too much flour. Thick batter = thick pizzelle.
How do I keep pizzelle crisp after storing?
Cool completely, then store airtight and away from humidity. If they soften, warm in a low oven for a few minutes.
Why are my pizzelle unevenly colored?
Usually the iron isn’t fully preheated, or the lid was opened too soon. Allow full heat-up time and avoid peeking.
How much batter should I use?
Most irons need 1½–2 tablespoons. Too much batter will leak out the sides; too little won’t fill the pattern.
Can the batter be made ahead?
Yes. Refrigerate for 1–2 hours, then bring to room temperature before cooking.
How long do pizzelle stay fresh?
Typically 1–2 weeks when stored airtight. They keep best in cool, dry weather.
Can I freeze pizzelle?
Yes. Layer with parchment and freeze. Thaw uncovered; re-crisp in a warm oven if needed.
Can I make pizzelle without anise?
Absolutely. Vanilla, lemon, almond, chocolate, espresso, maple, and seasonal spices all work beautifully.
Best recipe I have used. Came out nice and crispy. Thank you.
These never fail me either – always crispy – so glad it worked for you too!