Baking Artisan Bread at Home: An Introduction
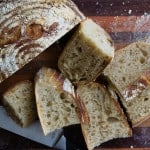
Sourdough bread made with a starter is a traditional and wholesome bread that's packed with flavor and nutrition. With a crispy crust and a soft and chewy crumb, this bread is made using natural fermentation and minimal ingredients, making it a healthier and more easily digestible option than commercially-made bread. The benefits of sourdough bread extend beyond its delicious taste, as the natural fermentation process can increase the bioavailability of nutrients, reduce the glycemic index, and even improve gut health. If you're looking for a healthier and more flavorful bread option, sourdough bread made with a starter is definitely worth trying!
Servings: 36 slices
Calories: 105kcal
Ingredients
For the starter:
- 1000 gram whole wheat flour
- 1000 grams bread flour (also called levain) or Recipe 2
For the dough
- 200 grams Starter (ie, Levain) from above (about 1 cup)
- 900 grams White bread flour (King Arthur brand recommended) (about 7.5 cups)
- 100 grams White whole wheat flour (King Arthur brand recommended) (about 1 cup)
- 750 grams Filtered water 80 degrees) (3 1/3 cups)
- 20 grams Fine sea salt 5 teaspoons
Instructions
How to Make the Starter (only if you don't have one already made):
- Combine the bread flour with the whole-wheat flour in a bowl and set aside.
- In a small wide mouth jar or container (glass is best here so you can see when it becomes active), add 100 grams of warm water (about 80 degrees) and 100 grams of the bread/whole wheat flour mix (it should look like thick pancake batter). I like to stir vigorously to get some air in it.
- Cover with a towel and let sit at room temperature until mixture begins to bubble and puff, 2 to 3 days. It works best in a warm spot (top of refrigerator, near a heating vent - just until you get it nice and active). Some enough put a heating pad underneath.
- After you see the starter starts to bubble, begin to feed it regularly at the same time each day. Feeding it at least twice a day will promote activity. Try feeding at 7AM and 7PM or 9AM and 9PM etc.
- To feed, I transfer about 25 grams of the starter to a clean jar and feed it with 50 grams of the flour mix and 50 grams of water (this is a 1:2:2 ratio; 1 part starter: 2 parts flour: 2 parts water)
- The feeding ratio needed will depend on how active your starter is and how warm or cold your room temperature is. Some people may need to feed their starter at ratio of 1:3:3 for very hot climates.
- The starter is ready to be used after it rises and fall predictably (usually after about 7 to 12 days). Many say that the starter should double or ideally triple within 4 to 6 hours.
To Make the Levain (ie, building the starter into a bigger portion to be used in the bread).
- The night before baking, add 1 tablespoon of the mature starter and mix it with 200 grams of warm water and 200 grams of the white-wheat flour mix and combine well. Cover with a towel and let rest at room temperature for 8 to 12 hours or until it has doubled, or preferrably tripled (I use a rubber band to mark the starting point to see how much it has risen.)
- To test for readiness, drop a tablespoon of leaven into a bowl of room-temperature water; if it floats it’s ready to use. If it doesn’t, allow more time to ferment.
- To store, I refrigerate my starter between uses (it doesn't require feeding when in the refrigerator but it will need a few feedings to activate it before using). The starter should be quite vigorous before storing in the cold; ideally it's been fed at room temperature for 2 weeks minimum.
To Make the Dough (Dough Day)
- In a large bowl or food grade bucket/tub (6 gallon capacity), add 700 grams (3 cups) of the water and then add 200 to 250 grams of levain (less if it's summer and more it it's winter) and stir to combine. Keep the remaining levain for future baking (keep feeding it to build it back up or you can store it in the refrigerator - I add enough flour to made a very soft dough before refrigerating the starter).
- Add 900 grams of the bread flour and 100 grams of the whole wheat flour
- Mix well so that there are no bits of flour remaining, then cover and let the bucket rest in a warm spot for about 40 minutes at a comfortable room temperature (do not add the salt at this stage). This is called a fermentolyse (autolyse is when you do this with only flour and water).
- After 35-40 minutes have passed, add the salt, and the remaining 50 grams of water and mix again with your hands to incorporate
- Instead of kneading, this dough is "folded" since this is a very wet dough. To fold, dip your hands in a bowl of water (to prevent sticking when you fold), shake off excess water, and gently grab a section of dough from underneath, stretch it out until you feel resistance, and fold it over the top. Turn the bowl/bucket a quarter of the way around and repeat the fold and then turn the bowl again and repeat (for a total of 3 folds).
- Repeat these 3 folds every half hour for about 3 hours.
- You will know the dough is finish this bulk proofing stage if it (this is a bit trickier with a dough that is this wet) has risen about 30% in volume.
- Remove the dough from the bucket, divide it into 2 equal pieces and shape the pieces into 2 rounds.
- Place the rounds seam side down in bread proofing baskets (I line mine with floured basket liners) and refrigerate overnight covered in plastic (if you want to score the loaves just before baking, make sure to place the loaves seam side up in the baskets and make sure you score them just before baking).
Bake Day
- When ready to bake, gently invert the dough onto parchment paper. Let the dough fall naturally out of the basket - do not tap or force it. Gravity will help here.
- Note: If the seams were placed down in the basket, now facing up, there is no need to score the bread
- You can bake these straight from the refrigerator; no need to warm the dough up (it improves oven spring)
- Preheat your oven to 500 degrees for about 30 minutes with the dutch oven (9.5 inch round or 11 inch oval) or a Lodge combo cooker set on top of your baking stone in the middle/lower rack (not the very bottom; this can cause the bottom of bread to burn). Other people use covered roasters. Note: I now use a covered roaster made by Graniteware since it's so much lighter.
- After the oven has preheated, carefully transfer the dough (use parchment paper if it helps) into the dutch oven or on the bottom of the combo cooker (be careful here!) and cover tightly with the lid using oven mitts (welding gloves or BBQ mitts).
- After loading the bread, immediately reduce the oven temperature to 475 degrees.
- Let the bread bake this way for about 20 minutes; then uncover, reduce the oven temperature to 450 and continue to bake for another 20 to 25 minutes or until the bread has developed a nice brown color.
- To bake a second loaf, reheat the oven at 500 degrees for another 10 minutes, and then repeat steps 5 to 7. Note: if using the Graniteware covered roasters, you may be able to easily bake two loaves at once.
Nutrition
Calories: 105kcal | Carbohydrates: 21g | Protein: 4g | Fat: 0.5g | Saturated Fat: 0.1g | Polyunsaturated Fat: 0.2g | Monounsaturated Fat: 0.04g | Sodium: 217mg | Potassium: 28mg | Fiber: 1g | Sugar: 0.1g | Vitamin A: 1IU | Calcium: 6mg | Iron: 0.3mg